Kitchen Backsplash: A Homeowner's Guide

Like it or not, your kitchen has to have a backsplash. You might counter this statement by saying that you're planning on leaving the wall behind your sink and stove uncovered by any material other than the wallboard, but that just means you're planning to settle for a painted drywall kitchen backsplash. It isn't a bad choice, and it's a low-cost one, but you could choose plenty of other materials that would provide more protection and look more interesting without draining your pocketbook.
The area behind the sink and stove attracts the most attention of any part of the kitchen walls, giving it the same design function as the accent wall in a living room. This area can also be the most difficult to keep clean because it's usually where the cooking oils from your stove and the gunk from dirty dishes end up. Installing a well-chosen backsplash material, which can often be a DIY project, doesn't just benefit the wall behind the stove and the sink. It brings out the best in the rest of your kitchen, including the floors, countertops, walls and appliances.
What Is a Kitchen Backsplash?
What Is a Kitchen Backsplash?
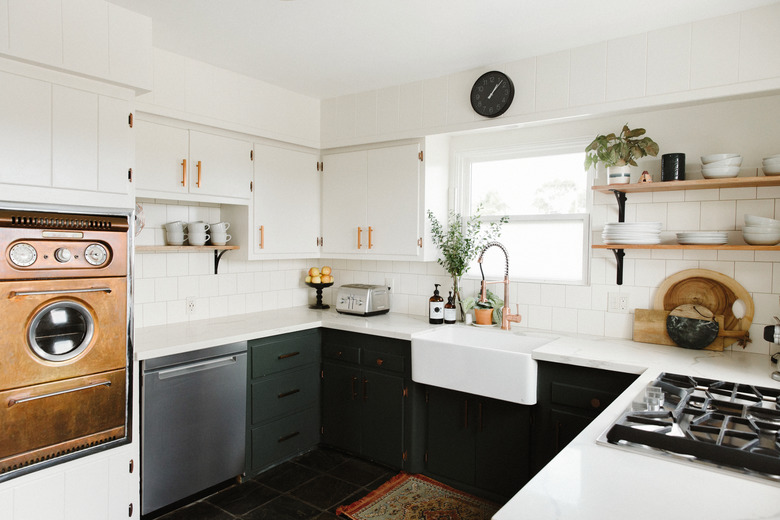
You might think of a kitchen backsplash as the riser on the back of the kitchen counter, which typically extends about 4 inches above the countertop surface. This is definitely a type of backsplash, but when designers use the word, they are usually referring to the wall area that extends from the countertop surface to the undersides of the upper cabinets or, in the absence of hanging cabinets, to the ceiling. It may be punctuated by a window, a range hood or a sink faucet. A kitchen island usually doesn't have a backsplash, but there's no reason one couldn't be incorporated into its design.
 Stephen Paul
As the name suggests, the main purpose of a kitchen backsplash is to protect the wall behind it from splashing liquids, including water from the sink, oils and greases from the stove and fruit juice from your blender. It needs to be waterproof and easy to clean, which disqualifies matte finishes and fuzzy materials like papier-mâché and rough-sawn wood. If it's behind the stove, the backsplash must also be heat-resistant, and if you choose a wood one, the fire code requires a clearance of at least 18 inches from the nearest gas-stove burner.
The most common kitchen backsplash materials, according to Talking Kitchens, are various types of wall tile, including ceramic tile, glass tile and natural stone. Among the many other options are:
- Wood and composite wood
- Laminate
- Stainless steel and other metals
- Cork
- Glass
On the less common but more stylish side, you can also choose:
- Faux brick
- Solid stone, such as travertine, quartz, granite and marble
- Stamped tin tiles
- Mirrors
- Polished plaster
- Concrete
- Vinyl wallpaper
Tile Backsplash Options
Tile Backsplash Options
Homeowners are most likely to opt for a tile backsplash for two main reasons:
- Versatility: No other option offers the broad color variations of tile, which can range from monochrome to wildly creative encaustic tiles or mosaic-tile arrangements. If you feel adventurous but you're short on inspiration, you can find some great mosaic-tile ideas on the website Made by Anado. You can also choose glass or subway tile to create a more conventional but still stylish focal point for your kitchen.
- DIY friendly: Tiling a backsplash is a less-demanding job than tiling a larger area, such as a floor or an entire wall, and it's a home improvement project that virtually anyone can undertake. You don't need carpentry or cabinetry skills, and if you lack confidence, home improvement outlets have your back by offering tiles preset on self-adhesive backing that you can simply press onto a properly prepared wall.
Backsplash tile can be small or large, square, hexagon-shaped, irregular or any combination thereof. You can install it in an afternoon, or you can take your time over several days to create your own artistic statement. Few other options offer this range of possibilities.
What About Wood?
What About Wood?
A wooden kitchen backsplash provides a warm backdrop that works well in a light kitchen populated by stainless-steel appliances and monochromatic tile or vinyl floors. You can choose shiplap or tongue-and-groove planks, bead board or even pegboard if you happen to need more places to hang your pots and pans. To function well as a kitchen backsplash, the wood needs a water-resistant finish, which can be paint or a clear coating that reveals the wood grain.
Some Kitchen Backsplash Materials Call for Professional Help
Some Kitchen Backsplash Materials Call for Professional Help
If your design plans call for a solid kitchen backsplash made from a natural stone such as granite, marble, travertine or quartz, you'll need to make accurate measurements and have the material cut at the factory. This is also true for stainless steel, copper and other types of metal. It's also an excellent idea to have these materials professionally installed rather than trying to do the job yourself. Materials such as laminate, tile, faux brick and wood are more DIY-friendly, but if you're not up to the task, you can hire a pro for any of these materials too.
Preparing the Wall for a Kitchen Backsplash
Preparing the Wall for a Kitchen Backsplash
Because the kitchen backsplash is such a visible feature, you don't want to ruin its appearance with nails or screws, so you'll be affixing whatever material you choose with adhesive. For the adhesive to stick, the wall must be flat and free of grease and oil and must have a nonglossy finish. You shouldn't have to replace the existing wallboard, but you have to put some energy into making it ready.
Start by washing down the surface with a solution of 1/2 cup or so of trisodium phosphate (TSP) per gallon of water. TSP is a strong detergent that removes stubborn grease and dulls glossy paint. It's caustic, so wear rubber gloves and goggles while using it. Follow this with light sanding with 150-grit sandpaper to further etch the surface, especially if the wall has a thick coating of glossy enamel.
Once the wall is dull and clean, you should be able to identify any contours or depressions, and you can flatten these by skim-coating with drywall joint compound. If you're planning to install a tile backsplash, it's a good idea to install cementboard, but this isn't essential because you can glue tiles directly to drywall as long as the area is perfectly flat and isn't subject to high moisture.
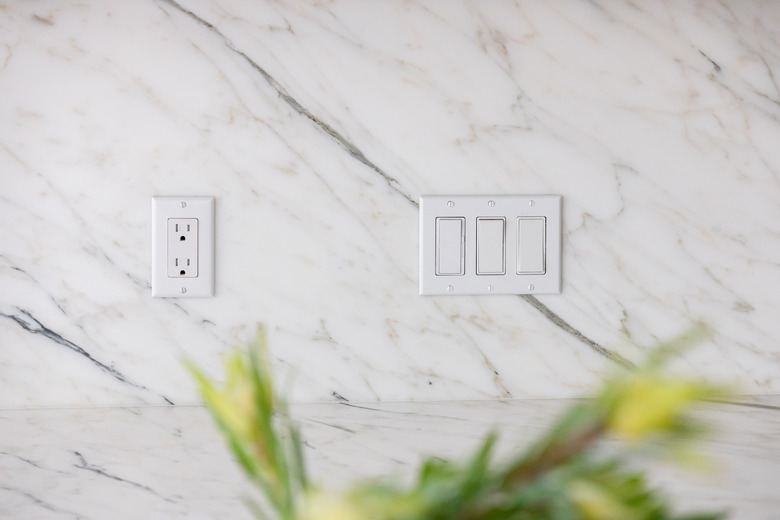
Kitchen Backsplashes and Electrical Outlets
Kitchen Backsplashes and Electrical Outlets
If you install any kitchen backsplash material other than wallpaper, you'll be increasing the thickness of the wall, so you'll have to extend the outlets. You do this with inexpensive plastic outlet extenders, which are available at any hardware store. They are rectangular frames that fit inside the existing outlet boxes to bring their front edges flush with the backsplash surface.
 Stephen Paul for Hunker
Before you install the kitchen backsplash, turn off the power to the outlets that need to be extended, remove the cover plates, unscrew the outlets and pull them out of the boxes. Cut the backsplash material to fit around the boxes and after installation is complete, fit each outlet through an extender, which sits flush against the backsplash's exposed surface, and then screw the outlet to the original box using longer screws if necessary. There's no need to disconnect the wires.
Kitchen Backsplash Installation Tips
Kitchen Backsplash Installation Tips
If you're planning professional installation of a solid backsplash, such as stone, laminate, metal or molded plastic with a faux-brick or other design, the pro who does the job will make the required measurements. If you're doing the work yourself, it's a great idea to make a template using pieces of kraft paper taped together and cut the template to fit the backsplash area precisely. Then, use the template to mark the cuts on the backsplash material.
There are a few more tips to keep in mind if your plans include wood, tile or some other material that doesn't require professional installation:
- Maintain a 1/8-inch expansion gap around the perimeter of the backsplash to prevent buckling, cracking and lifting of the backsplash material. After the installation is complete, caulk this gap with silicone caulk.
- Use adhesive appropriate for the material you're installing. You typically attach tiles with thinset mortar, but you can also use water-soluble mastic, which tends to hold tiles more securely while it's wet. Use construction adhesive for wood and other materials.
- Avoid visible fasteners and use adhesive whenever possible. If you're installing shiplap or tongue-and-groove planks, it's OK to use fasteners such as ring-shank nails or — preferably — trim screws driven through parts of the planks that are hidden by overlapping portions of adjacent planks. Drive fasteners into the wall studs and be careful not to hit the wiring for the backsplash outlets.
- Don't forget about trimming the edges. If you install a tile backsplash, you can trim it with wood molding or special tiles with beveled or rounded edges. You'll also need an edge around any other material you use, with the possible exception of solid stone.
- Seal unglazed tiles and tile grout. The sealer keeps the tiles and grout dry and prevents mold from growing. It also makes the backsplash easier to keep clean.
- Finish wood with wood sealer, primer or varnish before you put it up and then add a finish coat when the installation is complete. Don't use unsealed wood. It might give the kitchen an old-world look, but it will be impossible to keep it clean.
Caring for Your Kitchen Backsplash
Caring for Your Kitchen Backsplash
Because a backsplash is a vertical surface, you don't have to worry about standing water or spills, but the part that is near the sink is still likely to get wet, and it can get water-stained. Prevent this by wiping off water splashes as soon as they occur. When it comes to grease splatter from the stove, the safest way to handle it is to wipe it off with a solution of dish soap and warm water.
If you need a disinfectant, choose a vinegar and water solution or hydrogen peroxide over chlorine bleach, especially if the backsplash is made from stainless steel. Chlorine corrodes stainless steel, creating small pits that dull the surface and can't be repaired. Vinegar is also a good remedy for water spots that can mar any backsplash material.
The sections of a tile backsplash closest to the sink, stove and countertop are exposed to more contaminants than other areas, and they are the first to get discolored, especially the grout. Keep the grout clean by scrubbing it with a toothbrush and a mild abrasive, such as baking soda or white toothpaste. It's a good idea to reseal the grout every few years to keep out moisture and prevent mold from growing.