3 DIY Garden Waterfalls That Will Liven Up Your Landscape

We may receive a commission on purchases made from links.
A DIY garden waterfall can be the decorative touch that takes an otherwise-perfect landscape to a higher level. The advantages of a decorative waterfall aren't always apparent until you have one in your own backyard, but the addition of the sparkling motion and tinkling sound created by running, splashing water can add enormously to the pleasure of a garden. A backyard waterfall added to an existing pond can also aerate the water, helping to keep fish and water plants healthy.
Garden waterfalls come in many levels, from simple, self-contained patio units molded to look like stone or wood to enormous landscape projects that require considerable earthmoving and hard labor. These larger projects strain the limits of what a DIYer can accomplish, but there are still plenty of homeowners who manage to build impressive garden waterfalls themselves. For such large projects, plan to spend several weekends of pretty intense effort and a couple thousand dollars (at least) on materials.
Garden Waterfall Basics
Garden Waterfall Basics
There are some lucky homeowners who actually have natural creeks or streams running through their properties, and for them, all that's required to create a waterfall is some repositioning of earth and rock. Few people are that lucky. In most cases, a garden waterfall is a recirculating water feature that includes the same basic elements, most of them hidden from sight:
- A catch basin that serves as the reservoir for the water that circulates through the system.
- A spillway that serves as the high point of the water feature — the point that delivers water from a higher elevation where it falls down to the catch basin.
- Plumbing pipes to move the water from the catch basin back up to the spillway.
- A circulating pump operated by electricity that forces water from the catch basin back up to the spillway.
- A landscape elevation change. Because waterfalls work through gravity, there needs to be a natural or constructed change in elevation from the spillway to the catch basin.
- Electrical service. Unless you're lucky enough to have a natural stream on your property, all garden waterfalls require access to a GFCI-protected outlet or circuit to operate the circulating pump and in some cases, landscape lighting.
- Landscaping to hide the mechanicals and to make the water feature look natural. The goal of the waterfall feature is to make it look somewhat natural in the landscape, and a considerable amount of thought and labor can go into this effort.
Keeping these components in mind, it's possible to make almost any type of garden waterfall you can imagine.
DIY Container Waterfalls
DIY Container Waterfalls
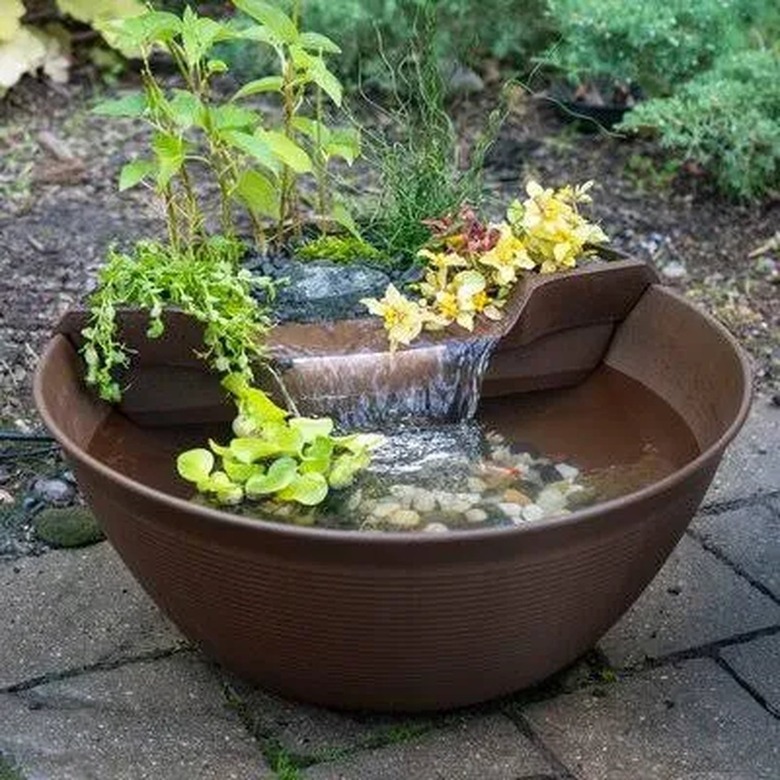
The term "container waterfall" refers to any waterfall feature in which the catch basin, pump, piping and elevated spillway are all confined within the same large container. A common example is a rustic style of water feature that makes use of a galvanized metal livestock trough as a pond, fitted with an elevated spillway unit and pump with piping that allows water to splash down into the tank from above. In one variation, a large galvanized tank is used as the pond/catch basin, and a smaller galvanized tank mounted above is fitted with a spillway to provide the falling water.
Just about any container or trough can be used to create a container waterfall. For example, you could use a stone or concrete trough inset in a patio or deck with an elevated spillway mounted above, or a prefabricated, rigid pond shell could be used as the container with the pump and elevated spillway mounted inside the pond, possibly hidden inside a pier of rocks.
The advantage of a container waterfall versus a more complicated landscape waterfall is that it works well in a small, urban landscape or courtyard garden where it is impossible to do major landscaping.
DIY Pondless Waterfalls
DIY Pondless Waterfalls
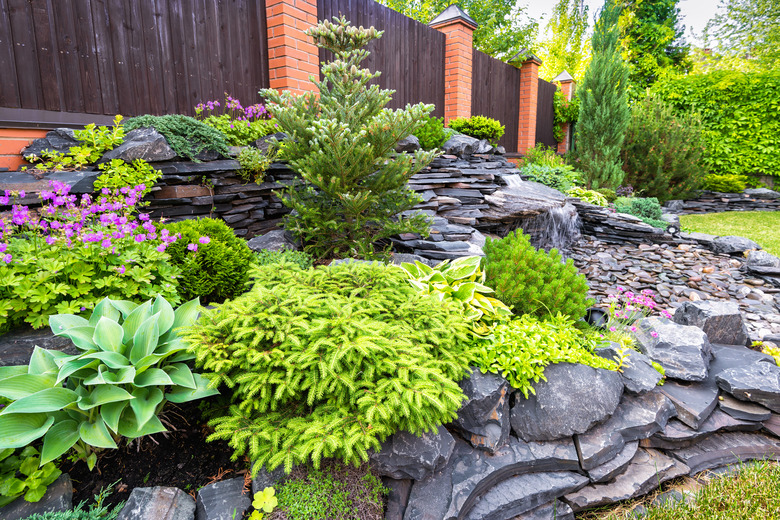
An increasingly popular type of garden waterfall uses manufactured and natural components to make a very realistic water feature. Described as "pondless" since there are no visible pools or ponds, these waterfalls feature an upper spillway box that allows water to cascade over rocks to a layer of porous gravel that covers a hidden catch basin and recirculating pump. From this catch basin, the water is recirculated through hidden piping back to the top of the waterfall.
There are distinct advantages to this pondless design, as it does not have the safety issues that come with an open pond that poses a threat to children and wildlife. This can be quite an elaborate waterfall to plan and build, but there are many convenient kits available that include the components you need. Understanding how a pondless waterfall is built makes it possible for you to build almost any custom garden waterfall feature.
How to Build a Pondless Waterfall
1. Plan the Layout
It's important to make sure your pond is positioned so it will be visible from the key vantage points in your yard. If you'll be enjoying it from a deck or patio, for example, plan the waterfall so it is visible from all seating areas. This project will require a lot of work, so you want to make sure the results are excellent.
2. Excavate for the Catch Basin
All pondless waterfall kits include some form of catch basin hidden beneath a layer of porous rock or gravel at the base of the waterfall. Use the catch basin box as a template to mark the yard with spray paint and then dig a flat-bottomed hole to the depth specified by the manufacturer. Call a locate service before digging so they can mark the ground with flags or spray paint above any buried cables or pipes. It's important that the sides of the excavation are perfectly vertical and that the bottom is perfectly flat.
Some waterfall kits require a portion of the overall excavation to be extra deep to house the pump reservoir.
3. Build a Berm
The soil you excavate for the catch basin can be used to create an elevated berm required for water to descend from the spillway to the catch basin. The vertical elevation doesn't need to be extreme — 2 or 3 feet of drop is often sufficient unless you are planning a waterfall with several tiers. For longer, multilevel waterfalls, create some natural meandering contours to the berm, which creates a more realistic look. Try to avoid a cone-shaped "volcano" of soil, as this will not look natural.
4. Shape the Watercourse
From the top of the berm down to the catch basin, mold a slightly hollow channel. This is more important for longer waterfalls that will descend in several tiers, but it is important that there be a slight trough shape to the berm to help contain the water. Even where the waterfall will simply spill directly downward over flat rocks, the sides of the waterfall need to be slightly raised to help contain the water.
5. Cover the Excavation With Liner
Most pondless waterfalls require the entire watercourse — from catch basin to spillway — to be lined with a sheet of EPDM rubber. The pond liner creates a hidden trough beneath the stones and landscaping to contain the recirculating water. For now, just loosely lay this large sheet of rubber over the area and press it down so it conforms to the excavation, from catch basin all the way to the spillway. If the watercourse is too long for a single sheet of liner, make sure that the upper sheet overlaps the lower sheet.
6. Install the Catch Basin
Over the pond liner, the kit's reservoir or catch basin is now installed. Installation will vary depending on the type of kit. It may involve a series of porous boxes that are assembled and laid in the excavation, or it may be a single hard-shell box with a porous top.
After installing the catch basin, backfill with soil around the pond liner to snug it up to the walls of the basin. Over the top of the catch basin box, lay some rocks and river gravel, covering the catch basin from view. However, make sure to leave access for installing and servicing the pump.
7. Install the Pump
Following the manufacturer's instructions, install the circulating pump into the catch basin. Make whatever plumbing connections are necessary to link the pump to the piping that will lead to the spillway at the top of the waterfall. Run the electrical power cord from the pump to the outlet location.
8. Install the Water Piping
Next, dig a trench from the pump outlet along the side of the berm and up the slope to where the spillway will be located. Lay the water piping in the trench and make the connection to the water pump. This usually requires a solvent-glue fitting reinforced with some form of compression fitting.
9. Frame the Watercourse
Lay stones to roughly frame the path that water will follow from the top of the slope down to the catch basin. There is some craft involved in positioning stones to create a realistic-looking waterfall, but it is generally best to use larger, irregular stones to frame the sides of the channel, with flat stones laid horizontally where the water will cascade downward.
Moving stones can be hard work, especially if you are using the large stones required to make a waterfall look most realistic. A helper and a two-wheel dolly can be useful for this stage.
10. Install the Spillway
The spillway component of the waterfall is a prefabricated box with a wide lip that serves as an exit point for water flowing downward. It is installed at the top of the waterfall over the rubber liner. It is generally hidden by rocks to create the appearance of water flowing directly out of a hillside.
Begin by creating a solid, flat area for the spillway box to sit at the top of the waterfall. Position the spillway so it is level from side to side and angled slightly downhill from front to back.
Connect the water piping to the spillway box using solvent glue and compression fittings as directed by the manufacturer.
11. Seal Rocks With Foam
Along all the joints where the large rocks meet the rubber liner, apply foam sealant. This expandable foam will close off gaps between the liner and the framing stones, keeping water confined within the course of the waterfall.
12. Complete the Landscaping
On the berm and around the catch basin, complete any backfilling required and shape the landscape to create a realistic look. This will involve filling in the water piping trench, burying the electrical cord running to the pump and adding more rocks to the berm and around the catch basin and spillway. It can also involve planting shrubs or other plants over the berm and around the catch basin.
You may need to haul in some extra soil to further build up the berm and to backfill around the edges of the liner. Excess liner can be trimmed away now but make sure it retains a trough shape to keep the water confined in the water course.
With the landscaping complete, fill the bottom of the waterfall's course with smooth gravel. The goal is to hide the rubber liner and the catch basin to make the water feature look completely natural.
13. Test the Waterfall
Now, test the waterfall by filling the catch basin with water from a hose. When the catch basin is full, turn on the pump and watch the water as it flows down from the spillway. Run the waterfall for several hours and then inspect to make sure there are no areas where water is escaping.
If all components are properly contained within the rubber liner, you will rarely need to add water to the system. Ordinary rainfall may be sufficient to replenish water in the system.
Landscape Pond With Waterfall
Landscape Pond With Waterfall
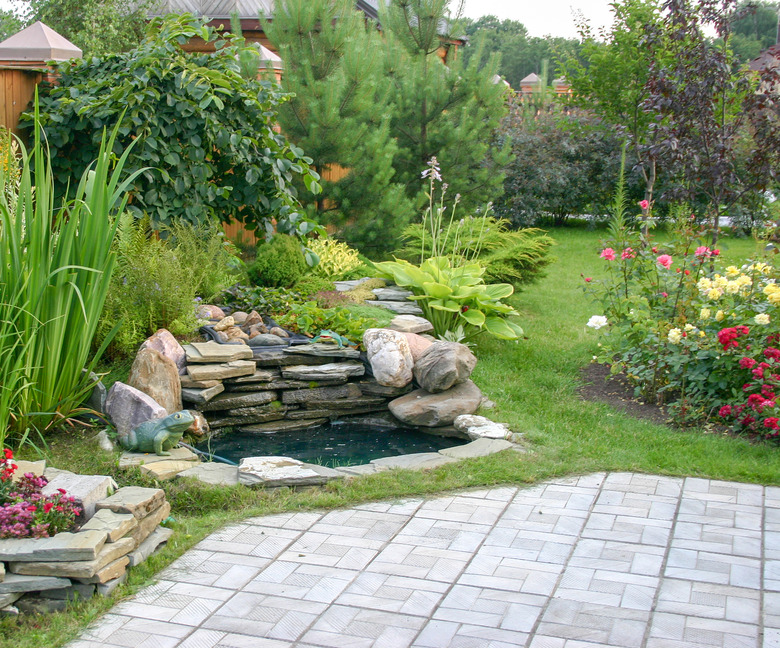
At the high end of garden waterfall design is the type that includes a traditional garden pond fed by a splashing waterfall. This type of water garden is constructed in much the same way as the pondless waterfall, but rather than a hidden catch basin, this system usually features an open pool of water or a small pond as the lower catch basin.
This type of waterfall uses many of the same components, including a recirculating pump and a sheet of EPDM rubber to line the course of the waterfall. The process begins with the installation of a landscape pond using either a rigid hard-shell liner or a flexible EPDM liner. Once the pond is installed, construction of an elevated berm, a stone-lined watercourse and a spillway is largely the same as it is for a pondless waterfall.