How To Build Your Own Dry Creek Bed
Many people build a dry creek bed on their property to control water runoff and erosion, but just as many add one because they are eye-catching landscape features that are relatively inexpensive to build. While the manual labor involved can be taxing, dry creek beds — sometimes called dry stream beds — are fairly straightforward DIY projects. The end result is a feature that is totally unique because no two will ever look alike.
The Basic Dry Creek Bed
The Basic Dry Creek Bed
A dry creek bed consists of a shallow ditch that is filled with rocks. The original dry creek beds directed water runoff from hillsides or areas where water puddled to where the water could dissipate without causing damage, such as a pond, a dry well or a rain garden.
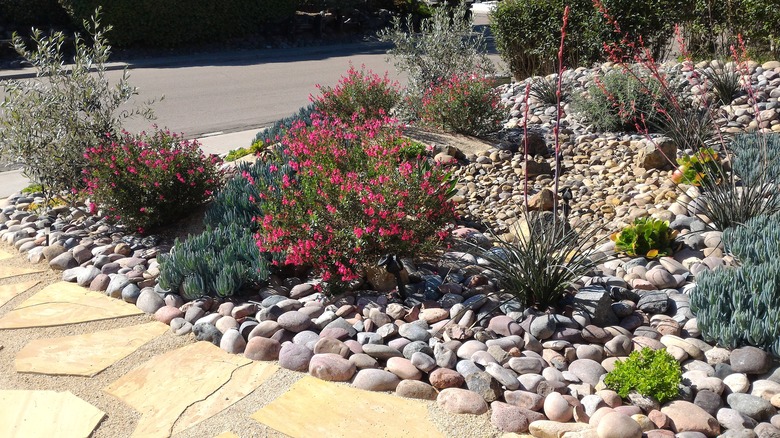
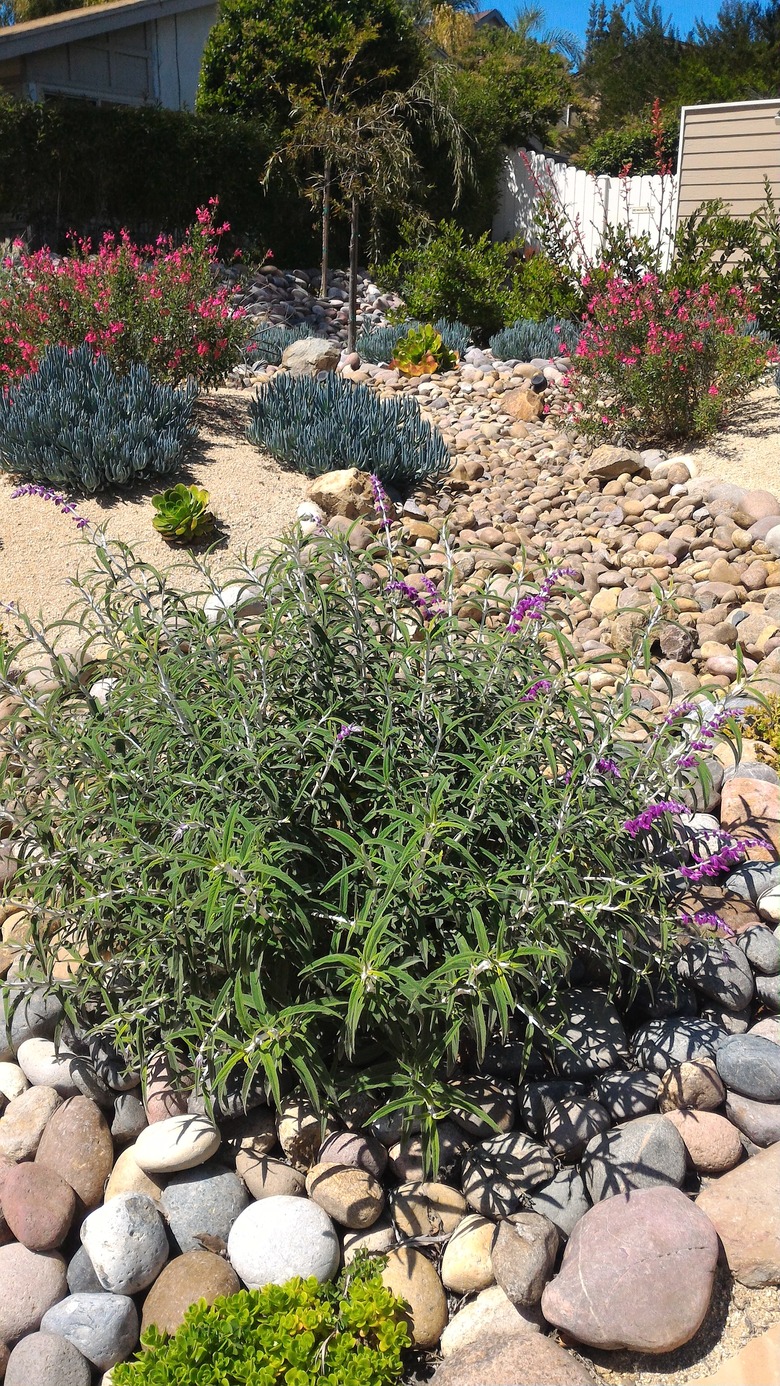
When used as a landscape feature, a dry creek bed is more than a drainage ditch. The shape of the stream bed and the stones selected give it its distinctive appearance. Because you will be dealing with rocks, this is one home improvement project for which you may be able to use some of the materials found in your yard.
You may be able to find some of the materials needed but not all. That's because the eye-catching feature of a dry creek bed is the use of rounded river rocks. These are stones that have been worn down and rounded by running water. Most people don't have them laying around their yard, but common rocks and boulders you may find in your yard are also used to supplement the more decorative stones.
Dry Creek Bed Rocks
Dry Creek Bed Rocks
Some of the terminology around rocks may depend on your supplier. In general, "rock" is a term that includes stones, boulders, cobble and pebbles or gravel.
Boulders are rocks that are more than 10 inches in diameter. They can range from being a little larger than a basketball (although few boulders are perfectly round) to rocks that are larger than a person. Stones that are about 2 inches to 10 inches are called cobble or cobblestones. Smaller rocks are called pebbles.
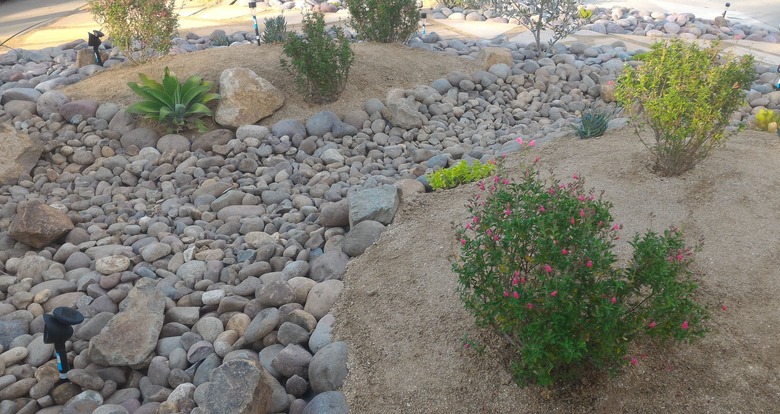
A dry creek bed will require rocks of different sizes. The bottom and middle of the ditch usually contains rocks in the 1- to 2-inch range. Then, river rock from about 5 to 8 inches fills in the top and sides. River rock comes in a number of muted colors but also in bright white and jet black. Boulders are not absolutely necessary, but they can be used for the sides of the bed or as accent pieces.
Much of the stone you will use is available from garden centers, home centers and stone yards. In most cases, you will be ordering rock in bulk. Figuring out how much to order is one of the most difficult parts of the job. Mulch & Stone provides a calculator that can help. The bed will require stones of different sizes, so it is best to discuss your plans with your supplier.
You will also need to plan how you will take delivery. The ideal situation is for the delivery truck to get as close to the creek site as possible. That's not always practical, especially if the dry creek bed is in the backyard. In most cases, you will be hauling material in a wheelbarrow.
 remedypic/iStock/GettyImages
Designing a Dry Creek Bed
Designing a Dry Creek Bed
The most efficient design for a drainage ditch is a straight line, but the best dry creek beds resemble natural streams. They should contain gentle curves so that the creek meanders through the yard.
Creek beds used to control runoff must start where the problem originates and end where the water can dissipate. You may want to make the stream wider at the beginning of the stream so that it captures as much runoff as possible.
When used solely as a landscape feature, the bed can be placed anywhere. Just remember that the creek bed can serve as a boundary and can divide the yard. If that is a problem, consider placing it near the edge of the property. In any case, the banks of the creek bed are great staging areas for a variety of plants.
One way to lay out a garden walkway is to outline the walk using garden hoses. You can do the same for this, although many people simply draw the bed freehand using marking spray paint. The width of the stream can vary, and it is fine to include wider pools along the stream path.
Because it is a stream, you may want to include a bridge in the design. Stone yards often sell large, flat rocks that can span the average dry creek bed. You will need to build up the sides of the creek bed where the bridge is located so that there is a space between the bottom of the bridge and the river rock.
No matter what the design shape or where you place it in the yard, the most crucial step in designing a dry creek bed is to call 811 before starting work. This is the national number that will put you in touch with local utilities. The utility companies will come to your home to mark the location of buried electrical, gas and water lines. It is also a good idea to mark the location of buried sprinkler lines.
Things Needed
-
Boulders (if applicable)
-
Small landscape stones (1 to 2 inches)
-
River rock (3 to 8 inches)
How to Build a Dry Creek Bed
1. Lay Out the Stream
Trace the flow of the dry creek bed using marking paint. Be sure to include gentle curves. Sharp turns will look unnatural. If the bed is used for drainage, the angles will hinder the water flow.
2. Excavate the Creek Bed
Make the creek bed half as deep as it is wide. So, a 24-inch-wide stream should be about 12 inches at its deepest point.
There is no reason to dig straight down so that the entire trench is at full depth. It helps for stone placement and water flow if the sides slope slightly toward the middle of the bed (the deepest area). Place the soil along the edges of the bed. It may help in the placement of the edge boulders.
3. Install Landscape Fabric
Lay out landscape fabric so it runs from side to side along the creek bed. It will act as a weed barrier while also letting water sink into the soil. Use landscape fabric pins to hold it in place. Overlap the fabric strips by at least 6 inches, starting at the end (lowest point) and working toward the start (highest point) so the strips will shed water like roof shingles.
 remedypic/iStock/GettyImages
4. Set the Boulders
Boulders can form the sides of the bed. You can install a wall of boulders or place them here and there for interest. Consider placing them at curves. Another option is to place a few large boulders in the middle of the stream bed.
For stability, partially bury the boulders, which means you will need to cut the landscape fabric with a utility knife. Set each boulder in place and tuck the cut ends of the fabric around it. Pack soil around the boulder as necessary.
5. Fill the Bottom of the Stream
Lay the small cobble in the middle of the bed but don't install it up the sides of the bed. Use a rake to install a 4- to 6-inch layer in the middle of the bed.
6. Install the River Rock
Place the river rock along the sides of the bed first and then fill in the rest of the stream. Many people like to place each stone, especially along the sides. It's a matter of choice and depends on the look you are trying to achieve.
7. Trim the Landscape Fabric
Cut and conceal any edges of the landscape fabric that are visible.