Setting Floor Tile: What You Need To Know

If you like the idea of laying your own floor tile, you're not alone. It's a popular DIY project because it's easy to understand the procedure, and you don't have to invest in a shop full of tools to do it. In fact, the only specialty tool you need to tile a floor besides a trowel or two and a bucket for mixing thinset mortar is a tile cutter or, if you have a project that requires a lot of angled cuts, a wet saw.
The procedure for laying a tile floor may be easy to understand, but it isn't always as easy to execute, so it's a good idea to do a small project such as a backsplash to get the hang of spreading thinset mortar and laying tiles with tile spacers so you'll be ready for the floor project. Your style may be to go into the big project cold, however, and that's OK, but you should know a few things before you begin. Floor tile is a forgiving material when the thinset is wet, but after it dries, any mistakes you make will be permanent, and if you can't work around them, you'll have to start over at the beginning.
You Need a Solid Subfloor for a Tile Floor
You Need a Solid Subfloor for a Tile Floor
Porcelain and ceramic tile are brittle materials, and so is the grout you use to fill the spaces between them, and they will crack if the subfloor has any flex. According to the Tile Council of North America, the traditional rigidity standard for tiling is L/360, where L is the length of the floor joists in inches. If the joists are 16 feet long, for example, the center of the floor can't deflect more than 1/2 inch from the edges.
Laying tile directly on plywood is almost always a bad idea, so you'll want to lay some kind of underlayment. Cement backer board finished with fiberglass cementboard tape and thinset mortar is the most common underlayment for wood floors, and for concrete floors, which don't need the extra layer of reinforcement, tilers often install a decoupling membrane. If you prefer, you can lay floor tile directly on concrete provided it's in good condition and isn't covered with a material that doesn't stick to thinset, such as epoxy paint.
What's the Best Layout Strategy?
What's the Best Layout Strategy?
In a square or rectangular room, most tilers locate the center of the room and begin tiling from there. This guarantees that the grout lines are straight with respect to the walls. In an irregularly shaped room or one with an alcove or fixed cabinets, another starting point may be more suitable.
When determining the best starting point for floor tile in an irregular space, it usually helps to make a scale drawing of the room on graph paper, letting each square on the paper denote one of the tiles. Using this method, you can pinpoint the best place to start on paper, find the distances of this point from the edges of the floor and convert these distances to the floor scale. Then, use a tape measure and a carpenter's square to find that point on the floor, and you're ready to put on your knee pads and start tiling.
 privetik/iStock/GettyImages
How to Set Floor Tile
How to Set Floor Tile
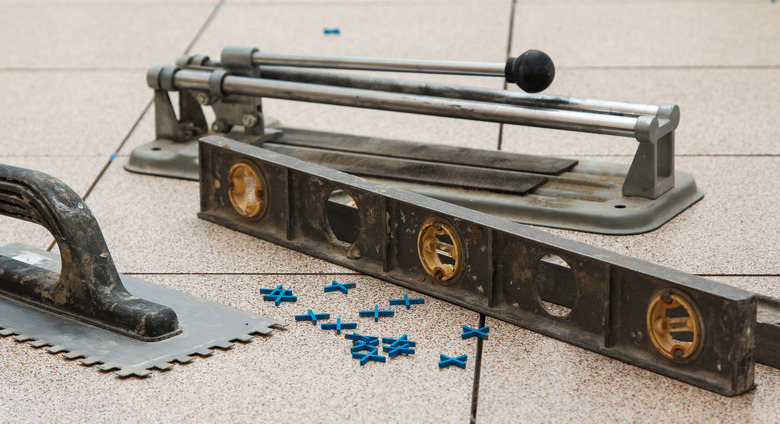
Things Needed
-
Thinset mortar
-
Tile spacers
-
Grout haze remover (optional)
-
Grout sealer
-
Tile and grout sealer (optional)
-
Tape measure
-
Chalk line
-
Carpenter's square
-
Bucket
-
Margin trowel
or drill and mortar paddle -
Notched trowel
-
Rubber mallet
-
Tile cutter or wet saw
-
Tile nippers
-
Rubber grout float
-
Sponges, rags or cheesecloth
1. Find the Starting Point
If you don't plan the layout using graph paper, you'll generally be looking for the center of the floor. To locate it, start by finding the midpoints of two opposing walls using a tape measure. Snap a chalk line between these points and then find the midpoints of the other two walls and snap a line between them. The intersection of these lines is the starting point.
Before you move on, use a carpenter's square to make sure the chalk lines are perpendicular — if the angle between them is anything other than 90 degrees, the grout lines won't be straight. If you end up having to adjust one of the lines, it's usually because the walls aren't straight and not because you made a measuring mistake.
You may have to make one more adjustment. Measure the length and width of the room, convert to inches and divide by the tile dimension. If the remainder is less than an inch, move the starting point by the remainder amount toward one of the walls. This prevents the problem of having to cut and install a thin strip, which is difficult to do and doesn't look great on the finished floor.
 Bilanol/iStock/GettyImages
2. Mix a Batch of Thinset Mortar
Pour clean water into a bucket and add powdered mortar incrementally, mixing as you go with a margin trowel or a drill and a mortar paddle until the consistency is like that of peanut butter and the mortar stays on your trowel unless you shake it off. After mixing, allow the thinset to sit undisturbed for about 10 minutes before using it. This slaking time is necessary for the mortar to develop adhesive properties.
3. Set the First Four Tiles
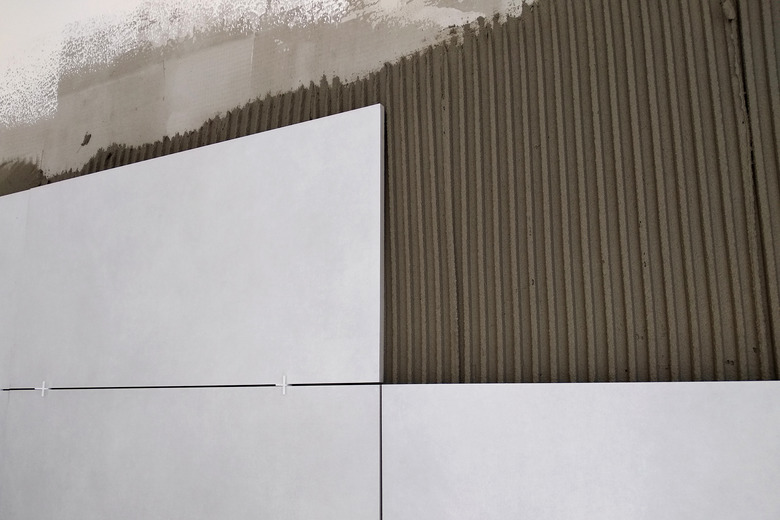
Place four tiles so that each has one corner touching the starting point and then set tile spacers between them. The most commonly used spacers are plastic crosses, and they should go vertically with one end sticking up so you can remove them easily. Check the grout lines to make sure they line up with the chalk lines and make adjustments if they don't.
Lift one of the tiles and spread thinset mortar on the subfloor using a 1/4-inch square-notched trowel. Set the tile in the mortar, place the spacers and then wiggle the tile a bit and tap it with a rubber mallet to seat it. Set the other three starter tiles the same way.
4. Lay All the Full Tiles
Lay the rest of the tiles radiating out from the first four. Work in sections small enough to allow you to set the tiles in fresh mortar. You don't want to cover a very large area with mortar only to find that the mortar has hardened before you get to it. Lay all the full tiles first, leaving gaps at walls and cabinets for last so you can do all the cutting at once.
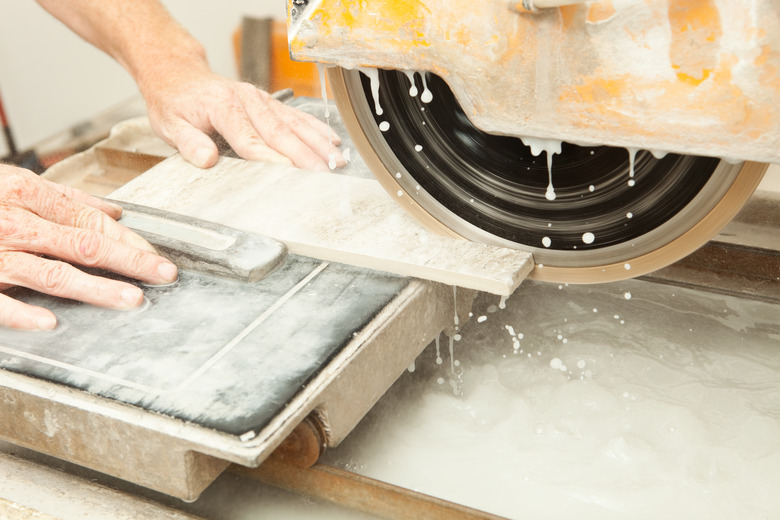
5. Cut Tiles to Fit at the Floor Edges
You can cut porcelain and ceramic tiles with an inexpensive tool called a tile cutter, which has a scoring tool that slides along a smooth metal rod. Place the tile on the platform, align the cut line with the rod, draw the scoring tool once or twice over the tile, move the tile to the edge of the platform and break it along the score line.
 BanksPhotos/iStock/GettyImages
A wet saw with a carbide or diamond blade that passes through a trough of water as it spins is also a good tool for cutting tiles. Wearing gloves, goggles and old clothing to protect yourself from the spray, push the tile slowly through the blade to cut it. You can use the tile saw to cut notches, and you can use it in conjunction with tile nippers to cut curves, which are like overgrown toenail clippers, or you can just use the nippers.
6. Mix and Apply Grout
Give the thinset at least 24 hours to set before grouting. Like thinset, grout is a cementitious material, and you mix it more or less the same way. The consistency should be about the same, and you also have to let it slake. You apply it with a rubber grout float.
Use the grout float to deposit a pile of grout on the floor and then spread it across the floor with a sweeping motion, making sure it fills all the grout lines to the tops of the tiles with no voids. Pick up excess grout with the float and put it back in the bucket. You have to stay off the floor while grout dries, so plan the grouting to end at an exit door.
7. Clean the Grout Haze and Tool the Grout
Let the grout set for a few hours until a haze develops and then clean off the haze with a damp sponge, a rag or a piece of cheesecloth. As you do this, tool the grout, which means to draw the sponge lightly along the grout lines to make them clean and slightly concave. If you have trouble removing the haze, you may have to resort to a commercial grout haze remover.
8. Seal the Grout and the Tile
The last step in any tile installation is to seal the grout, and it's an important step because unsealed grout quickly becomes discolored. If you installed unglazed ceramic tiles, it's also a good idea to seal them. Grout sealer and tile-and-grout sealer aren't very different products, the main difference usually being the applicator that comes with them. Wait for the grout to cure, which takes at least 48 hours, and apply the product according to the directions on the container.