How To Grout Tile
We may receive a commission on purchases made from links.
You've finished your DIY tiling job, perhaps by following instructions you found online. All the lines between the tiles are straight, and everything looks great, but you're not finished yet. You also have to know how to grout tile, or your hard work will be for naught. Grout is what fills the lines between the tiles (they're called grout lines or grout joints) and turns the tile installation into a single solid surface. You need to grout whether you're installing wall tile or floor tiles and whether the type of tile is ceramic, porcelain, glass, or stone. In all cases, the grouting procedure is essentially the same.
Grouting is the finishing touch to any tile job, a bit like putting the icing on a cake. It's a relatively DIY-friendly procedure, but as you can probably guess, you can do it wrong, and if that happens, your cake is ruined. The step-by-step instructions here will tell you how to grout tile efficiently and cleanly so the hard work you've already put in on your tile project doesn't go to waste.
 Trisha Sprouse for Hunker
Grouting Tools
Grouting Tools
Tile grouting proceeds in three stages — mixing, application, and cleanup — and each stage calls for particular tools. With one or two exceptions, tools for grouting aren't specialized, and you may already have some of them left over from another home improvement project.
Mixing
Cementitious grout comes in bags like concrete mix, and you have to mix it with water before use. The procedure is a lot like mixing concrete, but grout needs to be mixed more thoroughly, so you can't just turn it over with a shovel. Most pros use a narrow trowel called a margin trowel for this, but if you're doing a big job, mixing is easier with a drill-powered mixing paddle. This can introduce air to the mixture and weaken the grout, however, unless you operate the drill at a very low speed (under 350 rpm). The other necessity, of course, is a mixing bucket, and for most purposes, a plastic 5-gallon paint bucket works just fine.
Application
One of specialized tile grout tools you need is a rubber grout float, which is a wooden or plastic flat trowel with a rubber pad attached to its face. The thickness of the rubber may vary from product to product, but thinner is usually better because it allows you to push the grout into the grout joints more efficiently.
You also need a grout sponge. This is not the type that you use in the kitchen. It should be about 5 inches wide, 7 inches long, and at least 2 inches thick, and it should have rounded (not sharp) edges. This special sponge is used to clean up excess grout from the surface of the tiles as you work. You'll also need another 5-gallon bucket filled with water for wringing out the sponge.
Cleanup
After the grout hardens, a thin film of grout haze remains on the surface of the tiles, and you need to clean this off. If you don't wait too long after application, you can usually do this with a bucket of water and a piece of cheesecloth or a microfiber cloth. But if the haze becomes too hard for easy removal, you may have to use a grout haze remover or use your grout float to clean the tiles.
Things Needed
-
Vacuum
-
Sponge
-
Two 5-gallon buckets
-
Margin trowel or mixing paddle and drill
How to Grout Tile From Start to Finish
How to Grout Tile From Start to Finish
After you've finished laying new tile, don't be in too much of a hurry to grout because the tile adhesive, whether it's mastic or thinset, needs time to harden. You'll be putting sideways pressure on the tiles when you grout, so if you do it too soon, you risk pushing tiles out of position and ruining your straight grout lines. Give the adhesive a good 24 to 48 hours to set before you start grouting.
If there is drywall, wood trim, or anything else you don't want grouted around the border of the tiled area (this is common when grouting wall tile or a kitchen backsplash), cover it with painter's tape to protect it.
1. Clean Up the Grout Lines
When you're laying tile, adhesive tends to ooze from underneath the tiles and collects in the joints between them. It's best to clean this as you're laying the tiles while it's still fresh, but if you don't, you have to chip it out before you grout. Use a stiff putty knife or a small flat screwdriver for this. When all the joints are clean, vacuum the tiles to get rid of small particles that may be left over. It's also a good idea to wipe down the area to be grouted with a damp sponge.
2. Mix the Grout
Unless you're using premixed grout, you'll have to mix the powdered grout with water, following the manufacturer's instructions on the grout bag. Pour the powder into a 5-gallon bucket and add water incrementally, mixing with a trowel or a mixing paddle as you go. If you use a paddle, operate the drill at a low speed (350 rpm or less) to avoid introducing air to the mixture and weakening the grout. Make sure you use clean water because any minerals or other impurities can affect the grout color.
As the grout approaches the consistency of peanut butter, dribble in any extra water you might need, using a sponge. You don't want to overdo the water, or you'll end up with a soupy mixture. When the grout has the proper consistency, it should remain on your trowel even when the trowel is upside down.
3. Slake the Grout
Let the grout rest for about 10 minutes after you mix it. This is called slaking, and it allows the chemicals to bond with each other and create a strong mixture. After slaking, the grout might feel stiffer but don't add more water. Just loosen it by stirring it with the trowel.
4. Get Some Water and a Sponge
Fill a second 5-gallon bucket with clean water and get a grout sponge. You'll be using the sponge to clean excess grout off the tiles as you go, and you'll be immersing the sponge in the water to clean it.
5. Start Filling Grout Joints
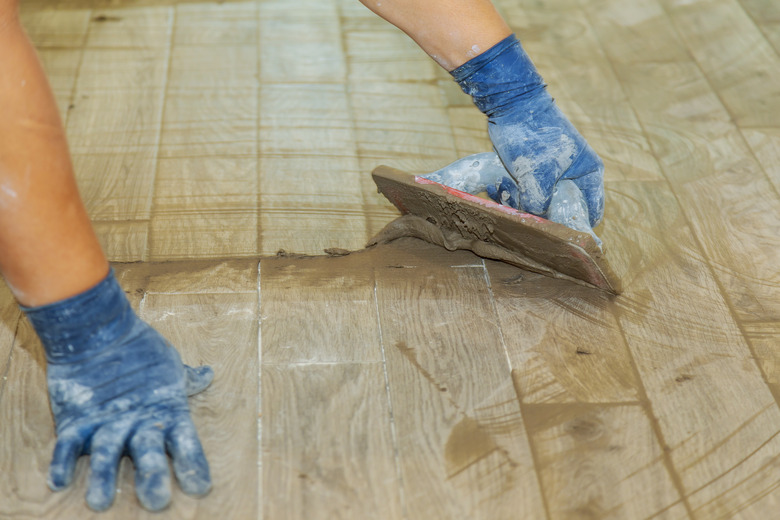
Dip the end of your float into the grout mixture and pull out a working batch, scraping the end of the float along the inside of the bucket to remove the excess and prevent it from falling on the floor. Transfer the grout to the first grout joint, which is usually in a corner of the tiled area, and put pressure on the float to force the grout into the joint. Moving the float in a circular motion, keep filling the joints in a small area no more than about 2 by 2 feet. When you're out of grout, drag the float at a 45-degree angle across the area to pick up as much excess as you can and return it to the bucket.
6. Wipe Down With the Sponge
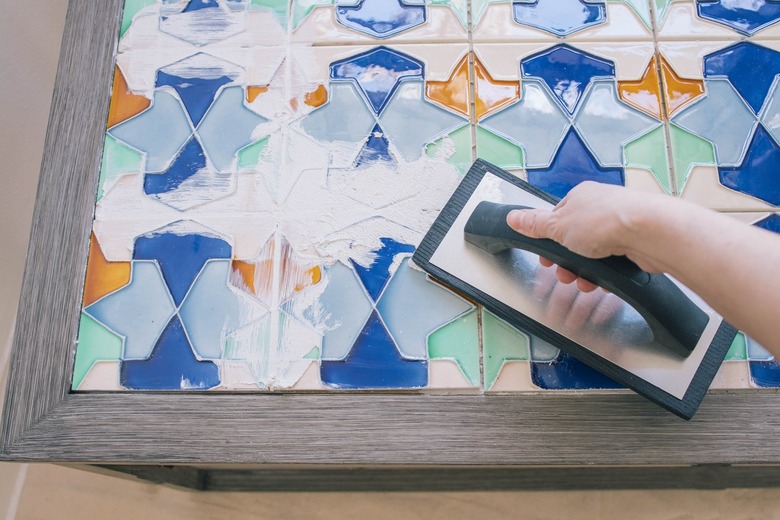
Soak the grout sponge in water and then wring it out thoroughly so that it's damp but not wet. You don't want to add any extra water to the grout you just applied, or the grout will be weaker, and it may discolor. Wipe the sponge diagonally across the section you just grouted to remove the rest of the excess grout. Wipe once, turn over the sponge, wipe again, and then clean off the sponge in the bucket of water, wring it out, and repeat. Do this until the entire area you just grouted is clean. Then, use the sponge to tool the grout by dragging it lightly along the joints to make a concave surface.
7. Keep Going Until You're Finished
Move on to the next section of the tiled area and repeat the process. Work in small sections and keep going until you've grouted all the tiles.
8. Wipe Off Grout Haze
Wait for the grout to stiffen but not harden, which usually takes about 30 minutes, and then wipe the tiles with a damp microfiber cloth or damp cheesecloth to remove the grout haze. As before, wipe diagonally across the tiles, or use a circular motion, and be gentle so you don't pull grout of the joints. Clean the sponge in water frequently and wring it out well as you work.
9. Buff the Tiles
Leave the tiled area undisturbed for the recommended amount of curing time, typically overnight, so the grout fully hardens. Buff the tiles with dry shop towels to remove any remaining grout haze. Switch to a new towel as each one gets covered with grout residue.
Tip
If you use premixed grout, you don't have to worry about mixing it, but you do have to be more careful about sponging it off as you go. It's stickier than ordinary grout and quickly becomes difficult to remove from the tiles if you wait even slightly too long.
How to Clean Grout Off Tile
How to Clean Grout Off Tile
If you wait too long before wiping off grout haze, it hardens and becomes more difficult to remove. If rubbing with water isn't working, you may have to resort to a commercial grout haze remover. Be careful, though. Most products are designed only for ceramic and porcelain tiles, so if the tiles are stone, you need a less acidic product designed for these materials.
When you regrout old tile, you have to remove the old grout, and the best advice for how to remove grout from tile is to use a grout saw. Old grout tends to crumble easily, so the job seldom takes longer than a day. You can also use a rotary tool with a grinding wheel attachment but remember to run the tool at a low speed to avoid damaging the tiles.