How To Resurface Countertops
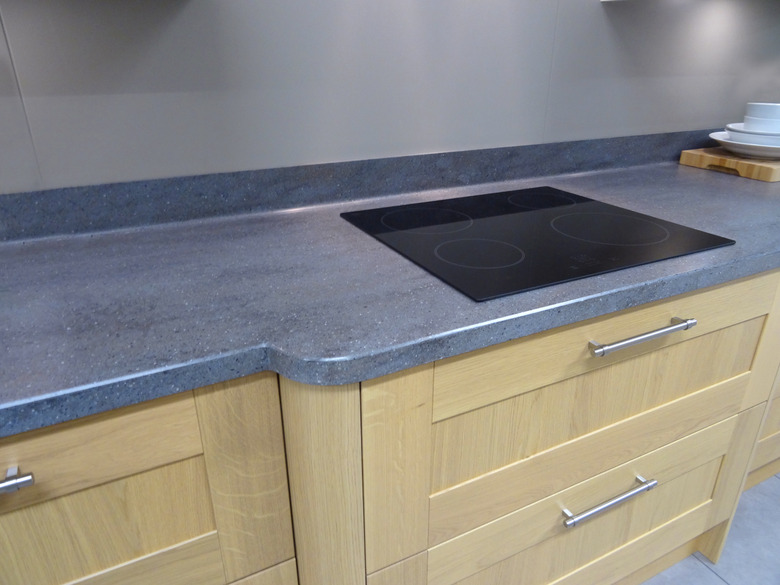
When it comes to kitchen countertops, resurfacing offers a great way to save cash compared to complete replacement. You can ipdate any laminate or non-porous countertop that's in good shape by applying a paint-on resurfacing producs. Most of these kits include several different liquid layers and even stone flecks, resulting in a finish that looks much like some stone or faux stone surfaces.
Before purchasing a kit, read the label thoroughly to get a grip on the amount of effort and time involved, as some take up to a month to cure after project completion.
What Can be Resurfaced?
What Can be Resurfaced?
Paint-on resurfacing kits are designed for use on laminates, but they also work on non-porous surfaces such as glass, metal and faux stone. Some will also work on wood countertops, although sealing may be required beforehand. Check the package label before purchase to ensure you're selecting a kit suitable for your countertop.
No matter what kit you choose, it requires a countertop that's clean, smooth and free from flaws such as chips, blisters or peeling laminate. If the countertop is not in good shape, it must be repaired before resurfacing, otherwise the problem will still exist after all your hard work.
Paint-On Resurfacing Kits

Paint-On Resurfacing Kits
Although the kits vary slightly from one brand to the next, most require that you degloss or sand the laminate surface to ensure paint adhesion. These kits provide a base paint coat that serves as the background color, optional add-in elements such as small bits of stone, plus a transparent or translucent top coat that adds visual depth and seals the countertop. Read the full instruction sheet before starting the project—otherwise you may find yourself scrambling for supplies during the short window of available as you move from one step to the next.
Things Needed
-
Countertop cleaner
-
Damp clean rags
-
Sanding pad from the kit (or 80- and 120-grit sandpaper and a sanding block)
-
Dust mask
-
Eye protection
-
Vacuum cleaner
-
Painter's tape
-
Newspaper
-
Paint stir sticks
-
Paint tray or disposable pan
-
Two-inch paintbrush
-
Microfiber paint roller
-
Stone chip dispenser (from kit)
-
Stone chips (from kit)
-
Rubber gloves
-
Plastic scraper (from kit)
1. Prepare the Countertop
Remove everything on or near the countertop. If the countertop isn't clean, wipe it down first with your favorite countertop cleaner and allow it to dry before proceeding.
Sand the countertop with the sanding pad included in the kit, or with 80-grit sandpaper and a sanding block. The goal is to remove the shine from the surface. Wear a dust mask and eye protection while sanding.
Wipe the countertop down with a damp cloth. If necessary, use a vacuum cleaner to remove dust from the area. Allow the counter to dry.
2. Apply the Base Coat
Apply painter's tape to any areas you do not wish to paint. Use newspaper and tape to cover larger areas, such as the backsplash or walls touching the countertop. Cover the sink drains as well, if the kit includes flecks or chips. This prevents the fine material from getting into the drain.
Stir the paint base color, then pour some of the paint into a tray or disposable pan. Set the tray close to the project area on the countertop, so you can slide it along as you work.
Paint the base coat on in a thick layer, covering rolled edges of the countertop and any area that needs to be resurfaced. Use the brush for edges and narrow areas and the roller for the wider flat surface of the main countertop areas.
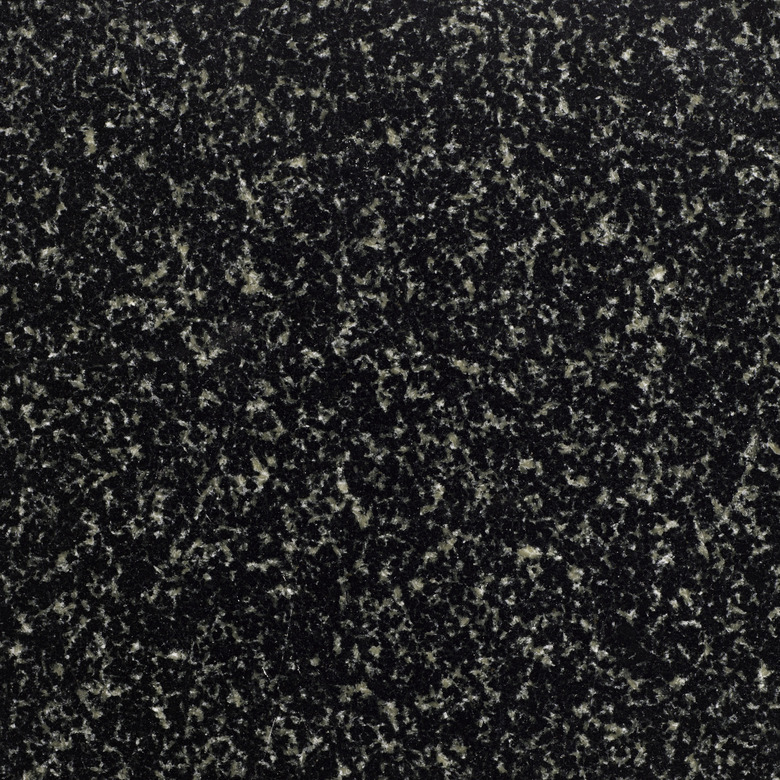
3. Apply the Stone Flecks
Place the colorful flecks or chips (if your kit includes these) inside the dispensing tool included in the kit. Turn the handle on the dispenser while holding it over the countertop to broadcast stone flecks over the countertop surface. Wear eye protection and a dust mask during this part of the project. Keep moving as you work in orde to broadcast the chips evenly. For vertical areas, you may need to fling the flecks on by hand while wearing rubber gloves.
Once all base-coated areas are covered with stone flecks, allow the counter to dry for 12 hours or longer, as directed in the kits instructions. (Skip this step if your kit does not include stone chips that require separate application.)
Vacuum the countertop, the floor and any surfaces which may have collected stone chips.
Tip
Some kits also include a wetting agent to use if the base coat becomes too dry as you sprinkle on the stone chips. It's better to work on only one countertop at a time during the base coat and stone chip phases, otherwise the base layer will become too dry for the stones to stick.
4. Prepare for the Topcoat
Prepare the countertop for its topcoat by making it smooth. Wipe your hand along the countertop, feeling for particularly rough areas. Chip off any stone clumps with the scraping tool provided with the kit. Afterward, gently go over the entire surface with the coarse sanding block from the kit, then go over it again with 120-grit sandpaper. Wear a dust mask and eye protection while doing so.
Vacuum the countertop, the floor and any surfaces which may have collected stone chips. Wipe the countertop with a damp rag to remove fine dust. Allow the countertop to dry completely. Vacuum the countertop and surrounding area once again.
5. Apply the Topcoat
Mix the two-part topcoat resin according to package directions in a clean paint tray or pan. Apply the topcoat with a brush for narrow areas or a quality roller for the main flat countertop surface and rolled edges.
Remove the painter's tape and newspaper after the counters are dry to the touch, which takes about six hours. Do not place anything atop the countertops for at least several days, or as recommended on the kit's label.
Option: Faux Finish Kits
Option: Faux Finish Kits
Some countertop resurfacing kits use paint colors to emulate the look of stone, rather than including actual stone chips between layers. This type of kit includes specialty paint rollers with a honeycomb-style texture on the surface, which applies paint to some areas and not others. These kits can be simpler to use than those that include flecks of stone— just apply primer, then a base color layer, then a top color applied with a textured roller. All layers require time to dry in between coats. A clear coat goes atop all the other layers to provide a hard protective coating.