
DIY in a Day brings you step-by-step instructions for easy projects that will spruce up your space — within 24 hours (or less!).
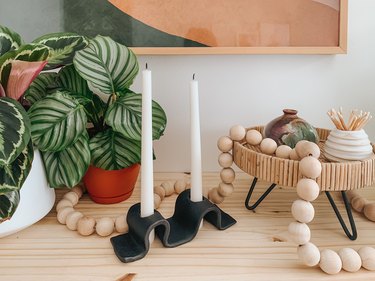
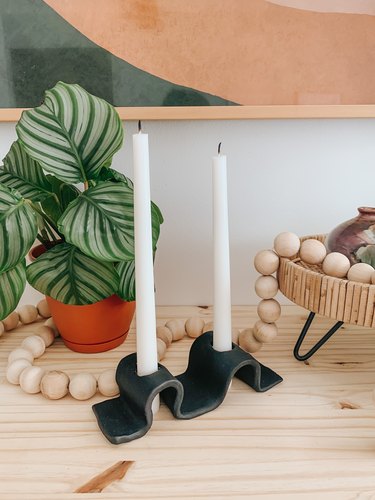
Here at Hunker, our whole team loves everything about candles, including different scents, accessories, and styling ideas. If you share our same obsession, you're going to love this DIY. Using air-dry clay and paint, here's how you can easily make your own wonderfully wavy candleholder. Your tabletops will thank you.
Note: While this DIY needs a few days for the clay to fully dry, the process of actually making the holder is fast and easy. Totally doable in a day!
Video of the Day
Video of the Day
Things You'll Need
Bowl of water
Toothpick or needle tool
Step 1
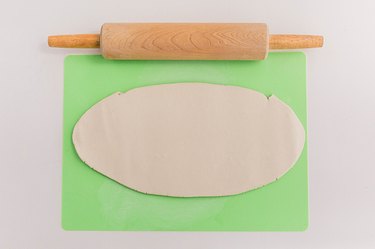
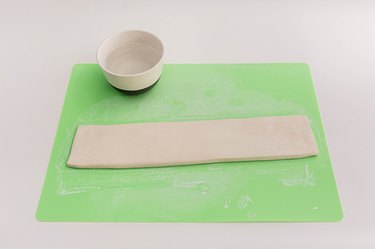
Roll out a grapefruit-sized ball of air-dry clay on a cutting board until it's roughly 1/4-inch thick. Don't go any thinner than that since this candleholder needs thickness in order to be stable.
Step 2
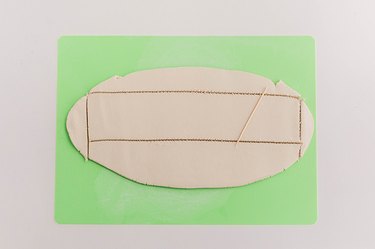
Cut out a 13-inch-by-3-inch ribbon-like strip using a toothpick or needle tool.
Step 3
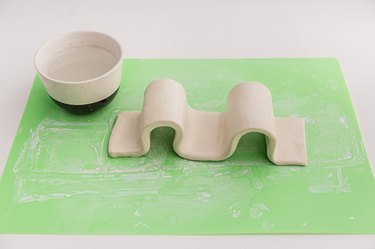
Dip your fingers in water and run them over the wet clay to help smooth out the cut edges of the strip. Only use as much water as you need to smooth the clay out. You don't want to overdo with the water, or else the clay will get too slick and hard to manage.
Step 4
Gently bend and pull up the clay strip in two or three spots to create a stable wave-like three-dimensional shape, as pictured here. Use water and your fingers to smooth everything out when you're done.
Step 5
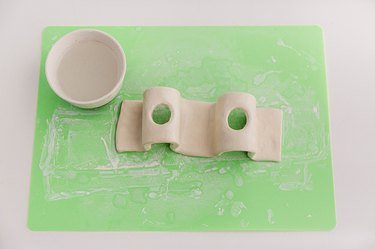
Use a sharp knife to cut holes through the centers of the highest parts of your clay candleholder. You'll want the holes to be a little larger than the diameter of your candlestick base — so, cut a hole about 1/4-inch bigger than your candlesticks.The clay will shrink as it dries, so go bigger than you think you'll need.
Step 6
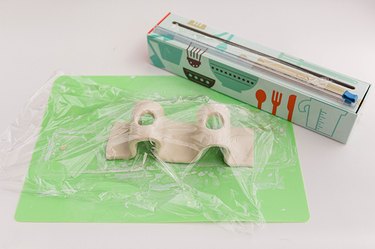
Smooth any rough edges with wet fingertips, and then lightly cover the clay with plastic wrap. The plastic wrap doesn't need to cover the clay entirely. This extra layer helps keep the clay from drying out too quickly, which could result in cracking. Remove the plastic wrap after 24 hours, and allow the clay to dry uncovered for two more days, or until it's entirely free of moisture. (The clay will be both lighter in color and in weight when dried out.)
Step 7
Once the clay is dry, paint it whatever color you'd like (we used black acrylic paint), and then you're ready to outfit your new holder with dripless candlesticks!
Note: As with all candles (but especially with this one given the DIY nature of your candleholder), never leave it unattended when lit.
