How To Install Cabinet Hardware
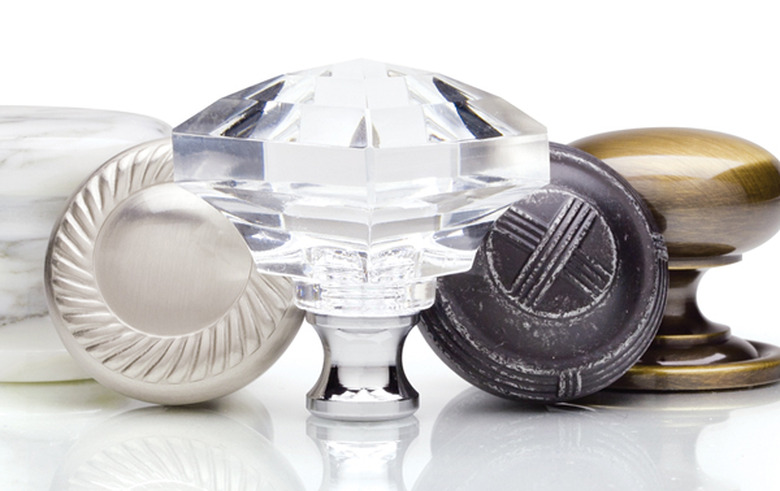
Whether you're refurbishing cabinets or building new ones, the hardware is an important design consideration. The door handles, drawer pulls, hinges are functional, but they are also decorative, and a fair amount of effort usually goes into choosing them. That effort is wasted if the hardware is poorly installed. That goes double for door latches, which won't even work if they aren't properly aligned.
 Cliffside Industries
The mechanics of installing handles, pulls and hinges are basic, and you seldom need a tool more complicated than a drill. Placement can be a little more challenging. When the cabinets have multiple drawers and doors, alignment is everything. Even a small mistake can ruin the appearance of the cabinet. You also have to decide on a placement scheme that makes sense. Should you put the door handles near the bottoms of the doors or more toward the middle? How far should the hinges be from the tops and bottoms of the doors?
Once you've finished measuring and marking, you'll have to drill holes and drive screws. That's usually pretty easy, but it's definitely possible to do it wrong. One of the biggest errors is to drill straight through a door and tear out the back, leaving an unsightly gouge that is visible whenever the door is open. It isn't difficult to avoid this.
Things Needed
-
Drilling template (purchased or self-made)
-
Drill with twist bits
-
Pencil
-
Level
-
Screwdrivers
-
Tape measure
-
Cabinet hardware (hinges, door handle, drawer pulls, as needed)
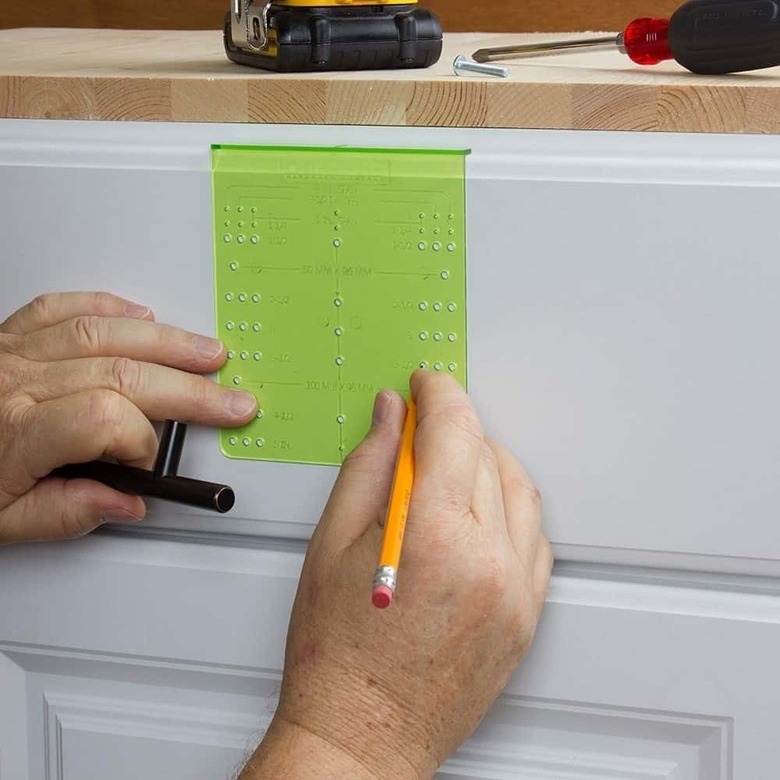
Use Templates for Multiple Holes
Use Templates for Multiple Holes
You can buy a template for installing cabinet hardware at any hardware store. It's a plastic plate with a series of predrilled holes that helps avoid tiny measurement mistakes that end up being much more visible that you expected. When you line up the template with a corner or edge of a door or drawer front and use it to make marks for your holes, alignment is guaranteed.
 Gliderite Hardware
You don't necessarily have to buy a template, because it's easy to construct your own from a piece of cardboard. Make a mark on the cardboard, drill a hole on the mark and you can use that hole to mark drill locations for all similar doors and drawers.
Tip
The ideal template for installing door handles and drawer pulls is made from two pieces of 1/4-inch plywood attached to a wooden core to form a U shape. Slip the template over the edge of the door or drawer front, position it where you want it and drill the hole. If the core is the same thickness as the door or drawer, the template automatically prevents tear-out on the back of the door.
Choosing and Installing Hinges
Choosing and Installing Hinges
Cabinet hinges come in a number of styles, some designed to be visible and some to be hidden. The type you need depends on whether the doors overlay the door frame or are inset. Some types, such as Euro-hinges, require mortises in the door and cabinet while others can be installed with only screws. Select hinges that will work with your doors and read the instructions that come with them, because installation technique varies according to the type of hinge you're using. A general procedure is as follows:
 Iurii Garmash/iStock/GettyImages
- Install each hinge on the door. The hinges should be from 1 1/2 to 2 inches from the top and bottom of the door. Keep the distances uniform.
- Hold the door against the cabinet frame. Open the door and butt the edge against the frame if you're installing hidden hinges; hold the door in the closed position flat against the frame if you're installing overmount hinges.
- Mark the position of the top hole of the top hinge, then remove the door and drill a pilot hole for the screw, using an 1/8-inch drill bit. Put the door back in position and drive a screw to hold the door in place.
- Level the door, using a spirit level, and mark the positions of the other hinge holes. Drill pilot holes, then drive the rest of the screws.
Tip
Don't forget to allow for a 1/8- to 1/4-inch gap between the doors. When installing concealed hinges that attach to the inside of the cabinet frame of the side of the cabinet, this gap is automatic, provided the doors are the right size. When installing hinges that butt against the cabinet facing, you have to create this gap yourself.
Placing and Installing Door and Drawer Handles
Placing and Installing Door and Drawer Handles
Handles typically go in the centers of drawer faces. They can also go in the centers of door faces, although it's more common to put them near the tops or bottoms of doors. The best placement is usually where the handle is easiest to reach—2 or 3 inches from the top for lower cabinet doors and the same distance from the bottom for upper cabinet doors. Whichever placement you choose, it should be the same for every similar drawer or door. The best way to guarantee this is to use a template, but you can also do it with a tape measure or ruler, a pencil and a level.
 bodu9/iStock/GettyImages
- Measure the distance of the handle from the top or bottom of the door and from the edge and make a mark. The distance from the edge depends on whether or not the door has molding. If so, center the handles on the molding. If not, the handles typically go about 1 1/2 inches from the edge of the door.
- Make identical marks on all similarly placed doors, such as those on all the upper cabinets or the ones on all the lower cabinets.
- Check the alignment of the marks with a spirit level. When you hold the level horizontally or vertically between a pair of marks, the bubble should be centered.
Once you've made all the marks, drill a hole through each one, using a drill bit with a slightly larger diameter than the handle screws. To prevent tear-through on the backs of the doors, lay a piece of tape on the back of the door, drill through the tape and remove it when you've made the hole.
If the handles have more than one screw, install the first screw through the hole you just drilled, tighten it and then adjust the handle, using the level to make it vertical or horizontal. Mark the position of the second screw, then rotate the handle out of the way and drill the hole for it. Finish installation by tightening both screws down with a drill or screwdriver.
Tip
One of the advantages of using a store-bought template for handle placement is that it has holes with standard spacing for most two-screw handles.