How To Make A Pillow
One pillow or a pile of them can make a big impact in a room by adding just the right pop of color and texture. For instance, in the photo below, notice the large pillow on the right side of the couch. The chartreuse color and velvety texture not only catches your eye but also beckons you to sit down and get comfy. But wait a minute—what if you're not so keen on chartreuse or any of the other available colors? No problem. You can make your own pillow cover quickly and affordably. Simply choose a fabric that makes your heart sing, and you've accomplished the most difficult part of making a pillow.
 West Elm
An envelope pillow cover is super simple because you don't need to add a zipper or make buttonholes. To create an opening to insert a pillow form, simply overlap the fabric. If your fabric is a solid color or non-directional print, you can use the one-piece method. However, if your fabric does have a directional print (a design with a top and bottom), use the three-piece method.
Things Needed
-
Fabric
-
Thread
-
Pillow insert, also referred to as a cushion insert
-
Rotary cutter and self-healing mat or scissors
-
Ruler for rotary cutting or measuring tape
-
Straight pins or safety pins
-
Steam iron
-
Sewing machine
How to Sew a One-Piece Envelope Pillow Cover
1. Choose a Pillow Insert
Determine the size and shape of the pillow based on how and where it will be used. Pillow forms come in a variety of sizes and shapes, and you can choose either feather or polyester fill or memory foam. Another option is to make a new cover for a pillow you already own. Many makers use the 20-inch square Ikea fjädrar inner cushion because the size works well on a couch, chair, or bed. The duck feather filling is fluffy and provides comfortable support. Plus, the price is hard to beat! If you use a fjädrar pillow form, remove it from the tight plastic wrap but don't fluff it until the pillow is done because it's easier to insert while compact. There are two tags: Trim the tag that's marked with a cutting line to preserve the care instructions and remove the other tag.
 Ikea
Ikea
2. Prepare the Fabric
If you plan to wash a pillow cover in the future, wash and dry the fabric before you cut it to prevent future shrinkage. Iron out the wrinkles with a steam iron so the fabric lies flat.
3. Cut the Fabric
Determine how large to cut the rectangle of fabric. Measure the width of the pillow insert and add 1 inch for seam allowances. Measure the height of the pillow insert; multiply that number by 2 and add 6 inches. If there is a design printed on the fabric, take care to measure the rectangle so that the motif will be centered on the pillow front.
 Tracie Henkel
Tip
When using the 20-inch fjädrar feather pillow insert, we recommend making the pillow cover only 18 inches square because the pillow will be plumper. So, using the above formula, the rectangle of fabric should be cut 19 inches by 42 inches.
4. Sew the Pillow Cover
With fabric cut, you can now sew the pillow cover:
- To hem both the top and bottom edges, fold the fabric 1/2 inch toward the wrong (back) side of the fabric and press. Fold over another 1/2 inch, press, and stitch in place, sewing approximately 3/8 inch from the folded edge.
- Lay the rectangle on a flat surface with the right side of the fabric facing up. Fold the top section of the rectangle toward the center. Then fold the bottom section of the rectangle toward the center; the top and bottom should overlap about 5 inches, and the height should be equal to the height of the pillow insert.
- Stitch the side seams 1/2 inch from the edge, backstitching at the beginning and end of each seam.
- Turn right side out and push each corner out. Tuck the pillow insert inside the cover and shake it to fluff the feathers.
Tip
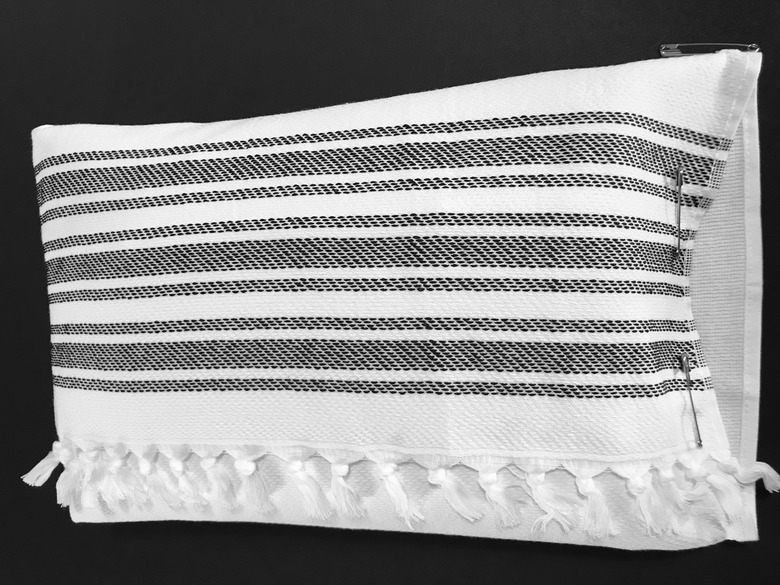
Use a kitchen towel for an extra speedy pillow cover for an 11-inch by 15-inch pillow insert. The ends of a towel are already hemmed or fringed, so all you have to do is stitch the side seams. To ensure the design and hem are placed correctly, wrap the pillow insert and use safety pins to secure the overlapped edges. Also mark the top with a pin. Then turn inside out to stitch the side seams, carefully removing the safety pins so that you don't stitch over them. Once the seams are stitched, trim away excess fabric on each side, leaving a half-inch seam. allowance. Turn right side out and slip the insert inside.
 Tracie Henkel
How to Sew a Three-Piece Envelope Pillow Cover
How to Sew a Three-Piece Envelope Pillow Cover
The construction of a three-piece pillow cover is very similar to the one-piece method; however, there will be one front piece and two back pieces. As in the one-piece method, choose a pillow insert and prepare the fabric.
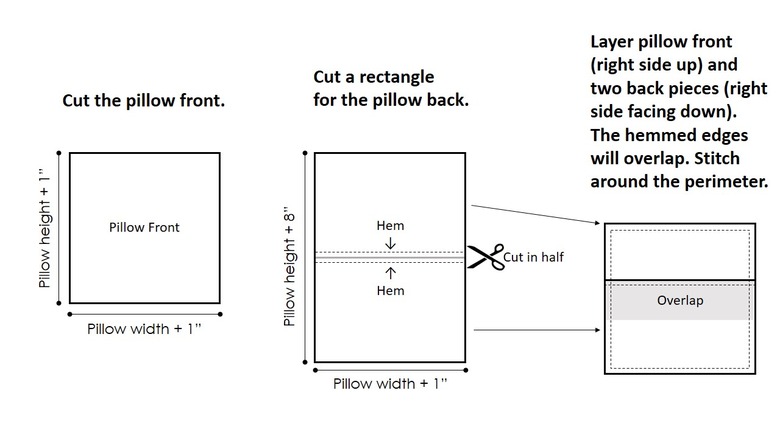
1. Cut the Fabric
To determine the size of each piece, measure the height and width of the pillow insert. Note that the front and back pieces can be cut from the same or different fabrics. Some makers choose to use different fabrics as a design element or simply to use up small fabric remnants. This can be an especially fun approach when upcycling fabric from different sources, such as vintage clothing and curtain panels.
- The pillow front: Add 1 inch to the height and width. Center the design within that area.
- The pillow back: Add 1 inch to the pillow width and 8 inches to the pillow height.
For the fjädrar feather pillow insert, cut a 19-inch square for the front panel and a 19-inch-wide by 26-inch long rectangle for the back panel.
 Tracie Henkel
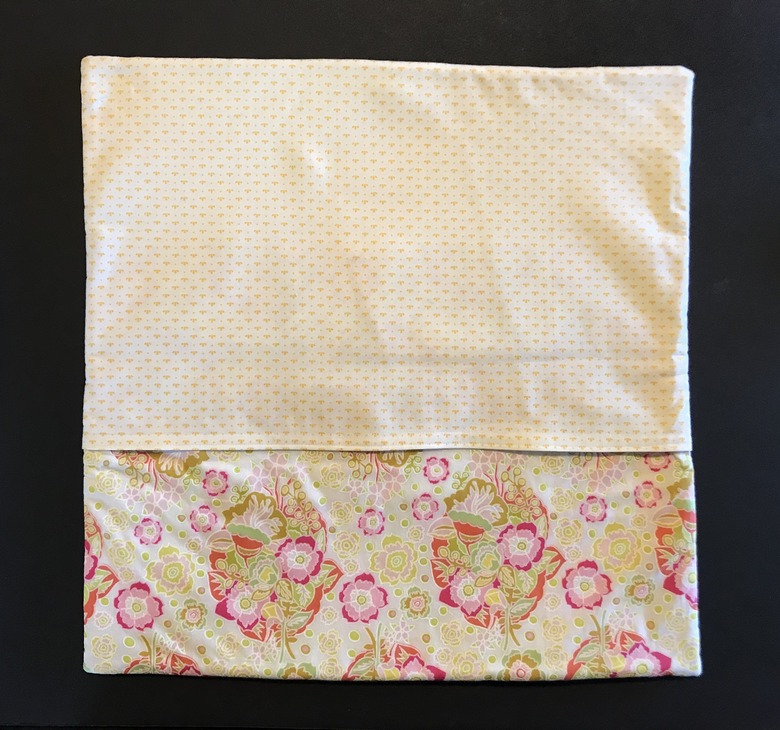
2. Prepare the Back Panel Pieces
Cut the back panel in half and hem the newly cut edges to maintain the correct orientation of the fabric design. To make a hem, fold the fabric 1/2 inch toward the wrong (back) side of the fabric and press. Fold over another 1/2 inch, press, and stitch in place, sewing approximately 3/8 inch from the folded edge.
3. Join the Front and Back Pieces
Lay the front panel facing up. Next place a back panel piece on top with the right side facing down, so that the right sides of the fabrics are facing each other. Align the top and side edges—the hemmed edge will be near the center. Finally, place the second back panel piece on top, matching the bottom edge and sides with those of the pillow front, right sides together. The hemmed edge will overlap the hemmed edge of the upper piece. Use pins to hold all the layers in place and stitch 1/2 inch from the edge around the entire perimeter.
4. Finishing
Turn the pillow right side out, pushing out each corner. Insert the pillow form and fluff.
 Tracie Henkel