How To Unclog A Bathroom Sink Drain
We may receive a commission on purchases made from links.
Bathroom sink drains almost always clog with hair and soap. Over time, soap buildup on the walls of the tailpiece and trap pipes can slow the drain and make clogged drains likely. Hair is particularly stubborn stuff in drains, which is why a plunger usually doesn't work, nor do liquid drain cleaners. Therefore, the best way to unclog a bathroom sink drain is to get inside the drain and pull out the clog. You can do this from the top end, if you're lucky. Otherwise, it takes just a few minutes to open up the drain from below and give everything a thorough drain cleaning.
Things Needed
-
Pliers
-
Wire coat hanger
-
Bucket
-
Tongue-and-groove pliers or pipe wrench
-
Drain snake (if necessary)
Remove the Stopper From Above
Remove the Stopper From Above
Sometimes sink stoppers pull right out, giving you easy access to the sink drain from above. Try to pull up your stopper, twisting it back and forth a bit, but don't force if it won't come out (you'll learn how to remove it later). If the stopper comes out, remove any hair and crud stuck to it, then run some hot water in the sink to see if the drain is cleared.
If the drain is still clogged, cut a 1-foot length of straight wire from a wire hanger, and bend one end into a small hook, using pliers. Fish the wire into the drain, using the hook to grab hair and pull it up and out. (There are also handy plastic "zip" tools sold for just this purpose.) Get as much gunk as possible with the wire, then flush the drain with hot water. Is your bathroom drain still clogged or dealing with a stubborn clog? Skip ahead to "Remove the P-Trap" (below).
Remove the Drain Stopper From Below
Remove the Drain Stopper From Below
If the sink stopper won't come up easily from above, you'll have to disconnect it from below. Place a medium-size bucket under the pipes below the bathroom sink. Locate the pivot rod of the stopper assembly—it's a metal rod or bar extending straight out from the backside of the vertical pipe below the sink (which is called the tailpiece).
 ClausAlwinVogel/iStock/GettyImages
Loosen the nut holding the pivot rod to the tailpiece, using pliers. Pull the pivot rod backward, releasing the sink stopper (some water will come out), then pull up the stopper. With the stopper and pivot rod out of the way, you have full access to the tailpiece and can clean it thoroughly with the hooked wire. It's better to pull out a hair clog than to flush it down with water because it might get stuck farther down the drain.
Remove the P-Trap
Remove the P-Trap
If the clog persists after cleaning around the stopper and inside the tailpiece from above, the next step is to disassemble the drain piping under the sink. The P-trap is the J-shaped section of pipe under the bathroom sink. It's secured by large nuts at either end, called slip nuts.
Place a bucket directly below the P-trap. Try to loosen the two slip nuts by hand, turning them counterclockwise, or to the left as you're facing the pipe. If you can't loosen them by hand, use tongue-and-groove pliers (also known as channel-locks) or a pipe wrench. Unthread the nuts all the way, then carefully pull the P-trap down and away from the tailpiece. If there's water in the sink or drain pipes, it will come out quickly, so make sure your bucket is ready.
Dump any water and crud from the P-trap into the bucket. Fish out any crud you can reach from the tailpiece and from the horizontal pipe that goes into the wall — called the trap arm. If there was a lot of hair and crud in the P-trap, tailpiece or trap arm, this was almost certainly the cause of your bathroom sink clog, and you can put the drain parts back together (see below). If you haven't found much clog material, or if a lot of water came out of the trap arm when you removed the P-trap, the clog is farther down the drain, and you'll need to snake the drain.
Snake the Bathroom Sink Drain
Snake the Bathroom Sink Drain
This is easier than it sounds and a simple skill to DIY; learning how to snake your bathroom sink will help you avoid some plumber bills for the rest of your life. If you don't already own one, buy an inexpensive 25-foot, drum-type drain snake, or plumbing auger, at a hardware store or home center.
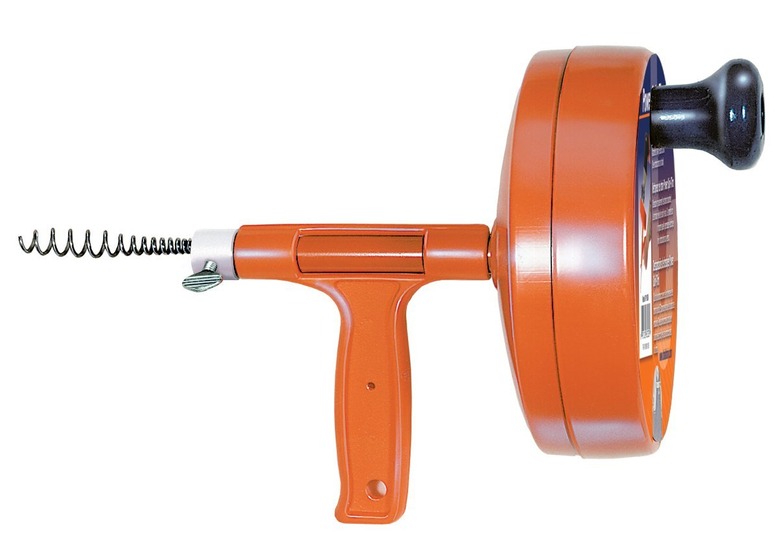 General Wire Spring Spin Thru Drain Auger
Loosen the thumbscrew to free the snake cable. With the sink drain trap and trap arm removed, feed the cable (which has a corkscrew end) into the opening in the waste pipe in the wall until it stops. This means the cable has hit a clog or a bend in the pipe. Tighten the thumbscrew onto the cable then rotate the snake's drum clockwise while applying moderate pressure on the cable.
When the cable moves farther into the drain, you've passed the bend or clog. Loosen the thumbscrew and feed in more cable. Repeat this process until you've gone 10 or 15 feet into the drain, then pull the cable back out, coiling it back into the drum as you go. (You can wipe the cable off by pulling it through a rag held in one hand as you retrieve it.) Remove hair, gunk and other clog material from the cable as it comes out of the drain. Repeat snaking if necessary, going farther into the drain, as needed, until you've removed the clog.
Put the Bathroom Sink Drain Back Together
Put the Bathroom Sink Drain Back Together
Reinstall the trap arm and P-trap in their original positions, tightening the slip nuts by hand (if they're plastic) or with pliers or a pipe wrench (be careful not to over-tighten). Note: The slip nuts work with a beveled plastic washer; the beveled, or tapered, side of the washer faces away from the open threaded side of the slip nut.
Fit the sink stopper into the drain, and reposition the pivot rod so it captures the hook or hole on the bottom end of the stopper. Secure the pivot rod with its nut.
Run the sink faucet full-blast while you check under the sink for leaks at the drain connections and around the pivot rod nut. Tighten any leaky connection just until the leak stops, using pliers. Be careful not to over-tighten and damage the nut.