How To Install Rubber Pavers
We may receive a commission on purchases made from links.
Soft, durable, slip resistant, and impervious to freezing, rubber pavers can be a great choice for patios, walkways, and other outdoor spaces. They're easy to install and maintain as well. Although they're less demanding than other paver installations, you do still need to do a little prep work before laying them. They're easier to care for, however, making them easier to live with after installation than other pavers. Here's how to install rubber pavers.
Choosing and Installing Rubber Pavers
Choosing and Installing Rubber Pavers
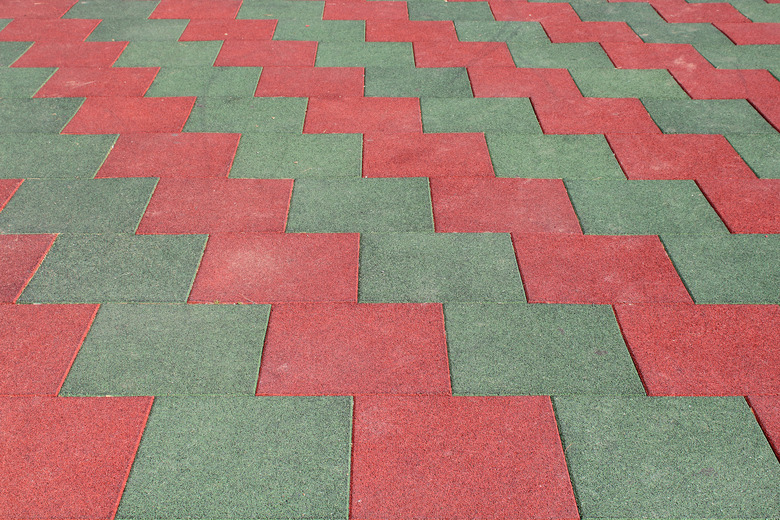
When choosing rubber pavers, you will find a wide variety of shapes and sizes. Although interesting shapes are available, the easiest option is to choose square tiles that have a design embossed on them. Popular brand Rubberific, for example, makes dual-sided pavers that feature a brick pattern on one side and a stone pattern on the other. You simply choose the side you like best and install them with that side facing upward.
It's important to store your rubber pavers out of direct sunlight until you can install them. Sunlight can fade rubber pavers, which usually isn't an issue when all the tiles on a sunny patio fade together. However, you don't want to end up with a pallet of pavers that have faded slightly on the outside but are darker on the inside. Keep them dry as well so they don't get wet and expand. If you install wet rubber pavers, they may shrink a bit when dry and cause gaps.
Installing Rubber Pavers Over Cement
Installing Rubber Pavers Over Cement
Installing rubber pavers over a base of cement or brick is the easiest installation option. You do need to make sure the surface is in good shape, however. A few minor cracks or small issues won't be a problem, but it's best to remove a crumbling or badly deteriorated surface than to install over it.
- Measure the surface to make sure you have enough pavers.
- Sweep the cement and remove any existing debris, like small stones.
- Install the pavers in even rows, applying a bead of construction adhesive around the edge of each paver before tapping it into place with a rubber mallet.
- Cut the pavers with a ruler and a razor knife when you encounter an area where you need only part of the paver to cover the surface.
- Let the adhesive dry for 24 hours before walking on your new pavers.
Installing Rubber Pavers Over Dirt
Installing Rubber Pavers Over Dirt
When placing rubber pavers over dirt or grass, you'll want to prepare the area in a manner similar to what you would do if using concrete or brick pavers. Digging down a few inches into the soil places the top of your pavers in line with the surrounding ground so you don't accidentally create a tripping hazard. It also creates a stable base so you can set chairs, tables, and other furniture on the patio without fear of them tipping.
If you want your paved area to be slightly raised, however, you can skip the digging. If you go this route, you'll want to build a wooden frame or place another edging material around your pavers to create an obvious lip. This lip will help hold the pavers in place and make it clear that there is a step around your new paver patio or play space.
- Dig out the area where you want to lay the tile to a depth of about 3 or 4 inches. Skip this step if you are raising your patio and instead install your frame, making it about 3 or 4 inches deep as well. Treated 4x6 boards work well as framing.
- Fill about 2 inches of the area with gravel and compact it with a tamper. Follow this with another inch or two of sand and compact it. Leave enough space above the sand to accommodate the depth of your tiles so that they are even with the surrounding earth when you place them.
- Check your new patio area with a level and make sure everything is even.
- Though optional, you may want to lay some landscaping fabric over the sand to prevent weeds from popping up through your pavers.
- Place the tiles over the compacted sand, aligning them with one another. Tap the ends of each tile with a rubber mallet to ensure that it fits snugly against the adjacent tiles.
- Tap metal landscape pins into the corner of each rubber paver with your mallet to keep them from moving. You won't need to do this with extremely heavy pavers, but you should use the pins if the paver manufacturer recommends them.