

Turn Wood Trays Into A 3-Tier Bathroom Organizer With This Chic Dollar Tree DIY
We may receive a commission on purchases made from links.
No one likes bathroom countertop clutter. It prevents your space from feeling like a relaxing retreat and makes it difficult to locate specific items when you're in a rush to head out the door. Shoving all your cosmetics, soaps, and dental supplies into the nearest drawer is a tempting fix, but an organizer tray works better. You can buy them from home goods retailers, but making your own lets you personalize its design, and might just save you a few bucks. DIY with Vera on Facebook has a great example of such a project that proves that this is the case. She built a chic-looking tiered bathroom countertop organizer with three Crafter's Square Wooden Trays from Dollar Tree, linked together with four Crafters Square Wood Dowels that serve as the fixture's legs.
To make her bathroom organizer uniquely eye-catching, the content creator stuck decorative paper to her wooden dowels and the outside edges of her trays with the help of a craft adhesive. A product like Mod Podge Waterbase Sealer, Glue and Finish is a good choice for replicating such an effect. She also used hot glue to attach the dowel pieces to the outsides of her trays, and a nail file to sand off the edges of the paper on the trays' corners. The finished project is ideally-suited for lightweight items such as washcloths, cotton balls, hair accessories, and makeup. It also pairs nicely with a smart bathroom storage solution you can find at a thrift store, such as using old baskets to store rolled towels and small items.
How to build a 3-tier bathroom organizer with Dollar Tree products
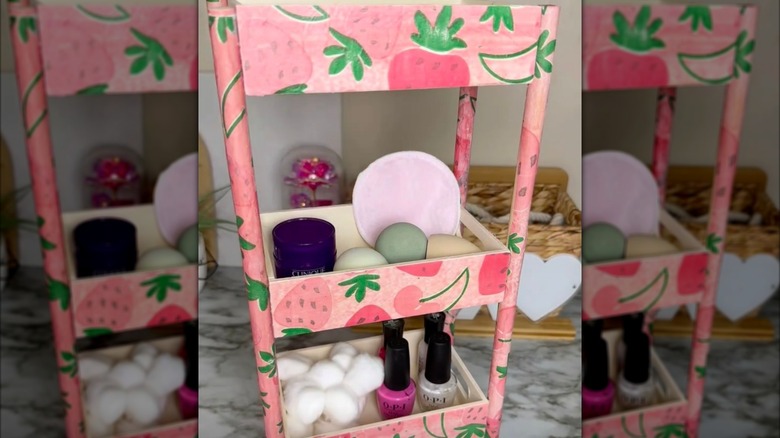
Though the assembly process for this project isn't overly difficult, there are few things to consider before you begin. First, decide which paper or paper napkins to use to decorate the outside of the trays and dowels. There's no need to stick with the pink strawberry pattern that Vera uses if you don't like the look — other colors may better match your bathroom. Just make sure the napkins you pick peel apart in thin layers. Also, consider getting a stronger adhesive than hot glue for attaching the organizer's legs. A product like E6000 Multipurpose Clear Glue, for example, will give you a more reliable bond. You can use this same adhesive for turning a thrifted vase into gorgeous home decor, and plenty of other everyday projects.
The first step in this DIY is sticking the paper or paper napkin sheets to the dowels and the outside edges of the Dollar Tree trays. Coat with Mod Podge, then smooth the paper carefully over the surface. If you want to extend the napkins' pattern further, put a layer down on the inside of the trays, too. Then, glue the trays to the dowels, starting from the top of the organizer and working your way down. Consider using a ruler during this step to ensure that the tiers are evenly spaced. To protect the wood and prevent objects in the organizer from slipping around, cut shelf liner to fit the insides of the trays. Now it's time to organize your small bathroom drawers and move items from the countertop to your pretty new tiered storage system.