Transform An Old Vase Into Beautiful Home Decor With A Fun Summer DIY
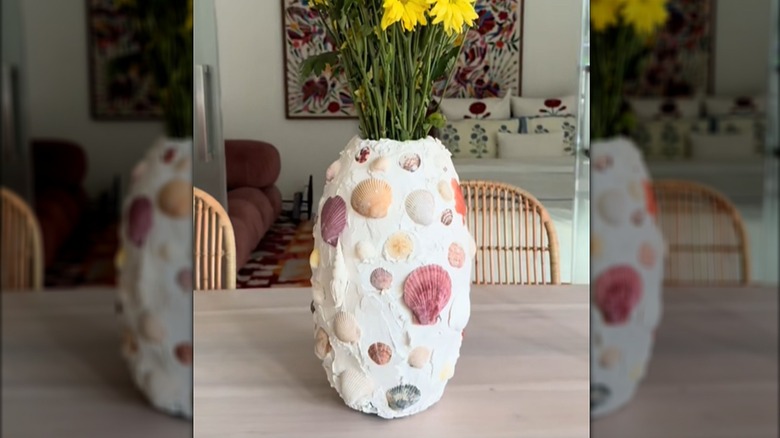
Whatever you do, don't toss those old vases you no longer use! Sure, maybe your style has changed, but it doesn't take much to completely transform the look of an outdated vase into a centerpiece you love. It's also a sustainable way to get a fresh look. You can turn a thrift store vase into a gorgeous decor piece with any number of creative embellishments. We're particularly fond of an idea from TikTok creator iammichellepham involving plaster and seashells. Intrigued? You will be when you see the results!
We love this project for its simplicity. You don't have to know how to paint or spend hours perfectly aligning the elements. At its core, this project is as simple as slathering on plaster and positioning seashells where you want them. Don't overthink it! You don't need an interior design degree to create this stunning sea-inspired vase that brings a little bit of summer to your home.
When choosing a vase, factor in the size and shape. Smooth sides are often easier to work with — you won't have to fill as many gaps with plaster and you won't see any intricate details anyway. Gentle curves can make for interesting design opportunities, but tight curves could be more difficult to cover if space is limited. If you're using larger seashells, pick a vase with a similar scale. If you're going with a smaller vase, make sure you have enough small shells to create a design you love. You'll also need sandpaper and a damp cloth to complete the project.
Create a seaside vase with plaster and seashells
This is one of those artsy DIY ideas for decorating with real seashells from the beach. You can create a vase with the shells from a summer trip as a unique display for those souvenirs. Or, find shells at thrift stores, craft stores, or online. You can also incorporate other three-dimensional objects, like driftwood, pebbles, or a tiny glass jar of sand.
The inspiration project uses white plaster and naturally colored seashells, but you can add color or embellishments yourself. To enhance the shells, consider paint, glitter, or decoupage. You can also add a variety of colorants to the plaster, to change the overall background. You might choose light blue to mimic water or tan to create a sandy beach look.
To craft the project, first clean then sand the vase lightly before wiping it down. Then, spread plaster over one section of the vase, working quickly to keep it from drying. You want a thick enough layer to cover the vase and hold the shells. You'll never get the plaster perfectly smooth, so adding some intentional grooves or swirls gives you control over the look. Then, press the shells and other objects into the plaster, and let it dry. You can cover the entire vase or use tape to mark off a part of the container you want to leave bare. Personalizing the shell vase to your tastes is a perfect example of how to ensure your themed room is cool, not tacky when it comes to beachy, seaside vibes.