Transform An Old Tomato Cage Into An Adorable Storage Basket You'll Love
There is no doubt that accent baskets are useful and attractive. (Who doesn't love a high-end blanket basket?) Want to love them even more? You can make your own adorable storage basket using a wire tomato cage as a starting point. This DIY basket hack is fun to do, practical, and ultra-affordable. The trick to this DIY is wrapping yarn around the cage to create the bottom and sides of the basket.
When you look at a tomato cage, you can see that it is essentially a basket already, except it's ugly and doesn't have a bottom — two things that need to be addressed. Many of us have tomato cages stuck on the rafters of our garage or in the corners of our storage sheds. And when planting season rolls around, why use them in your garden when you can use a DIY tomato cage that's better for your plants instead? Wire cages can also be purchased for under four dollars a pop at home improvement big box stores if you don't have any at home.
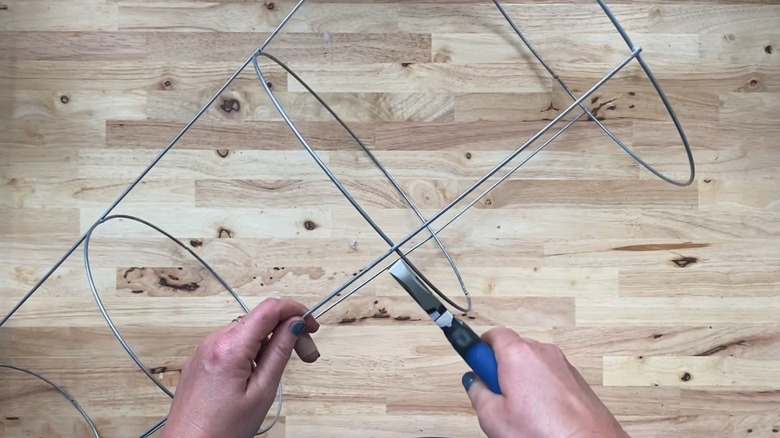
There are so many stylish ways to decorate with baskets, so make this project your own. If you don't want any of the silver from the cage to be visible and are going for a super colorful basket look, you may wish to paint the cage a bright color. You can also paint it a neutral color, such as black or white. That is the beauty of DIY projects: You are in charge. Using a wire cutter, cut away the top of the cage, leaving two circular rings with the uprights between them. Now that the cage is prepared, it's time to get busy "weaving" your basket.
Wrapping your tomato cage in yarn
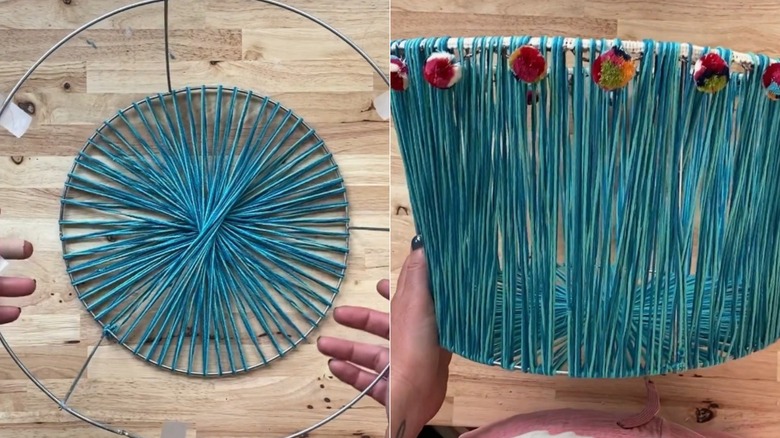
Select your yarn and roll it into a tight ball a little larger than a golf ball. Start with the bottom. Put the cage on a table with the smaller ring on top. Using the yarn ball, tie off the yarn on the ring where one of the uprights joins the ring. Then, take the yarn straight across to the opposite edge of the ring. Wrap the yarn around the ring and take it back to the other side of the ring, crossing the middle of the opening. Repeat this process, placing the yarn about 1/2-inch to the side of the previous loop using a kind of figure-eight weave, always crossing the middle, until you've woven the bottom of the basket. Tie off the yarn.
Now for the sides of the basket. Before you get started with the yarn, you might want to glue a thin strip of fabric or ribbon around the basket's top ring to cover the uprights' sharp edges. The rest of the process is essentially the same as making the bottom of the basket, simply wrapping yarn vertically rather than horizontally. You'll need to squeeze your yarn ball between the strands of yarn on the bottom. Slide the strand over if it is difficult to get the ball through, then slide it back in place. If you run out of yarn, simply create another yarn ball and tie the two pieces together. Continue until you've closed in the basket, tie off the yarn, and you're done — unless you want to add decorative accents.
Here, you can let your imagination run wild. Weave some differently colored yarn or ribbon around the basket horizontally. String wooden beads on the added yarn, or create fringe out of strips of material, other types of string, or specialty yarn.