Yes, You Can Spray Paint Your Walls And Ceilings — Here's How
We may receive a commission on purchases made from links.
When it comes time to paint the interior of the home, most people automatically assume they should grab a paintbrush and roller, but they rarely consider using spray paint on the wall or ceiling. But spray painting is a much faster and easier process than applying paint with a brush or roller —and with the equipment readily available at paint centers and home supply outlets, there's no reason to avoid it. You'll simply need to rent or buy a handheld airless sprayer and standard interior paint, which means you'll have just as many options as usual in terms of color and sheen. Just like any paint project though, there's a fair amount of prep work required to protect the surfaces you don't want to paint. These handy tips can help you prepare to paint your walls and ceilings like a pro.
Paint Sprayer Pros and Cons
Paint Sprayer Pros and Cons
Pros
- Quick paint application
- Smooth finish
- Better coverage on textured surfaces
- Easier cleanup
Cons
-
Takes more skill to get it right
-
You'll need to wear a respirator
Some of the advantages of spraying your walls and ceiling instead of brushing or rolling them include:
- Faster paint application, so the job takes less time
- A smoother finish with no brush or roller marks
- More complete coverage on textured surfaces
- Easier cleanup
Spraying does have its downsides, including the fact that it takes a certain amount of skill to do it right. Most people can acquire that skill very quickly, however, and once you get the hang of it, spraying is a fun way to paint. You also have to assiduously cover everything you don't want painted — including yourself — and you need to wear a respirator.
Choosing a Paint Sprayer
Choosing a Paint Sprayer
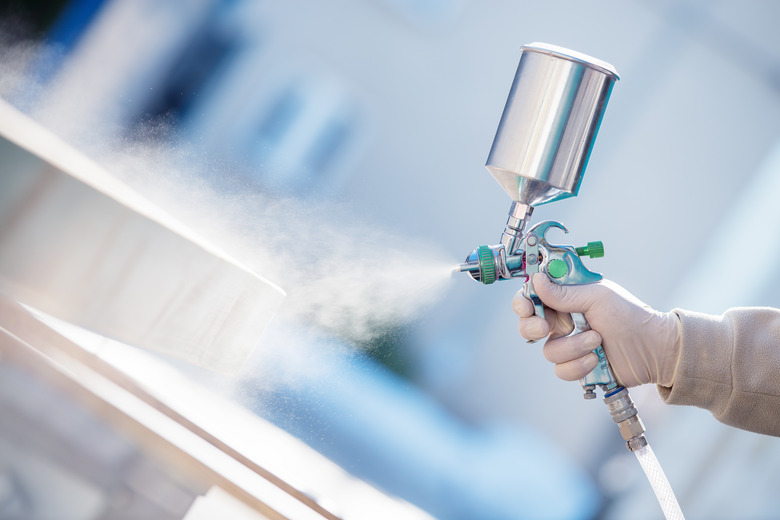
The type of spray gun you need to paint walls and ceilings isn't the air-compressor-powered high-volume, low-pressure (HVLP) gun that refinishers use to paint furniture or automobiles. An HVLP gun mixes paint with air to create an aerosol spray, which works great in a controlled painting environment, like a spray booth, but is far too misty and diffuse for interior walls. The gun you need is a handheld airless sprayer; it creates the spray by the action of a pump forcing paint through a small aperture.
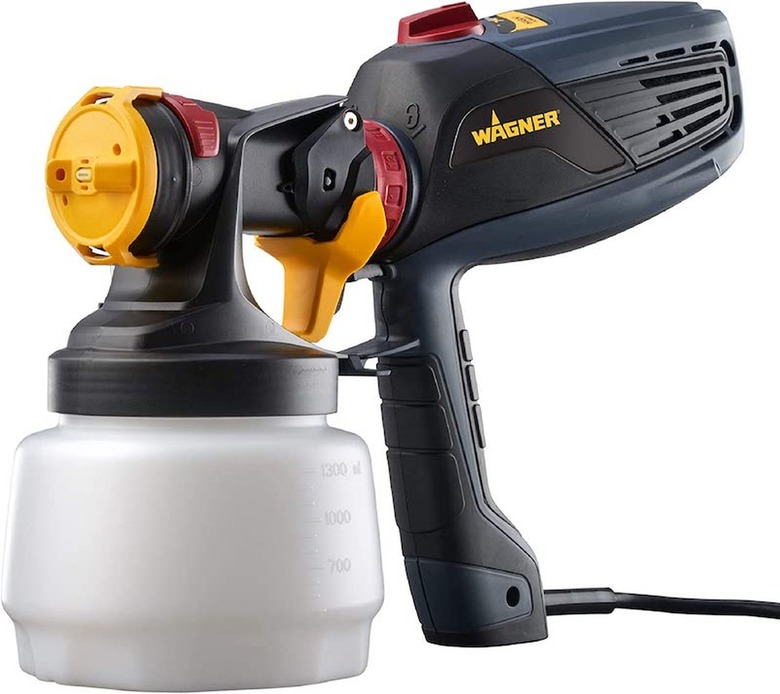
Several manufacturers make handheld airless sprayers, and the two most popular brands are Graco and Wagner. Both companies offer corded and cordless sprayers. Cordless sprayers offer more freedom of movement but be sure to check the product specifications because some cordless sprayers are designed for just staining, not for regular painting. Whether you go for corded or cordless, make sure the sprayer comes with a nozzle that can handle interior water-based paint without clogging or spitting. Most do.
One of the disadvantages of a handheld sprayer is that the paint reservoir only holds a quart, so it has to be refilled frequently. If you're doing a lot of painting and you want to avoid having to do this, choose a standard airless sprayer, such as the Graco Magnum. This sprayer (and others like it) has a stationary pump that straddles a 1- or 5-gallon paint can and a nozzle attached to it by a length of pressure-resistant hose. You can also use a model that has a 1 1/2-quart reservoir, such as the Wagner Flexio.
Selecting Your Ceiling and Wall Spray Paint
Selecting Your Ceiling and Wall Spray Paint
Most handheld airless spray painters can handle any type of interior water-based paint. Some will even spray these paints straight out of the can, although a small amount of thinning may be necessary if the paint is old or if you're using super-thick masonry paint for basement walls. You can also use your sprayer to spray drywall primer; acrylic enamel for interior woodwork; and even solvent-based paint for an exterior wall, exterior trim, and woodwork.
It's always worth checking the product specifications before you purchase a sprayer to make sure it can handle the type of paint you're using. Some cordless models are designed only for stains and very thin paints, and some models require you to purchase an optional nozzle for latex paint, although that nozzle is usually supplied with a quality sprayer. Once you're sure you don't have to worry about whether the sprayer can handle it, choose the best paint color and sheen needed for your home improvement painting project.
What Else Do You Need?
What Else Do You Need?
The biggest problem confronting homeowners doing their own spray painting is overspray, and most of the extra materials you'll need apart from supplies for cleaning and fixing walls prior to painting are drop cloths, painters' tape, and masking paper. When it comes to drop cloths, it's worth a few extra bucks to purchase canvas ones because they'll stay put without tearing, and the overspray will be absorbed into the material rather than forming a film of paint that you can step in and track around the house.
You'll need masking tape to cover woodwork, windows, countertops, and other built-in features you don't want to paint, and you'll also use it to form straight transitions between walls you paint different colors. Choose a top-quality brand, such as 3M Scotch Blue or Frog Tape, to ensure it seals well but won't pull paint off the wall when you remove it. Use it with good-quality masking paper to cover large areas, like windows, countertops, and floors near baseboards, or purchase pre-taped masking paper for these surfaces.
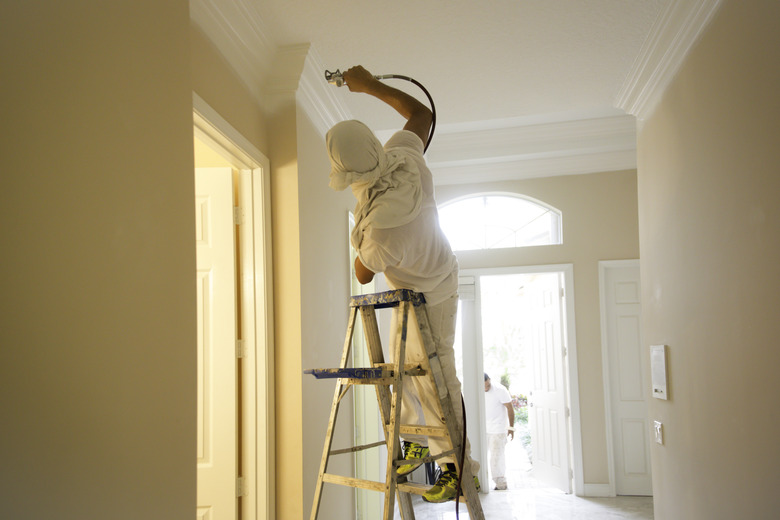
When it comes to reaching the ceiling and the top of walls, you have two options. One is to purchase a ladder, and a lightweight 6-foot aluminum ladder is the best choice because it's easy to move around the room and will give you the height you need without bumping into low-hanging lights or architectural features. The other option is a gun tip extension pole. It screws onto the gun nozzle and gives you 30 extra inches of reach. Finally, you'll need a paintbrush and possibly one or more paint rollers to take care of drips and areas of uneven coverage. Professional painters use back-rolling as a technique to add a surface texture to the painted surface.
How to Spray Paint Walls and Ceilings
How to Spray Paint Walls and Ceilings
As you do when brushing or rolling a wall, you have to clean the walls before you use a spray paint gun, and you may need to scrape loose paint, fix holes with putty, and sand the putty flat. If surfaces have a glossy finish, you should dull the finish by sanding or using a liquid de-glosser to ensure the new paint will stick. Once the walls are clean and dry, you're ready to start.
1. Get the Room Ready
Move all furniture away from the walls. If you can't take it out of the room, move it all to the center of the room and cover it with a drop cloth while you cover the floor with more drop cloths. Open one or more windows for ventilation and close the doors to keep overspray out of other rooms. It's not a bad idea to hang plastic film in the doorways to protect the doors from overspray.
2. Mask Off What You Don't Want to Paint
Remove all electrical cover plates and apply masking tape over exposed switches and receptacles as well as on window and door casings, baseboards, and other trim and moldings in the room. Try to make clean lines at the edges of moldings; the final look of the paint job will depend on how carefully you do this. Use masking paper to cover large surfaces and the edges of the floor near the baseboard. If you're painting one or more walls — perhaps an accent wall — different colors from the color you're spraying first, you don't need to mask them off just yet. You'll do the masking when you spray the second color.
3. Get Yourself Ready
If you aren't wearing painting clothes, now is the time to put them on. Your outfit should ideally include a shirt with a hood to protect your hair from overspray but you can also wear a hat. Put on a respirator and a pair of goggles.
4. Thin the Paint if Necessary
Put some of the paint in the sprayer reservoir, take the sprayer outside, and spray a test surface to make sure you have a good spray pattern. If the paint spits or doesn't make a full pattern and you need to thin it with water or a solvent, thin all the paint at the same time to avoid having to do it every time you fill the reservoir. Pour the paint into a 5-gallon bucket, add about 10 percent water or solvent, and then spray again. Add more thinner as needed.
5. Spray Primer and the First Color
If you're painting unpainted drywall, spray the entire room with PVA drywall primer and then follow this with the first-color coat. You don't need to spray surfaces that will be a different color but don't worry if they get paint on them because you'll cover that with the second color.
When using a sprayer, keep the tip of the nozzle 3 to 6 inches away from the surface you're painting and keep the sprayer moving in a vertical or horizontal direction, overlapping the leading edge of the fresh paint by about 50 percent of the spray pattern. Keep a brush or roller handy so you can smooth out drips as soon as they occur. You can spray right up to the edges of the taped areas — no cutting in is necessary.
Tip
One of the advantages of using an airless paint sprayer is that you don't have to wait for the first coat to dry completely before spraying a second coat of the same color. After painting a wall or a section of the ceiling, go back over it, moving the sprayer in the direction perpendicular to the original direction. This creates a crisscross pattern and helps eliminate streaks.
6. Paint the Second Color (as Applicable)
Give the first coat several hours to dry completely and then lay masking tape and paper along the edges of the areas you want to spray a different color. Lay the tape as straight as possible to get a good, clean line and extend the coverage with masking paper to cover at least 4 inches of the area that receives the first color. Spray the second color when the masking is complete and then wait for the paint to dry before removing the tape and masking paper.
7. Clean Up the Sprayer
The final, crucial step in any paint job for which you use a sprayer is to clean the spray gun thoroughly. Pour unused paint back into the container and then fill the reservoir with water or solvent and spray it through the nozzle until it runs clear. If you don't want to take the gun outside, point it into a 5-gallon bucket while you do this. Finally, disassemble the gun and soak all the parts in clean water or solvent overnight.