

Empty Milk Jugs + Some Cement = Adorable DIY Garden Decor
We may receive a commission on purchases made from links.
The next time you finish a gallon of milk, you might want to hold onto the jug. These plastic containers don't look like much, but they could help you make the most adorable stone decor for your garden. On TikTok, krystleconfusesherself demonstrated how the plastic from milk jugs can be repurposed to make a custom mold for the cutest ladybug stepping stone. By cutting the jugs into plastic rings of different sizes and adding wood supports, the DIYer created a shaped mold durable enough for quick-setting cement or concrete mix. Rather than spending money on a unique stone mold to add whimsy to your garden, this project allows you to upcycle old plastic containers for free.
While many projects use veggie trays as a simple Dollar Tree kitchen find to DIY stylish pavers on a budget, milk jugs allow you to get the perfect shape for this themed garden decoration. To keep this project budget-friendly, Home Depot sells a 60lb bag of Quikrete for about $5. Cement stains, like Quikrete liquid cement color (about $10 at Home Depot), will work wonderfully for painting your ladybug stepping stone black and red. However, outdoor acrylic paints can also be used to bring your character to life. This smart way to reuse milk jugs could also help you to craft other garden critters, like a bee, since the plastic can be manipulated into various shapes. When you're finished, the upcycled plastic mold can be thrown away for easy cleanup.
How to make a ladybug mold with milk jugs
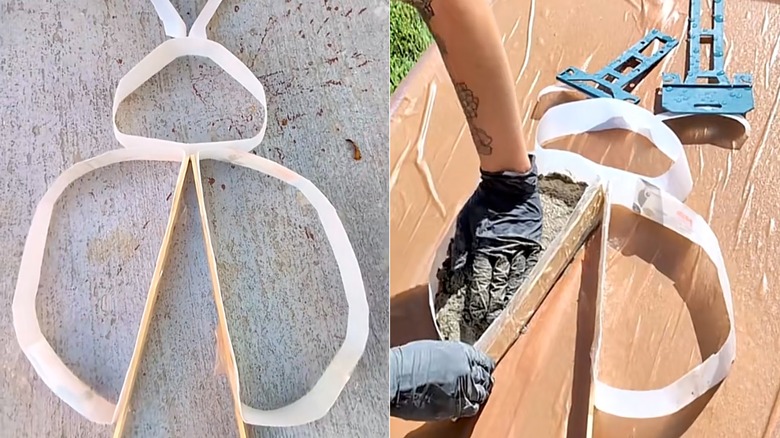
To create the head, body, and wings of the ladybug, the DIYer used three plastic rings cut from milk jugs, as well as a smaller strip of plastic. One ring will make the head and should be a smaller oval, while the other two should be identical to create the wings. The smaller strip of plastic will close off the space between the wings to form the body. A pair of scissors will be the easiest tool for cutting the milk jugs.
Once you have all of your pieces, arrange them on a board covered with plastic wrap to make the ladybug mold. Set the two wings at an angle so that the tops touch, creating an empty triangular space between them. Place a thin, rectangular plank of wood against the inside of each wing to give it a semicircle shape with a flat side. Add the strip of plastic between the wood, curving it and forming the ladybug's circular body.
While the DIYer tried to incorporate little antennas atop the ladybug's head, they fell off, and her final project didn't include them. To make other shapes besides this insect, get creative. Use objects like rocks or homemade wooden frames to hold the plastic milk jugs in the perfect design for your stepping stone decor. Once the mold is ready, mix the cement according to the package directions, and pour it into your ladybug form.
Tips for creating a cement ladybug stepping stone
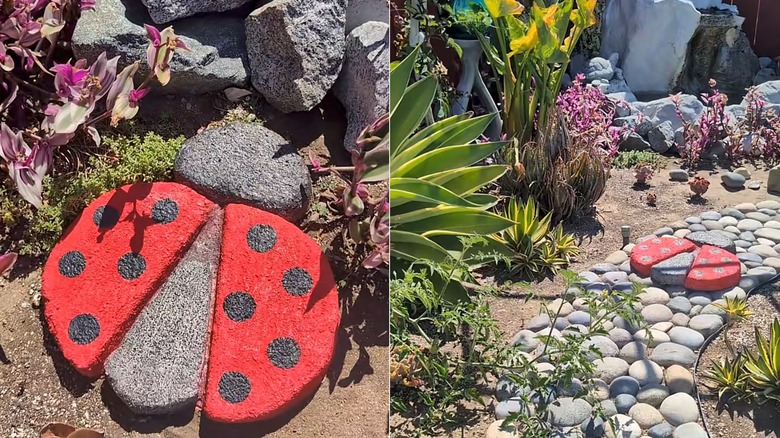
To craft an even sturdier stepping stone, place pieces of hardware cloth or chicken wire in the middle of the mold, adding more of the stone mixture on top. While the cement is still wet, carefully pull the mold out. Now, use water to smooth and join the sections of the ladybug.
After the cement has dried, you can paint your ladybug. Mix a stone stain with water according to the directions and paint it onto your garden decor. Otherwise simply brush outdoor paint over the stone. Consider additional features like giving your ladybug a face or arranging its dots in a fun pattern. Alternatively, decorate the stone bug with yellow and black instead to make a bee. If you're concerned that the weather will harm your garden pal, seal the stone after the paint or stain dries.
Set your cute little ladybug in your garden, on your patio, or along the path in your backyard. Otherwise, consider making several ladybugs and creating a walkway of adorable stepping stones. If you want a simple way to make more friendly creatures for your outdoor space, you can transform a bowling ball into adorable garden decor.