

Transform A Bowl And Cup Into A Cute Mushroom-Inspired Plant Stand
We may receive a commission on purchases made from links.
Don't head to the store just yet — your next piece of household decor might already be in your kitchen cabinet. If you've been looking for a unique way to display your plants, it turns out that you just need a bowl and a cup (along with a few art supplies) to create a whimsical plant stand that looks like an adorable mushroom. All you have to do is set a potted plant onto the mushroom's cap, and it'll elevate it in the cutest way. To get a better idea of what the stand will look like, start thinking storybooks and classic video games. We're talking about the fly agaric mushroom, that one famously known for its red-colored top that is covered in white dots. By painting the bowl and cup, you can easily recreate the fly agaric's features.
The DIY is affordable even if you need to purchase all of the supplies. When YouTuber Timm Sevitz shared the project online, he used plastic kitchenware from Target. For example, Target's Room Essentials Cereal Bowl and Room Essentials Tall Tumbler are 50 cents each, and you can find suitable options at Walmart and other stores. The other materials needed are a white primer (like this Reeves Liquitex Basics Acrylic Gesso), acrylic paints, Mod Podge, and a heavy-duty adhesive like E6000. Keep in mind that it's possible to make adjustments to the supply list if you end up having a different vision for your mushroom. The main concept, however, will remain the same.
How to make a mushroom plant stand that's oozing with charm
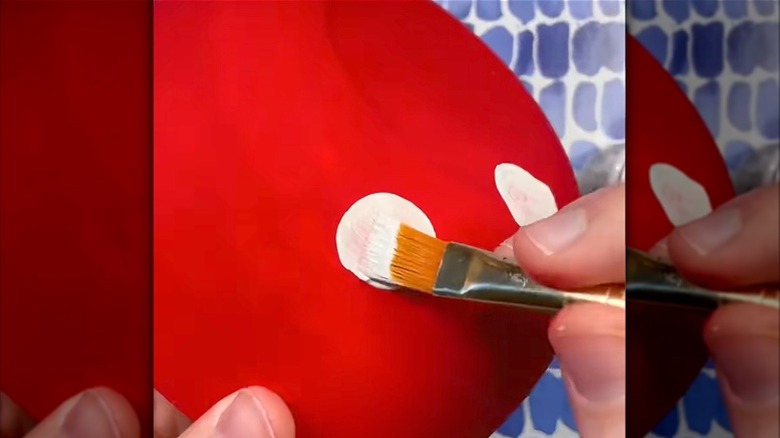
Begin by removing the stickers from your dishware and cleaning it well. If it's plastic, rough it up using a piece of sandpaper to give the primer and the glue a better surface to hold onto. Paint the outside of the bowl with a white primer (which will help the acrylics adhere better). Now, go over the bowl with a couple coats of red paint. Once dry, create large, white dots all over the cap, an easy step if you make a paper stencil for the circles beforehand or use a round sponge brush to stamp the circles on the bowl. You could even look at imagery online if you need some inspiration! Set the bowl aside and move on to the plastic cup.
Update the color of the cup if it doesn't look very mushroom-like (it'll be the stem). For instance, you could paint it white, cream, or tan. After both dishes are dry, apply an adhesive appropriate for the material to the bottom of the cup. If the plastic is hard to glue, as is common with materials like polypropylene, you may want to consider using an adhesive bonding primer first to ensure a strong, long-lasting hold. Glue the inverted bowl on top of the upside-down cup, and it'll become a mushroom with fairytale vibes. Use a foam brush to cover it with a layer of Mod Podge as a final touch to give it an attractive and protective sheen. Let the piece rest overnight so the glue has time to set.
Set up your DIY mushroom plant stand
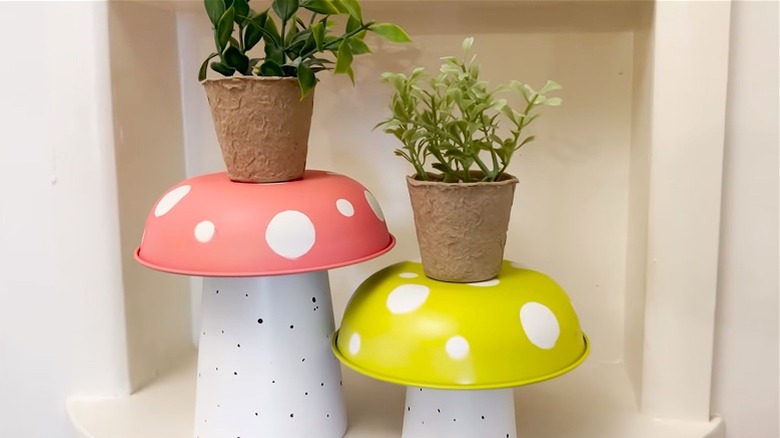
Place the mushroom in a spot that would be ideal for your favorite plant (like on a kitchen counter or deep window ledge). The plant's marker will likely reveal what type of lighting it prefers — such as direct or indirect sunlight. Use the mushroom to hoist the plant up, and they'll be quite the adorable duo. Just make sure that the plant isn't so heavy that it topples the piece over. Add to the whimsy by creating multiple stands of different sizes. Cluster them together, and it'll be like a quirky countertop garden. You could even sprinkle in fairy or gnome figurines.
Feel free to use glass dishware for the project instead of plastic. The key is to flip the bowl over to see if it'll fit the cup well while also resembling a mushroom and to use a strong glue that can bond glass to glass, such as clear epoxy or construction adhesive. Paint the glassware with the iconic design, or keep it clear for an alternative look. Wish it was a glowing outdoor plant stand? You could try attaching mini lights, such as LUXPRO Waterproof Micro LED Puck Lights, to the cap's underside to further enhance the magic at night (just be sure to nestle the mushroom's stem into the dirt so the piece remains stable).