

Cover Plastic Plant Pots With Clothespins To Create Countertop Storage With Vintage Charm
No clothes line? No problem! We have plenty of project ideas for clothespins — like transforming clothespins into adorable floral decor. The inexpensive little wooden clips are versatile for so many projects. Sandy from Whimsy Barn used the old-fashioned straight clothespins with a slit to decorate the outside of a container with a picket-fence-style vintage accent. She used twine to connect a row of the clothespins and then tied them around her container. This idea is the perfect way to dress up old plastic pots and give them a new life as countertop storage.
Most homes have the spring-style clothespins, which have been around since the late 1800s, even if it's just for random duties, like holding chip bags closed. But this project calls for the straight, spring-free clothespin style — they were the early version of clothespins, often carved by hand at home. Don't worry: There's no whittling involved in this project. If you don't already have these doll-style or peg-style clips, you can either thrift them or buy a new pack — these Jianwei Round Wooden Clothespins work.
The other main item you'll need is a roll of thin twine, but you can use yarn or another string-like material instead. The original creator ties the clothespins in place, but you can also use hot glue to help secure the decorations to your pot — thin plastic could melt from the heat, though, so use caution. When choosing a pot for this decoration technique, look for something roughly the same height as the clothespins so they cover it completely. Also, keep in mind what type of container would work well as extra kitchen storage. You can spray paint the container first or cover it in fabric to dress it up.
Wrap a plastic pot in old-fashioned clothespins
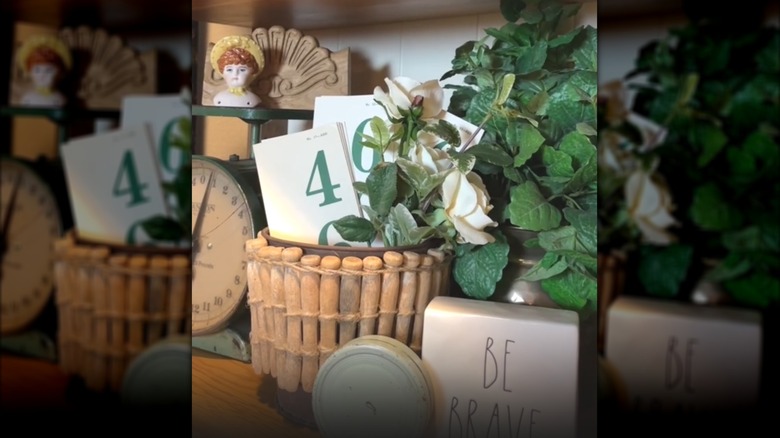
There are plenty of genius ways to reuse old plastic pots around your garden, but this clothespin decoration idea turns those basic pots into cute vintage indoor storage. Start by decorating the clothespins if you want to update them. Since the clothespins are made of wood, staining them is an option. You still get the wood effect but in a slightly different shade. If you want more color, a coat of paint does the trick. You can also wrap the clothespins in yarn, fabric scraps, or twine to incorporate texture — just make sure the slits remain open as you'll use those to tie the clothespins together.
To start your chain of clothespins, slide the end of a long piece of twine up through the slot and tie it in a knot at the back of the clothespin. Grab the next clothespin and slide the twine up through the slot, but wrap it completely around the outside of the clothespin this time. Repeat with the rest of the clothespins, sliding each one next to the previous pin. Then, repeat with another piece of twine, wrapping it around the pins a little lower. This creates more stability. You can also wrap twine around the top parts, just below the enlarged head portion.
The original creator put painter's tape over the clothespins to help secure them as she lifted them and wrapped them around the container. Then, tie the ends of the twine tightly to secure the clothespins around the container. Add a few dots of glue if necessary to keep them from shifting. You can add bows, faux flowers, twine spirals, and other accents to dress up the look if desired.