

Don't Toss Empty Egg Cartons — One DIYer Turned 100 Of Them Into An Impressive Bookshelf

If you have a huge stack of empty egg cartons, it may seem like you'll never complete enough DIY projects to use them all. But what if those waffled cardboard cartons could become furniture with useful storage? In a series of TikTok videos, TikToker sydsfabshop found a smart way to use empty egg cartons to create a gorgeous, cave-like bookshelf with smooth, curved features. With around 100 egg cartons, the DIYer made paper mache to cover her custom wooden structure. This project may be a bit labor-intensive and time-consuming, but it creates a beautiful freestanding set of shelves with multiple cavern-like spaces to store your books or decorations.
To build this unique, asymmetrical bookshelf, you'll need other supplies to craft the structure. The DIYer used pieces of plywood, as well as wooden planks, as a sturdy base for the furniture. However, you could use wood pallets to DIY a bookshelf for more budget-friendly lumber. The curved sides and backings of each shelf were constructed with wood, cardboard, and scrap building material.
To get that smooth curved shape, the DIYer used expanding spray foam, thin foam sheets, and tape. While this bookshelf base is a lot of work to build, it will support heavy books and decorations. For a simpler DIY, modify a thrifted bookshelf with cardboard to create the base for your egg carton paper mache. You can craft the bones of your bookshelf entirely from cardboard and hot glue, though your furniture likely won't be as sturdy.
Crafting the framework for an egg carton bookcase
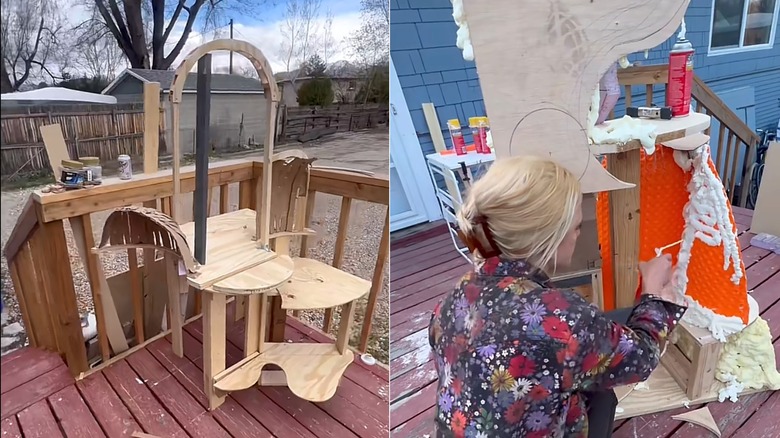
First, Sydsfabshop planned out the design of her storage and cut out pieces of plywood to form the flat bottom of the shelves where the books will sit. With wooden planks, she created legs for these pieces to set the height of the different shelves. A drill and screws would be a simple and efficient way to connect the wood pieces. Because of the large size of the furniture, the DIYer made three separate wooden structures.
@sydsfabshop Lots more to do, but i got a great start on this today! #workprocess #theotherartfair #foryou
Then, the DIYer formed arches around the shelves to create the cave-like openings. She added two wooden supports attached perpendicularly to each taller shelf to form the sides of the archway, placing a rounded piece of wood or cardboard on top. To enclose the arches around each shelf, the DIYer attached strips of cardboard or scrap material, forming the curves. A strong adhesive will help to attach these components.
To further fill out the shape and secure the pieces together, Sydsfabshop sprayed expanding foam sealant over the structure. This allowed her to create more dramatic, thicker curves. Then, she covered the entire structure in pieces of foam sheets and packing tape for a smooth, rounded finish that's ready for paper mache. If this is too complicated, you can add rounded features to a regular bookshelf. With an old or thrifted piece of cubby furniture, wedge pieces of cardboard into the cubes to outline your curves. Otherwise, cut the structure of your shelves from cardboard, hot-gluing the pieces together.
Upcycling the egg cartons into the cave bookshelf
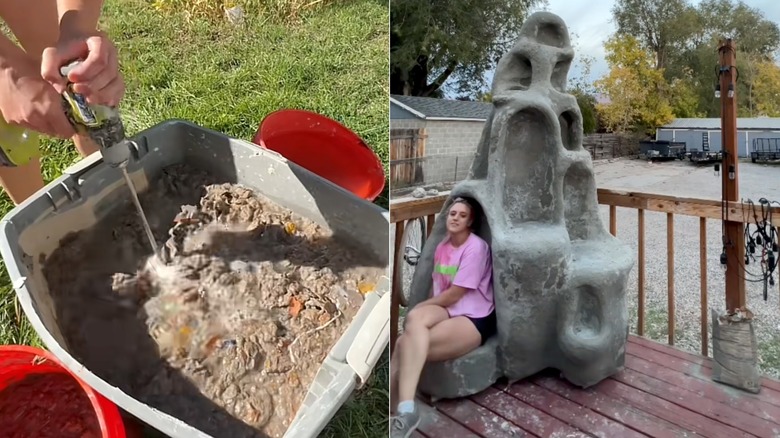
Once you have crafted the structure for your paper mache, you'll need to process your egg cartons. Just like how you can turn egg cartons into stylish countertop storage bowls, making paper mache with the cardboard cartons will help you form a hard surface for your bookshelves. Sydsfabshop placed ripped pieces of cardboard egg cartons into a large plastic bin with water. Using a drill with a long attachment, she blended the cardboard and water into a slush. Then, she mixed in white glue to create the paper mache. Mod Podge will also work to hold the paper product together. Before adding your glue, it's important to squeeze out the water from the cardboard.
@sydsfabshop Only a few more sessions and ill have the topcoat on! This has been an exhausting process—i make the papermache cement in small batches (because cement dries super fast). I press small chunks on at a time, massaging them into other sections. With my typical paper mache, i apply tons of thin layers—with this, im applying one super thick layer. And its all an experiment! Theres no guarantee this will be the weatherproofing i hope for. Excited to see this done. #caveshelf #artprogression #artprocesscheck #flowstate
Finally, the DIYer slathered her entire bookshelf structure in the egg carton mixture. Press and smooth the paper mache against the base to create the shape of your shelves. This will likely need to be done a few times. Allow each layer to dry and harden before adding more. If you want an even stronger, stone-like bookshelf, stir a bit of cement mix into your egg carton paper mache and use this mixture for the final coats.
Once it's finished and dry, sand any rough or uneven spots on the paper mache. If you don't like the color of the upcycled egg carton finish, paint your bookshelf before adding books and decor. Set your homemade furniture in your living room for a gorgeous yet functional accent piece.