

Recreate Joanna Gaines' $170 Fall Tapestry With A Simple Dollar Tree Hack

Joanna Gaines is in her moody, vintage girl era — and the Magnolia wall art collection is reflecting that, with three dreamily distressed paper tapestries. But pieces from the HGTV star's Magnolia store can be pricey. The Oversized Enchanted Forest Tapestry is currently on sale and still costs $170. (Normally, it's a whopping $229). If you love the look of Gaines' style but her artwork is out of your budget, there's a fun trick to DIY your own version. Shannon from The Daily DIYer YouTube channel posted a Dollar Tree DIY to make stunning wall art on a budget that resembles Gaines' autumn forest tapestry. The hack? Use Dollar Tree broom handles as tapestry rods and attach them to a large printed forest scene to recreate the look for less than $30.
Of course, you can buy metal rods, but the Essentials Black Plastic Broom Handles are just $1.50 each. The DIYer sourced a digital print of a forest scene from Etsy for less than $3 and went to Walgreens to print it out. This is the most expensive part of the project, but you can typically find coupons for their photo center online. Stores like Staples and UPS can also print large posters. You can also find other options for inexpensive illustrations. Print your own photography or artwork, or browse thrift stores for inexpensive framed images you can repurpose.
In addition to the broom, you'll need a miter box and saw for cutting the broom handles. A heat gun helps remove the ends of the rods, and a hot glue gun (or another strong adhesive) is needed for securing the artwork to the makeshift tapestry rods. You'll also need a string hanger, jute rope, hardware, and power tools to display the finished product.
Crafting a DIY version of Joanna Gaines' forest tapestry
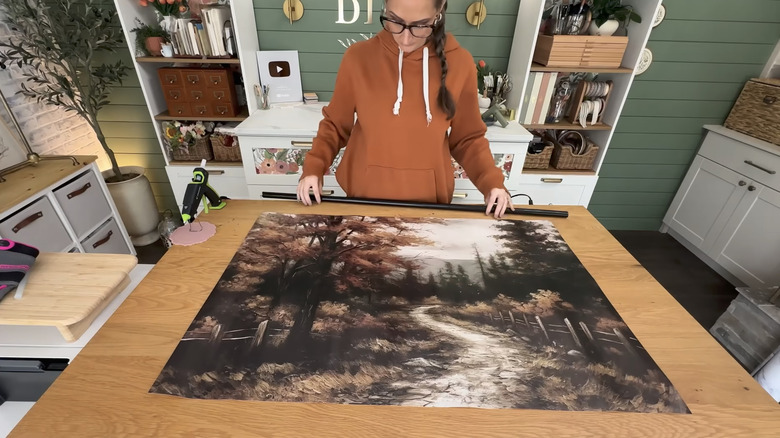
While Gaines' decor is listed as a tapestry, the wall art is made from paper rather than fabric, making The Daily DIYer's version pretty close. To get a similar style and color scheme to Gaines' artwork, Shannon chose this Autumn Woodlands Print. After picking up the custom poster, she rolled it in the opposite direction from how it was packaged. This helped to flatten the curved paper. Alternatively, you could lay out your artwork on a table and place books on top. You want to ensure the print is completely flat before attaching the rods to prevent unwanted ripples.
A lot of wall art projects focus on transforming ornate old frames into wall decor – in contrast this broom handle trick has a simple yet elegant look. To begin making the tapestry rods, the DIYer removed the handles from the ends of the broomsticks using a heat gun to loosen them. She made a hole in the metal rods using a hacksaw and then cut them with metal snips. You could also use a pipe cutter or a metal saw to carefully cut through the rods, and then snap the pieces apart.
Shannon trimmed the poles longer than the poster so there would be a few extra inches on each side after the print was centered. Gaines' frame stops at the edge of the print, so if you want the same look, consider cutting your broomsticks shorter for less overhang. To cover the cut ends, the DIYer used Wooden Candle Cups from Hobby Lobby, painted them black to match the rods, and secured them with hot glue.
How to assemble and hang your DIY autumn wall decor
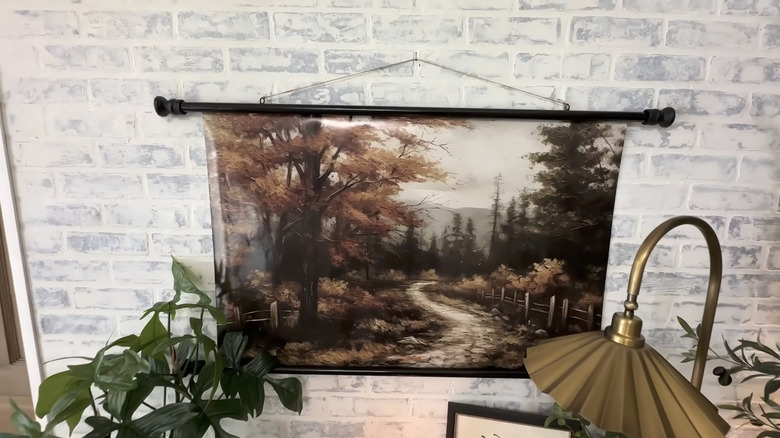
To complete the Joanna Gaines dupe tapestry, The Daily DIYer hot-glued one broomstick along the top of the poster and the other along the bottom. Hot glue dries quickly to prevent anything from slipping out of place, but other strong adhesives like E6000 would also work for this DIY. If you want to get a similar crackled effect to the Magnolia tapestry, you can also experiment with applying a layer of school glue and translucent crackle paste. Once the rods are secured to the poster, Shannon added a basic string hanger. While Gaines' fall forest tapestry doesn't include this feature, other artwork from Magnolia does, like the Hand-pressed Herbarium Tapestry.
On each side of the top tapestry rod, the DIYer drilled a very small hole 5 inches from the artwork's edge. Then, she screwed an eyelet hook into each. By tying a piece of jute between the hooks, she created the cute, rustic tapestry hanger. Twine would give the same effect, though any string will work. If you don't want the string hanger, create two holes in the back of the rod, to slip onto picture-hanging nails. Hang your DIY wall art in your living room or bedroom to bring fall vibes into your home. This simple decor recreation can also help fill empty space on a gallery wall for an easy DIY accent wall project.