

Upcycle Old Bath Mats And Cardboard Into A Beautiful Basket To Store Blankets
We may receive a commission on purchases made from links.
Why buy baskets for your home when you could make them? Hand making your own baskets using recycled materials is easier than it looks, plus it is eco-friendly and gentle on the wallet — because let's face it, baskets can be surprisingly expensive. Making your own baskets also lets you customize the size, color, and style. When you have a bit of free time, try out this DIY project by HomDecor.Diy on TikTok for a simple way to make a beautiful and functional basket reusing old household items you probably already have lying around.
You will need a handful of simple supplies to complete this clever DIY storage project. To get started, gather up a bath mat, a cardboard box, four squares of cardboard, a medium-weight hemp rope, a hot glue gun (with glue), small wooden dowels, yarn, and fabric in a pattern you love. Once it is complete, blankets can be folded and stacked inside.
For this project, a standard, fabric bath mat won't work well. Instead, what you want to look for is a slatted PVC or foam mat, the type typically used in the shower or under a rug to help provide grip. A heavy-duty shelf liner, like the ALIUNI Shelf Liner on Amazon for $15, would also work for this DIY, provided the design has slats and grooves — a feature that will be important for a later step. Once you have found an appropriate bath mat for this project, you are going to cut it down to size.
Building the base of your DIY basket
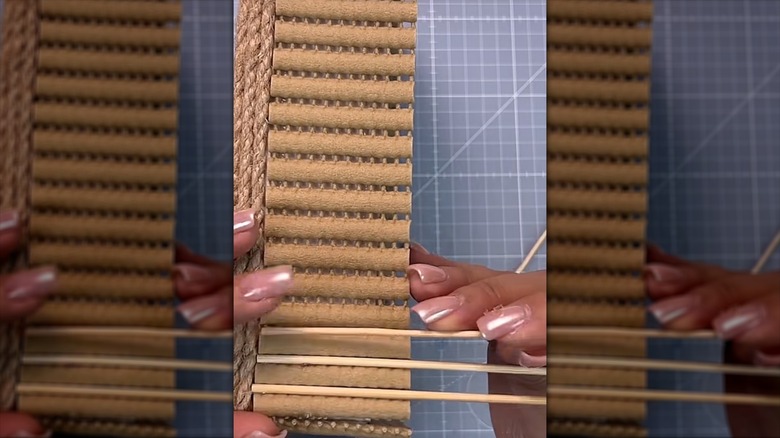
In the original DIY, the mat is cut so that it is a couple inches wide and long enough to wrap all the way around the box. You will want to make sure you cut your mat so that the slats run vertically across the width, not horizontally down the full length of the mat. This is also a good time to cut your chosen box down to size as well. For this project, you will want to choose a box that is the size you want your finished basket to be. The box needs to be cut so that each side is a few inches tall. Once it is cut, set aside the cardboard scraps to use later in the project.
@homdecor.diy Part 1/2. Basket made from a bath Mat #diy #craft #homedecor #diyidea
Now that all of your pieces are cut to size, it is time to put everything together. Step one is to use hot glue to attach a medium-weight hemp rope to the bottom of your box. In the original DIY, the rope is wrapped three times. If you don't like the heavy look of thick rope, simply choose a thinner hemp or twine and wrap it around a few more times, or use another material like chunky yarn, felt, or a wide velvet ribbon. You could even skip this step entirely and bring the bath mat you will be placing later all the way down to the base.
Once the rope is secure, use your chosen fabric to line the inside of your box. You can find quality, affordable fabric at most craft stores, like Eugene Textiles' stripes print craft fabric for $3 per yard at Michael's. The original DIY uses hot glue along the edges of the box to hold your fabric in place, but another glue like spray adhesive or thinned-out Elmer's would do a better job of keeping the fabric flat and smooth. Once the fabric and the rope have been glued down, it's time to adhere the bath mat to the top portion of your box base, just above the rope. The slat design should be running vertically like fence posts all the way around.
Putting it all together
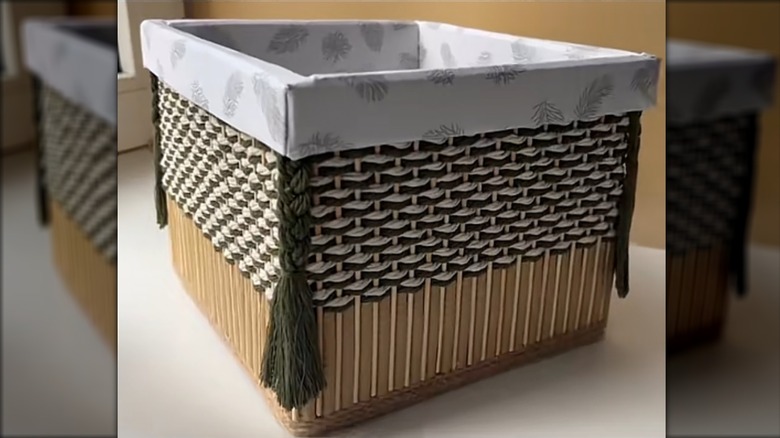
Once you have covered the side of the box, it is time to glue thin dowels into the grooves between each slat of the mat. When they are all glued down, measure how high you want your finished basket to be, then cut the dowels to that height. The original DIY uses yarn to weave between the dowels and build up the sides of the basket. You could also use strips of fabric, more hemp rope, or even recycled materials like plastic bags. Keep weaving until you reach the top of the dowels, then finish it with a dot of hot glue and turn your attention to the inside.
@homdecor.diy Part 2/2. Basket made from a bath Mat #diy #craft #homedecor #diyidea #crochet
To complete the inside portion of your basket, you will need four pieces of cardboard, each cut so that they will slide flush against the interior walls. The discarded sides of your box will work well for this, provided you didn't make your basket taller than the original box and you cut them cleanly. Each of the side pieces should be about 1 inch taller than the top of the basket because you will be folding them over to create a rim. Two of the sides should be cut with tabs on the top that should hang over the side and will be used for creating the rim.
After the cardboard has been cut, wrap each of the pieces with the same fabric you used to line the inside of your basket. Then, slide them into the basket and fold down the top. The tabs you made should interlock with the pieces that don't have tabs, creating a seamless rim. Finally, using more yarn, make four braided tassels. Glue these to the outer corners of the basket, fill it with your favorite blankets, and you are done! Once you've finished, this beautiful basket will work great as an easy and stylish way to store blankets.