Give An Old Wooden Salad Bowl New Life And Turn It Into A Gorgeous Light Feature
We may receive a commission on purchases made from links.
There it was on Instagram ... a woman converting a wooden salad bowl into a cool little lamp. She didn't use fancy tools or techniques and yet built a beautiful lamp that worked great just the same. You may think that it would bug me, an expert woodworker, to see influencers, amateur woodworkers at best, crank out a really neat project that relies on minimal skill and even less effort. Not true! In fact, when I saw the video, I couldn't wait to try this clever innovation out myself.
Lamps have always kind of been "my thing." I've made scores of them over the ages, from desk lamps to wall sconces to freestanding floor lamps. I usually end up giving them away — I mean, how many lamps does one household need? (My answer: one more, this one.)
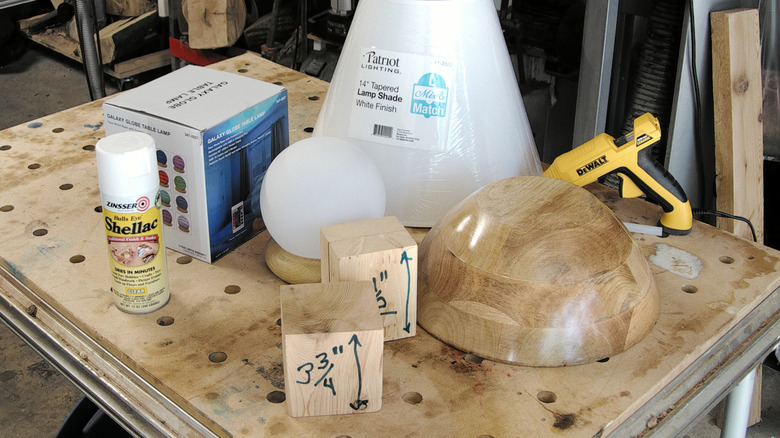
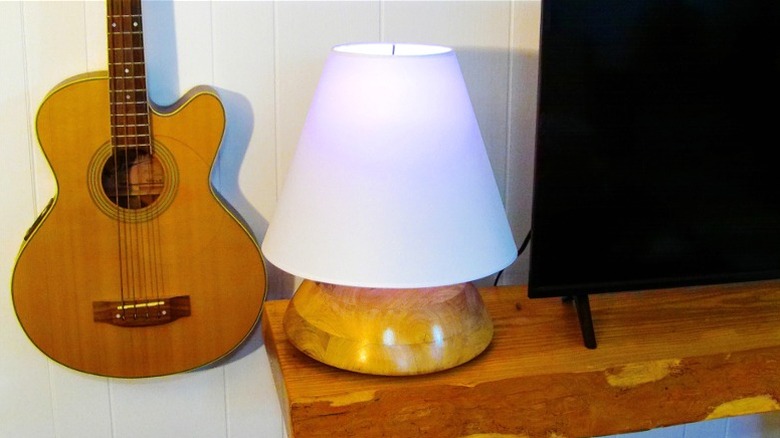
This lamp is made from a 12-inch wooden bowl, a couple of blocks of wood, and a store-bought lamp shade, though you can also try your hand at making a lampshade from scratch. For the light, I used a globe lamp similar to this Buroraix Galaxy Globe Table Lamp. It's one of those lamps with a bunch of different colors and even moving patterns. You can also make it just go white, which is what I do. Of course, you could always use a lamp rewire kit and a standard bulb for a more traditional build, but this little globe cost me about the same amount as that assembly and cut out a lot of extra steps. The salad bowl is one I found thrifting; you've likely seen many like it if you go to flea markets or yard sales (or, you might already have one at home).
Proportions are the key to a good-looking lamp

When you look at any piece of furniture and like how it looks, the primary reason is that its proportions suit you. Its height and width fit together. The negative space, such as the open areas between table or chair legs, just seem right. There has been a lot of ink and pixels spilt on this topic (much of it by me), but the point I'm trying to make is that the proportions of this lamp are in your hands. When you get your bowl, whatever you will be using for a lamp and the lampshade in hand, you will need to noodle about how they will fit together. When I went to a big box home improvement store to source my lampshade, I was disappointed. I had in mind a more squat shade with an intense angle. None to be found (though my picayune budget may have been part of the problem).
When I got home with the lamp and lampshade, I stacked them and found the shade sitting on top of the lamp covered the entire bowl. Not good. I needed a wood block to elevate the light and the shade. In my case, the block turned out to be 4 ½ inches tall; I cut it from a scrap 4-by-4 I had in my shop. After taking a look at the assembly, I determined it would look better if the bowl was lifted about ¾ inch from the surface on which it would sit (a "reveal" in design speak). So, I made another 4-by-4 block of wood from 2-by-4 stock glued together and cut it to 3 ¾ inches tall to lift the bowl while hidden underneath. At this point, the proportions really pleased me.
Putting your DIY lamp together
Assembling the bowl lamp could not have been easier. I did take a moment to clean the outside of the bowl with 0000 steel wool moistened with some denatured alcohol. It removed a lifetime of sketchy buildup. Then, I applied a spray coat of shellac from an aerosol can. This added a bit of shine and will make it easier to keep the lamp clean in the future. With the bowl coated, I secured the lower bowl block inside the bowl with a generous amount of hot glue (an essential adhesive for any homeowner), taking care to center the block as I did so to ensure the gap between the bowl and the table surface was even all the way around.
Next came the upper block attached to the bowl with the same hot glue. When that glue had cured, I attached the lamp base to the upper block in the same manner. Simple as pie (the pastry, not the mathematical constant). Because the LED lights in the lamp produce almost no heat, I could have secured the lamp shade to the lamp with hot glue. But as it balanced easily on the globe, I didn't feel the need to do so.
My little globe lamp needs to be recharged using a USB cord from time to time, and its remote control requires two AAA batteries. If you choose to make your own bowl lamp, you may wish to consider painting the bowl and choosing a more colorful lamp shade. My example was fun to make, and I literally got it done in an afternoon. Thanks again to the Instagram gal who inspired me to follow her lead!