Use Old Milk Jugs To Create A Budget-Friendly Greenhouse With This Smart DIY
Dreaming of a gorgeous backyard greenhouse but living on a milk jug budget? That's perfect! You don't need a massive greenhouse, grow lights, or special equipment to start your seeds early — not with the milk jug greenhouse DIY in your arsenal of gardening tricks. With it, you can start your seeds outdoors much earlier than normal. And all it takes is a little bit of modification to your clean, empty jugs. In fact, there are several genius ways to use old plastic containers in the garden.
Milk jug greenhouses work even in the winter when it's still cold and snowing. The naturally domed shape of the milk carton is what makes it perfect for winter sowing and starting plants early — that and the translucent quality of the plastic help create the greenhouse effect. The jug will hold the heat and moisture inside to help the seeds germinate and the seedlings grow, all with very little care from you. Since you're leaving the jugs outdoors, you're already slowly acclimating the plants to the harsh outdoor weather (with the dome's protection, of course).
While gallon-size milk jugs are pretty standard for this DIY greenhouse method, you can try similar recyclable containers as alternatives to seed-starting trays and indoor germination. Whatever you use, it needs to be deep enough for 2 to 4 inches of soil and have a lid (or the option to modify it to have one). You'll need a utility knife and duct tape to make the jug modifications. And don't forget a permanent marker or wax pencil to label them.
How to make a milk jug greenhouse
Start saving your milk jugs early to make enough greenhouses for your garden. If you're not a big milk drinker, ask friends and neighbors to save theirs, or see if local coffee shops will save them for you. As with all of the smart ways to reuse milk jugs, this one starts with a thorough cleaning to remove any leftover dairy residue. Recycle or repurpose the lids, since they won't be used for this project.
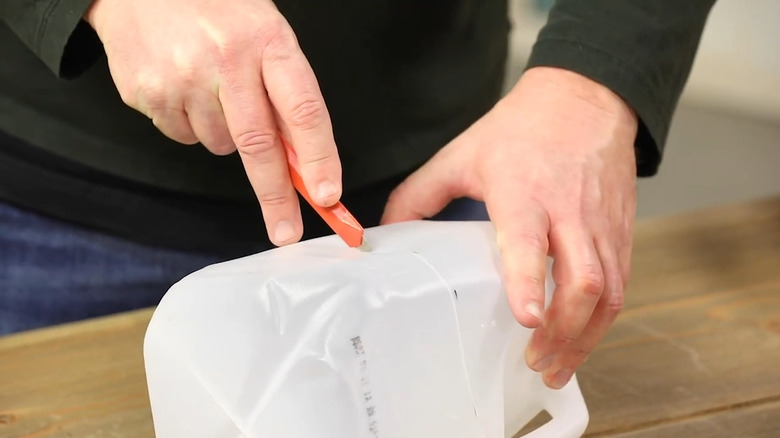
To create a flap or lid on the jug, you'll cut horizontally almost completely around the container just below the handle. But you want to keep about ½ inch of the plastic connected by the handle to create a built-in hinge. Use your utility knife or a drill to make drainage holes in the bottom of the jug. Your mini greenhouses are now ready to fill with about 3 inches of light, well-draining potting soil. Moisten the soil just enough for it to hold its shape in a ball, and then plant your seeds according to the package instructions.
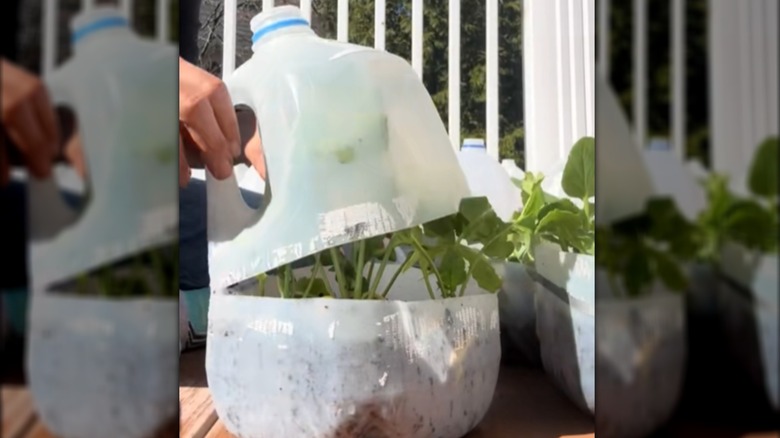
Number your cartons and keep a record of what you put in each one. Align the top and bottom of the jug, and use the duct tape to seal it. Place the jugs in a sunny spot protected from wind, and check them occasionally to look for condensation. If the soil in the jugs is dry, spray in a little water. When the seedlings are almost ready to be transplanted, remove the tape and open the jug slightly to help them acclimate to life outside the greenhouse.