26 Genius Ways To Use Lids From Old Plastic Containers Instead Of Tossing Them

Most of the world's plastic ends up in landfills, and not just the stuff that can't be recycled. According to a 2022 NPR article, a lot of the plastic you put in your recycling bin may be getting buried rather than given a new life. In other words, reusing plastic before sending it away is more important than ever. Repurposing the lids that come with plastic takeout containers, cottage cheese tubs, paint buckets, and more is not only possible, but enjoyable, since there are so many creative ways to do it. Even if you have a huge stash of plastic tops that lost their bottoms long ago, you can find new tasks for them to perform in every room of your house and even your garden. Sometimes this involves artistic upcycling, but other times it's just a matter of seeing a lid from a new perspective.
You may be able to use plastic lids in upcycling projects that call for other types of plastic discs. Likewise, repurposed ideas for non-plastic lids often work with plastic ones, especially if heat isn't involved. For example, though you can repurpose pot and pan lids to fashion a beautiful cake stand, flat lids from large food-storage containers make just as nice platforms for baked goods.
Re-envision lids as art canvases
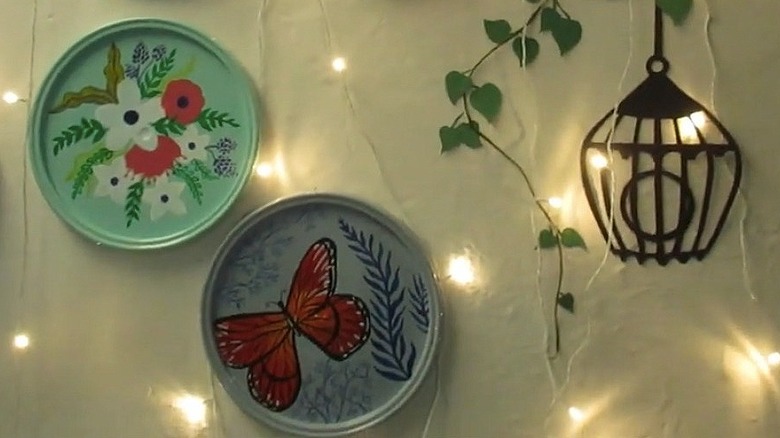
A range of flat plastic lids are easy to repurpose as art canvases. Take the two-dimensional route by decorating them with acrylic paint, or express yourself in three dimensions by attaching shiny marbles, colorful mosaic tiles, or silk versions of your favorite flowers. The lids from 5-gallon paint buckets are a good choice if you'd like large canvases for individual works of art, whereas smaller round lids are ideal for gluing together to form interesting shapes. Connect lids of any size with string to make wall hangings that take advantage of your home's vertical space.
Reuse as paint palettes

Whether you're painting a portrait of your dog on a canister or a botanical mural on a wooden fence, you need a flat surface for dabbing and mixing different pigments. A spare plastic lid can do the job beautifully. In addition to offering smooth and level surfaces for your paints, plastic lids tend to be easy to clean and provide a moat to stop paint from dripping. If you still have your lid's container, you're in luck: You can press it onto the lid to form a seal that keeps paint dollops from drying out quickly.
Build an end table

Large plastic lids are especially versatile for upcycling. Turn one into an end table with PVC pipe. Affix one wide piece of pipe to the center of the lid's bottom, or four pieces of equal lengths positioned the same distance from each other. When using a single pipe section, screw it to the lid using L brackets for extra support. Skinnier pipe sections may be stable enough when attached with strong glue, such as Gorilla Max Strength Construction Adhesive. Consider painting your table to add character. Use primer to help keep paint on plastic surfaces permanently.
Create terrazzo-style coasters
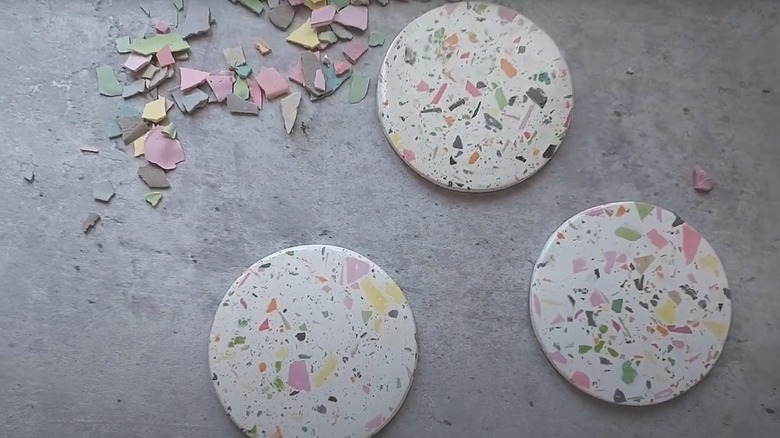
To keep your new end table in tip-top shape, you'll need some coasters to prevent drinks from sweating on it. Fortunately, small plastic lids were practically made for this purpose. Flip them upside-down and set glasses on them, or use them as molds for creating new coasters from plaster of Paris. If you love the confetti-like look of terrazzo, mix bits of dried acrylic paint into the plaster when preparing it. Once the plaster dries, remove the coasters from the molds, sand away jagged edges, and apply Krylon I00500A07 triple-thick clear glaze spray or a similar product.
Re-envision as floor protectors
Sofas, bed frames, and other heavy pieces of furniture are notorious for scratching beautiful hardwood and stone floors, especially when they're dragged rather than lifted during the moving process. Lighter pieces, like plant stands, can also cause damage if their bottoms are sharp, rough, or rusty. Placing plastic lids beneath furniture feet can prevent these problems and make room rearranging a less daunting task. Lids in neutral colors are a wise choice since they tend to blend in with their surroundings. For added floor protection, glue soft yet durable felt to the top of each lid.
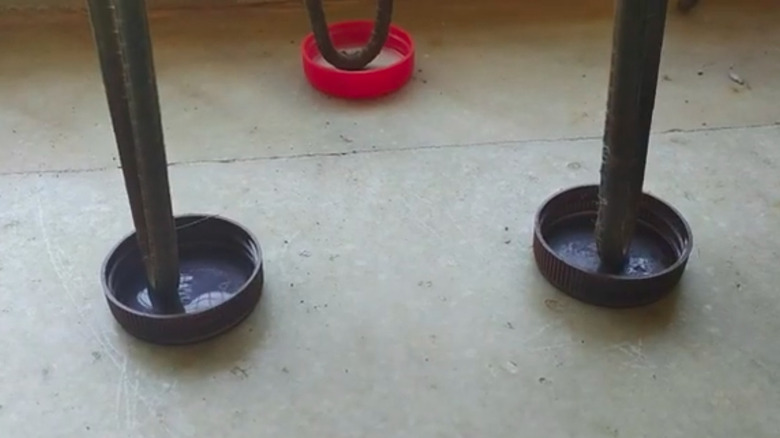
Put together a suspended shelf
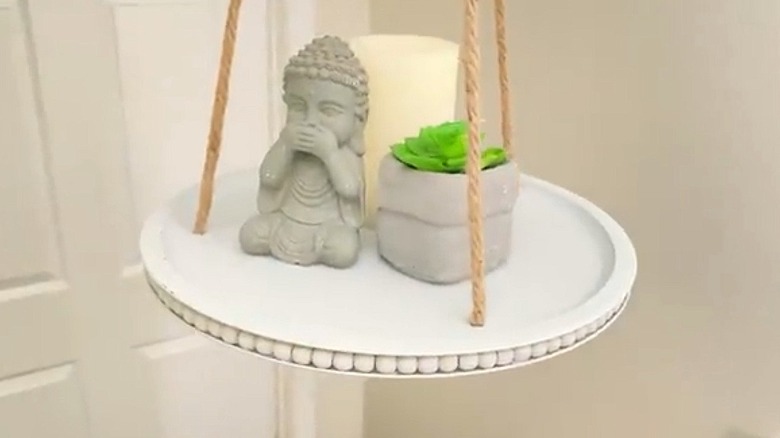
Create a focal point for a room by constructing a suspended shelf. A lid from a gallon-sized ice cream pail can display candles, books, or small plants. To customize the shelf's look, paint it, line it with fabric, or glue together two lids and adorn the edge with beads or faux flowers. To hang your shelf, insert three to four evenly spaced holes an inch from the rim. Draw wire or rope through the holes. If you have a single ceiling hook, bind together the ends of the ropes or wires for a secure hold.
Engineer a 3-D hologram projector
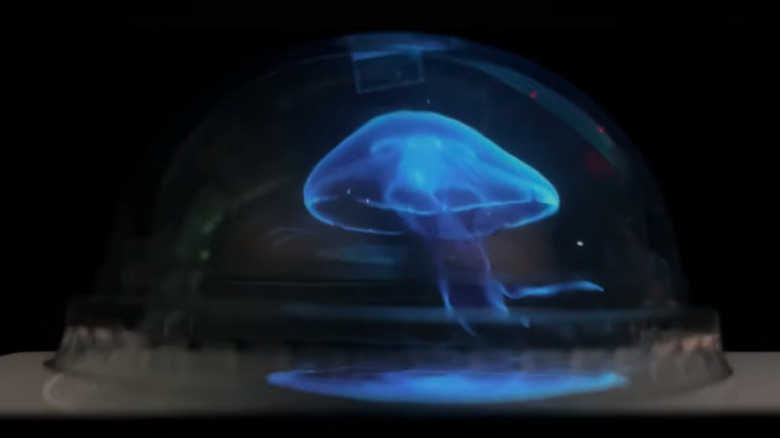
One of the most intriguing things you can make from an old plastic lid is a device that turns images from your smartphone's screen into 3-D holographic projections. To make one, you'll need a clear, dome-shaped lid and a piece of flat, transparent plastic. Trace the lid's circumference on the flat plastic, splice this circle in half, and cut it out. Position the semicircle at a slight angle in the dome's center and tape it in place to form a little dividing wall. Then, place the dome over your phone's screen and watch what happens.
Frame photos
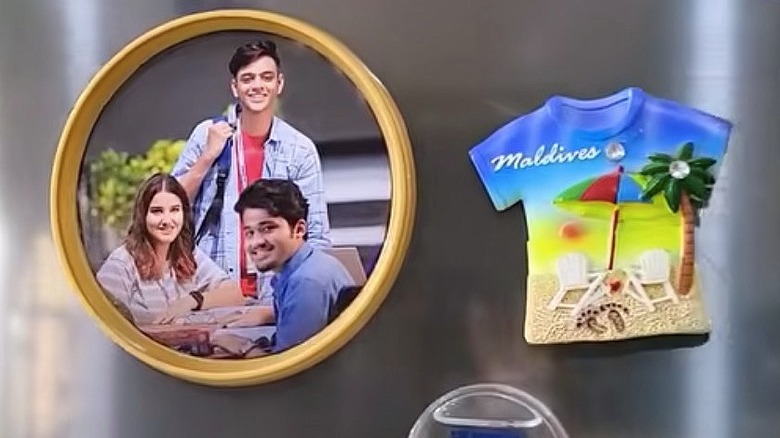
Many plastic lids can double as photo frames. Cut a photo to fit the recessed area of a lid, affix it to the lid with glue, and stick a magnet to the back to attach your creation to your fridge. Want a larger photo display for a wall? Glue small, round frames together to form a circular wreath or a flower shape, and then add a hanger to the top. For some extra aesthetic appeal, cover the frames with glossy paint or metallic enamel. Or, trim their edges with beads, buttons, sequins, or other eye-catching embellishments.
Cut out chunky clips
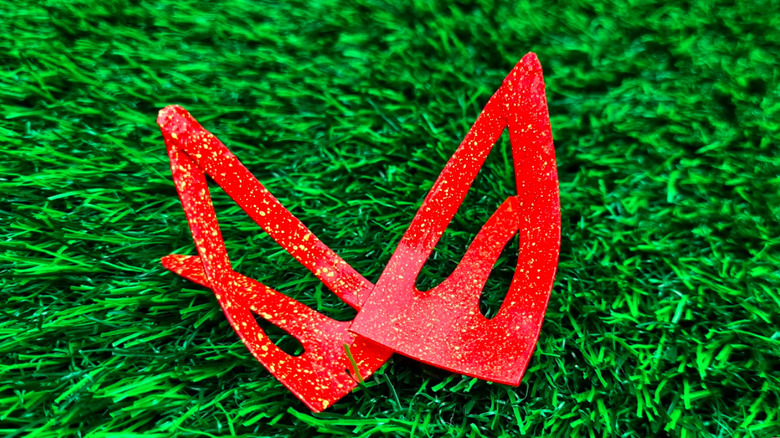
Frames aren't the only way to hang photos. Transform a plastic lid into clips for attaching pictures to string — or even holding your hair back. Draw a rectangle measuring 1 inch by 2½ inches on the lid, cut it out, and draw four parallel lines starting ½ inch from a short side. Snip out the spaces between the first and second lines and the third and fourth lines. What's left should look like a fork. Round the tips of its tines and attach the ends of the outermost tines with Super Glue or something similar.
Organize odds and ends

If you've got a divided tray's plastic cover, you may have hit the lid jackpot. In many cases, the covers of these trays also have compartments. This type of lid makes a terrific organizer for all sorts of odds and ends, from hair accessories to cosmetics. Or, use it to sort and store small, loose office supplies such as thumbtacks and paperclips. If you're in a pinch while throwing a party, a compartment-filled lid can even moonlight as the type of tray it used to cover, keeping veggies and dips apart until your guests unite them.
Keep trinkets tidy
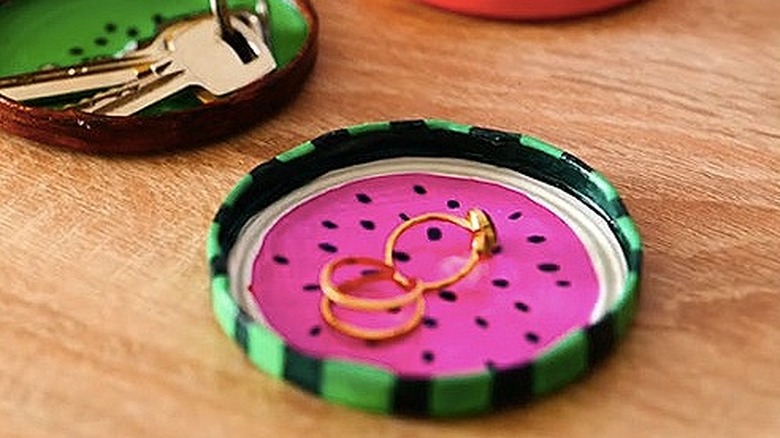
Creating dedicated resting places for rings, postage stamps, screws, and other tiny objects prevents them from getting lost. Plastic lids from cream cheese tubs and peanut butter jars can perform this function when turned upside-down. If you're using round lids, paint their interiors to resemble other round objects, such as watermelon slices or your favorite planets. You could also stud the edges with painted dots or stick-on gems. Take this project to the next level by hot-gluing the lids' edges together to form an appealing composite shape. This creates a cute organizer for jewelry and other baubles.
Construct a key hook station
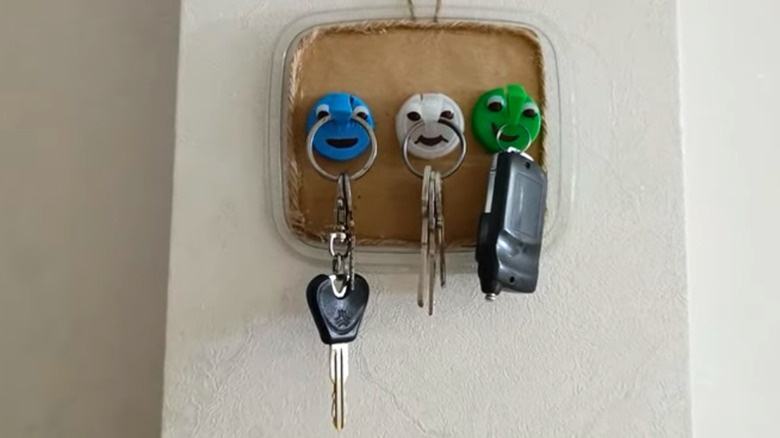
Give your keys a home that's easy to use and hard to miss when you enter and exit your house. A medium-sized lid is a great foundation for a key hook station. Line the lid's top with fabric or wrapping paper and attach a twine loop to slip over a nail. Then, hot-glue hooks to the surface you decorated. To repurpose even more, turn plastic bottle caps into hooks. Make two short, parallel cuts from each cap's edge to its center. Bend these little sections down to hang your key rings on them.
Fashion a storage basket

If you have a round lid and a mountain of plastic bottle caps, team them up to create a storage basket. The lid forms a sturdy base for building a wall of caps. Boost the lid's style quotient by attaching printed fabric, and paint the caps a single color. From there, hot-glue the caps together in an alternating pattern. Begin with one circle of caps on the lid's top, near its edge. Place a similarly sized cylindrical object inside the circle to prevent lopsided construction. Add layers of caps until the basket reaches your desired height.
Craft a coin purse
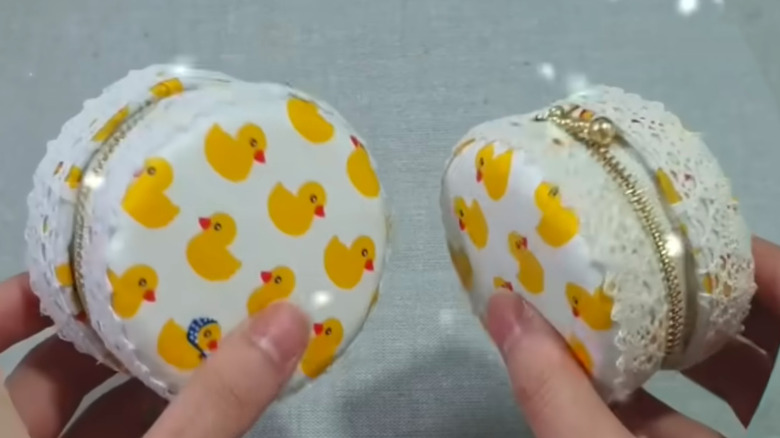
A zip-close container is handy for your house and your handbag to store earbuds, earrings, or loose change. Make one with two plastic lids that are identical in size. No sewing skills are needed, just a hot-glue gun. Affix fabric to the lids' flat surfaces. Choose a sturdy, pliable material for the interior and a cute print for the exterior. Find a cloth-backed zipper that's the same length as the lids' circumference. Unzip it and glue half to the interior edge of one lid and the remaining half to the other.
Transform into towel rings
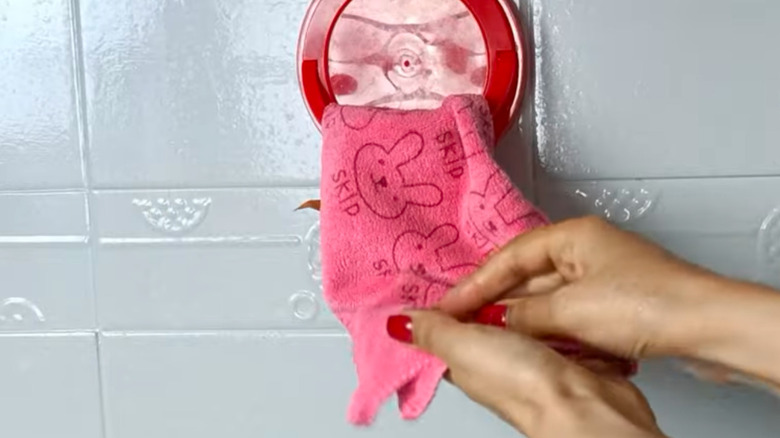
A plastic lid with a handle is a ready-made hanger for dishcloths in your kitchen and hand towels in your bathroom. Stick it to a wall with heavy-duty double-sided tape or a product such as Command picture-hanging strips. Don't have a lid with a handle? Make a towel ring with a basic round lid. Cut out its center and wrap the plastic hoop that remains with fabric strips or ribbon. If you're feeling fancy, glue on a few fabric rosettes. Then, pop your new towel ring onto a small hook you've attached to a wall.
Reinvent as spoon rests
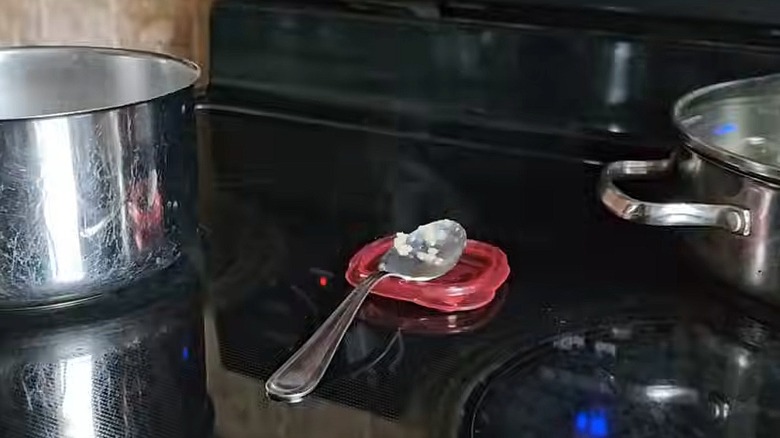
Some of the best ways to repurpose lids are so simple that you'll wonder why you haven't thought of them before. For example, a plastic lid makes a good spoon rest when you're stirring soup or other pot-based foods as they cook. It's free, easy to wash, and keeps your stovetop from getting dirty. That said, take a couple of steps to prevent the lid from melting. First, place it a safe distance from burners, even those that are switched off. Second, let your spoon cool for a moment before you set it on the lid.
Hold your soap bars
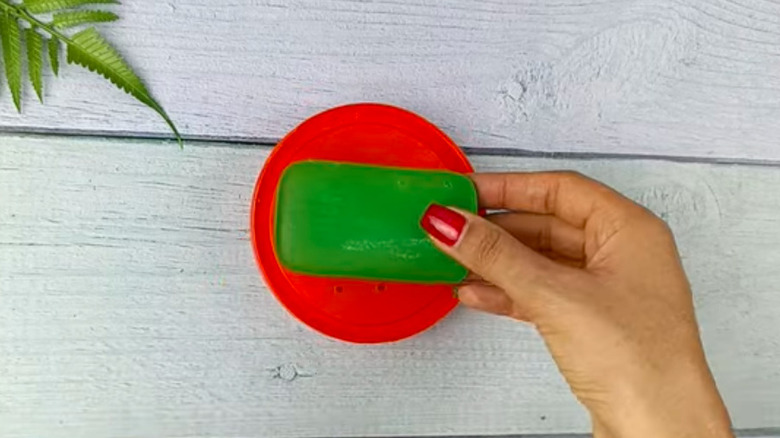
Putting a bar of soap on a platform keeps it from making your counter slimy and sliding onto the floor. Luckily, a plastic lid with well-placed holes makes an excellent — and free — soap dish. Unlike a small ceramic plate you might repurpose as a soap holder, a lid sporting drainage holes helps excess water drain away. Give it a style upgrade by adding rubber feet or coating the rim in a contrasting color of waterproof paint. A kit such as the Shuttle Art 25-piece outdoor acrylic paint set will give you lots of options.
Design custom craft stencils

Got a lid made of thin, flexible plastic that you can cut precisely with a utility knife? If so, it's probably yearning for a second life as a stencil. To fulfill its dreams and chase your own artistic ambitions, make a stencil of a design you'd like to put on a poster, a wall, or another paintable surface. It should be something composed of shapes you can trace onto thin paper with a marker and then slice with a sharp blade. Tape the traced design to your lid so it doesn't move when you cut it.
String together a garland
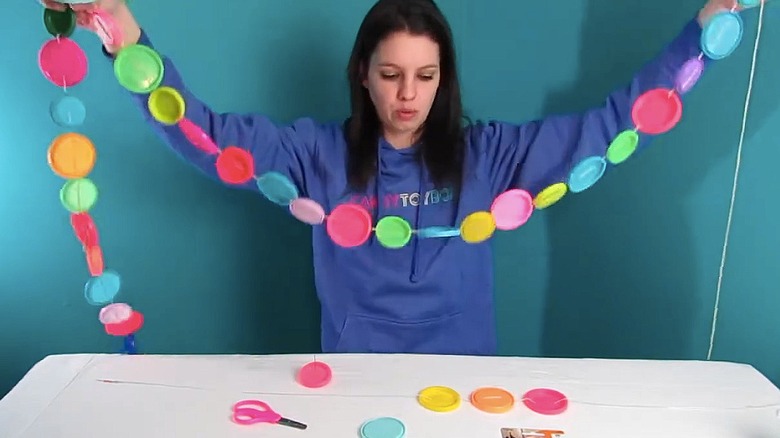
Have a stash of small, colorful lids on hand? You probably do if you've got a collection of Play-Doh containers. Poke holes in them and string them together with twine to form a vibrant garland you can use indoors, outdoors, or both. If the lids you've amassed aren't very colorful, upgrade them with cheerful hues of paint. Use self-sealing, weather-resistant paints if you plan to hang your garland outside. Once your festive garland is ready for prime time, plan a party so you can decorate!
Make mesmerizing mobiles

A homemade mobile is a sweet way to personalize a nursery without buying something new. Just one plastic lid can get you started. Punch evenly spaced holes near the lid's rim and pull strings through them. Knot together the ends above the lid's top. As you design the rest of the mobile, minimize safety risks by keeping strings shorter than 7 inches and steering clear of small objects such as beads. You might trim the lid's exterior edge with rickrack and suspend jumbo pompons or felt hearts with additional strings you've affixed to the lid's interior edge.
Upcycle into cheerful suncatchers
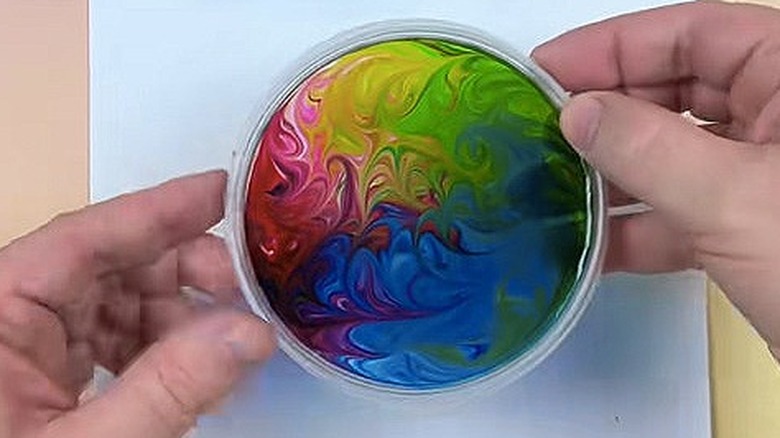
Craving a pop of color near one of your windows? Make a suncatcher with food coloring, transparent craft glue such as Elmer's Washable Clear Glue, and a round plastic lid. Draw circles of glue on the lid's interior until it's completely covered. Then, add dots of food coloring and swirl them with a toothpick. When the glue dries, the disc it forms will resemble a big gummy candy. Once there are no tacky spots, remove it from its mold, poke a small hole in it, and guide a ribbon through the hole to make a hanger.
Decoupage holiday ornaments
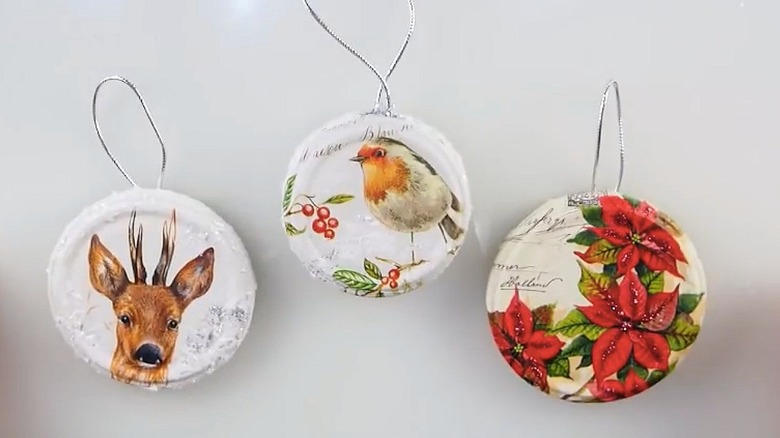
Decoupage is simply a fancy term for gluing pictures to an object and applying a protective coating. To start making decoupaged ornaments, cover lids with snowy white acrylic paint. While it dries, cut out pictures that summon the holiday spirit. Gather illustrations from greeting cards, photos and text from magazines, and gift wrap scraps with seasonal prints. You can even use bits of fabric. A product such as Mod Podge Gloss Sealer, Glue & Finish works as both an adhesive and a multi-coat varnish. Finish each ornament with a hanger made of velvet ribbon or metallic cord.
Whip up wreaths
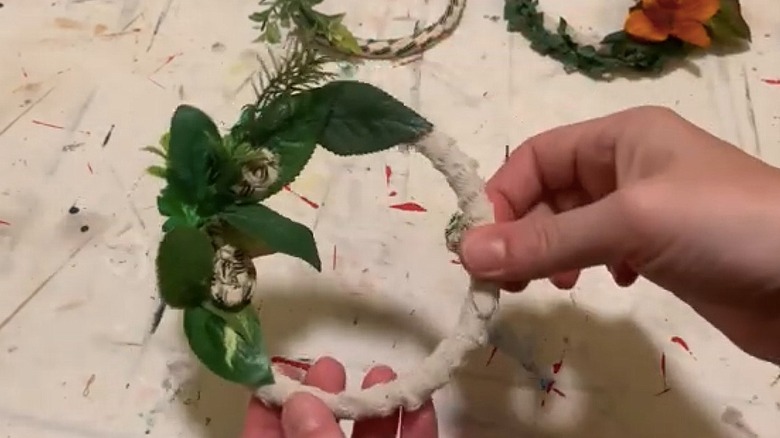
Round plastic lids are actually wreath forms in disguise. Cut out their middles, and the pieces left over are ready for wreath-making and other crafts that require a sturdy ring structure. To start making a wreath, wrap a ring with twine, ribbon, or other long strips of fabric. Next, attach embellishments such as faux greenery and miniature pinecones. Or, use the rings to DIY other minimalist wreaths with dried flowers, chunky yarn, and additional visually interesting materials. You can even use a lid-turned-ring as the base of a wreath centerpiece featuring fresh greenery and candles.
Repurpose as hoop-style plant hangers

If you're a geometry fan, a houseplant hanger with circular elements is bound to please. Though you can DIY this style of hanging planter with embroidery hoops, try repurposing round lids instead. As with the wreath project, start by turning a lid into a twine-wrapped ring. Repeat this process with a second lid of the same size. Insert one ring into the other at a perpendicular angle, zip-tie the intersection points, and hot-glue a small basket to one of these points. Then, place a potted plant in the basket and hang your creation with rope.
Catch plant pot drips

The lids from old takeout containers may be made of a higher-quality plastic than the saucers that came with some of your plant pots. In other words, if you've got a saucerless pot, try catching stray drips with a plastic lid that's slightly larger than its base. No fancy accoutrements are needed for the lid to do its new job, but you might want to decorate it so it complements the pot or its surroundings. Waterproof outdoor paints are the way to go, since splashes can happen anywhere, even indoors.
Protect garden produce from pathogens

Fruits and vegetables that sit on the ground in your garden are susceptible to soft rot. Instead of crossing your fingers and hoping this bacterial infection doesn't ruin your ground-resting produce, like melons and squash, slip a plastic lid under each. The lids reduce the crops' contact with wet soil, where the problem-causing pathogens live. Since they may occasionally collect mud and rainwater, be sure to swap them out after storms. Also, dry them if they get wet when you water your plants. Running low on lids? Substitute plastic plates or frisbees as needed.