Installing An Electric Fireplace: A DIY Guide

We may receive a commission on purchases made from links.
Electric fireplace installation can be as simple as unpacking the product from the box and hanging it on the wall or setting it on the floor and plugging it in. You don't have to worry about gas lines or venting, but you do need to make sure you have an electrical outlet within reach of the power cord because it isn't safe or legal to operate an electric fireplace using an extension cord.
Of course, a freestanding or wall-mount electric fireplace offers little of the ambiance of a wood-burning or gas fireplace, and if decor is high on your priorities list, you'll probably want to install a built-in recessed electric fireplace insert. For the most part, this is a straightforward DIY project for someone with carpentry skills, although if you aren't electrically minded, you'll need a licensed electrician to install the wiring. Electric fireplaces draw a hefty amount of electric power — 1,500 watts is typical — and while you can operate one on a standard shared circuit, a dedicated circuit is highly recommended. It eliminates overloads and bothersome trips to the panel to reset a circuit breaker.
Few walls in your house are likely to have enough internal clearance for an electric fireplace, so the best approach for built-in electric fireplace installation is to build a bump-out wall that juts out from an existing wall. This approach allows you to take advantage of the existing wall insulation behind the fireplace and conserve precious Btu, and it invites the addition of a decorative mantel to enhance the appearance of the fireplace and make it the focal point of the room. Electric fireplaces are designed for easy installation, so once the wall is built and covered over and the electrical service is in place, dropping in the actual fireplace is a cakewalk.
Planning the Size and Location of the Fireplace
Planning the Size and Location of the Fireplace
Ambiance aside, the main reason most homeowners want a fireplace is to supply heat, and they need one with enough output for the room in which it's located. A simple way to determine output requirements is to multiply the dimensions of the room (width x length x height) to find its volume in cubic feet and then multiply the volume by 4. This calculation gives you the minimum heat output in Btu needed to warm the entire room. A 10 x 12-foot room with an 8-foot ceiling has a volume of 960 cubic feet, so the minimum output needed would be 3,840 Btu. You'd want a fireplace with an output as close to this number as possible (for example, a Dimplex 4080 would be suitable) to ensure all parts of the room are warm and that no place becomes overheated and uncomfortable.
Physical dimensions also factor into the size determination. Output of electric fireplaces tends to increase with size. If you have a large room to heat, you need a large fireplace to do it, and it's going to occupy a lot of space on the wall in which you install it. This is another advantage of building a new wall because you can place it in a corner of the room if windows, built-in bookshelves, or other obstructions prevent you from erecting it against a flat wall.
You also have to consider necessary clearances from combustible materials, such as draperies and carpeting. They depend on fireplace design to some extent and are usually specified by the fireplace manufacturer. In general, count on a 3-foot clearance in front of the unit and 1 1/2 feet on either side. Clearances above and below the unit depend on whether the unit releases heat from the top, front, or bottom. If it releases heat from the bottom, which is preferable if you plan on installing a wall-mount TV above it, an electric fireplace must generally be at least 18 inches from the floor.
Electric Fireplace Installation: Wall-Mount
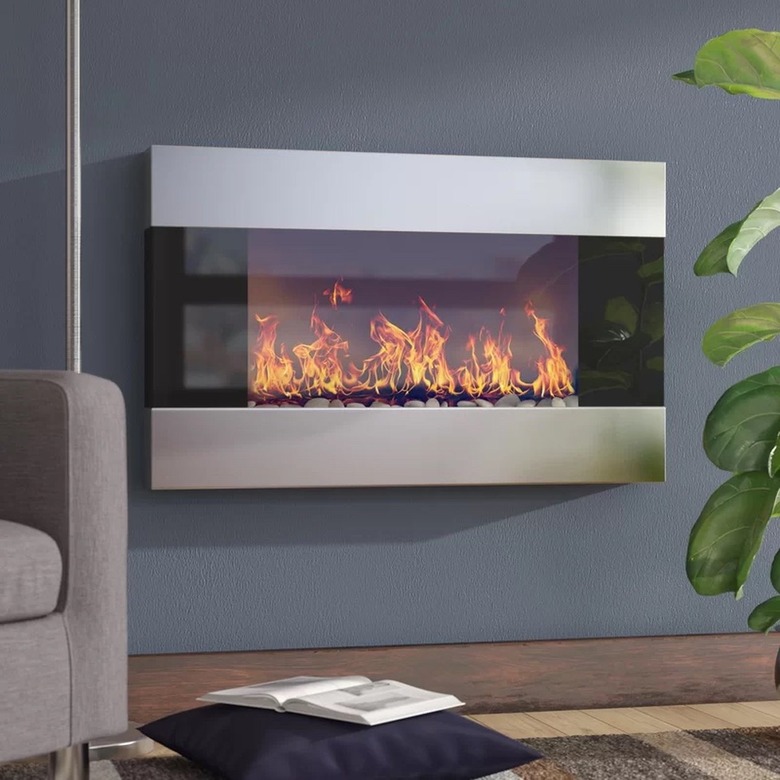
Electric Fireplace Installation: Wall-Mount
Installing a wall-mount fireplace is a little like hanging a picture frame, albeit a very heavy one that might take two people to lift into place. Before you begin the fireplace installation, you need to find a suitable place, keeping room design in mind and an eye toward where it will provide the most efficient heating for the room. Choose a location that's close enough to a wall outlet to allow you to plug in the cord directly without having to use an extension cord for power. If there isn't one, you either have to install one yourself or get an electrician to do it. Here are the basic steps of a typical installation.
1. Lay Out the Location on the Wall
1. Lay Out the Location on the Wall
Measure the dimensions of the fireplace using a tape measure and use those measurements to do a mock-up on the wall using painter's tape. Lightly scribe a level line denoting the top of the unit on the wall using a pencil and a level. Make two vertical lines to represent the sides of the fireplace as well as another horizontal line for the bottom. Apply a strip of tape along each line to create a rectangle that matches the fireplace dimensions. Besides making it easier to locate the brackets for the unit, the mock-up allows you to step back and see how the fireplace will impact the room design.
2. Mark the Locations of the Studs
2. Mark the Locations of the Studs
Use a stud finder to locate all the studs that intersect the rectangle and mark their positions on the tape. For stability, you'll want to place each mounting bracket in front of a stud and drive the screws that hold the bracket into the stud. If that isn't possible because of the placement or the fireplace design, use strong drywall anchors, such as toggle bolts, to support brackets that aren't in front of studs. Conical plastic anchors aren't strong enough to support the weight of a fireplace.
3. Install the Mounting Brackets
3. Install the Mounting Brackets
Secure the mounting brackets to the wall using the product specifications to guide you on the correct placement. Like picture hooks, the brackets are usually placed a specified distance from the top edge so you don't see them, and the spacing between them has to be accurate.
4. Attach the Bottom Bracket to the Fireplace
4. Attach the Bottom Bracket to the Fireplace
If the bottom bracket isn't already installed, screw it to the bottom of the fireplace using a screwdriver and the manufacturer-provided screws, following the installation guide.
5. Mount the Fireplace
5. Mount the Fireplace
Remove the tape from the wall, lift the fireplace into position (getting someone to help if necessary) and hang it on the mounting brackets. Check with the level and make any needed adjustments. Then, screw the bottom brackets to the wall. If any of the predrilled holes don't intersect studs, mark their positions, take down the fireplace, install wall anchors, and hang the fireplace again. Check for level again just to make sure and then screw the bottom brackets to the anchors.
6. Install the Glass Cover
6. Install the Glass Cover
If the fireplace comes with stones or crystals for ember or flame effects, set those in place and then install the glass cover according to the installation guide. Plug in the unit and it's ready for use.
Electric Fireplace Installation: Recessed
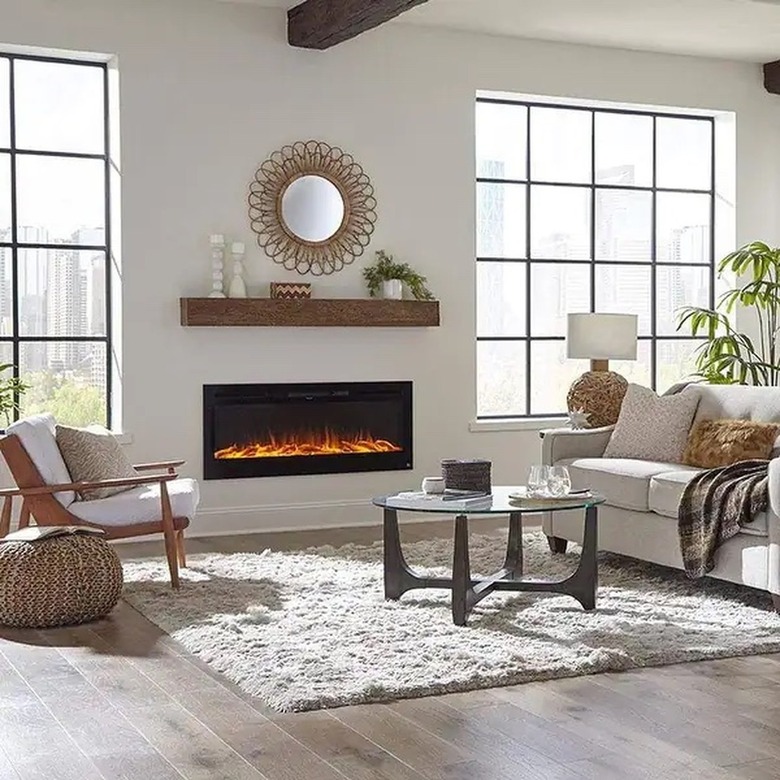
Electric Fireplace Installation: Recessed
A recessed electric fireplace generally needs more space inside the wall cavity than 2x4 studs can provide, which is another good reason for building a bump-out wall: You can make it out of 2x6 lumber. This creates a lot less hassle than building it from 2x4s and spacing the new wall far enough from the existing wall to allow the front of the fireplace to be flush with the wall covering. Although there's nothing stopping you from constructing a full wall from floor to ceiling, you'll only want a half wall if you plan to construct a mantel to make your electric insert look like a traditional fireplace.
1. Mark the Location of the Fireplace With Tape
1. Mark the Location of the Fireplace With Tape
Measure the dimensions of the fireplace and use a pencil and level to mark its outline on the existing wall. Tape along the pencil lines using painter's tape. Step back and make sure you've left enough room for anything you're planning to install underneath it, such as a bathtub. (Yes, by the way, you can have an electric fireplace in your bathroom. Installing one is an increasingly popular home improvement project, and because it doesn't have a firebox or real flames like a gas fireplace, it's a lot safer and just as atmospheric.)
2. Construct the Wall Frame
2. Construct the Wall Frame
Cut the top and bottom plates from 2x6 lumber to the proper length and cut 2x6 studs for the ends of the wall. Assemble these to make the wall perimeter and then cut two more studs of the same length to frame the sides of the fireplace opening and screw them to the plates to create the sides of the fireplace opening. Leave the amount of clearance specified in the installation guide between them. (It could be as much as 1 1/2 inches on either side, although most require less than this.)
Install a horizontal header and sill plate for the fireplace by nailing them to the studs on either side of the fireplace opening. Fill in the rest of the wall with vertical studs, spacing them at 16 inches and cutting cripple studs to fit above and below the fireplace opening. The cripple studs below the sill plate will support the fireplace.
3. Fasten the Bump-Out Wall to the Existing Wall
3. Fasten the Bump-Out Wall to the Existing Wall
Lift the new wall into place against the existing wall and screw it to the floor and to the ceiling joists. To secure it to the wall studs, install 2x6 blocking between the cripple studs under the opening, screwing the blocking to the cripple studs and the sill plate. Locate the studs in the existing wall using a stud finder and screw the blocking to the studs. If the wall is very long, you'll probably want to install blocking between the studs at the ends of the wall and screw that to the wall studs too.
4. Install the Electrics
4. Install the Electrics
Run a length of 12/2 electrical cable through the wall frame and down through the floor so you can route it to your home's electrical service panel. Connect it to a new dedicated 20-amp circuit breaker following local code requirements. (Make sure the breaker remains off until the fireplace installation is complete.) Drill a hole through the sill plate and feed the cable through so you are ready to hardwire the fireplace by connecting it to this cable. You may need an electrician to help you with this part of the installation process. If you have a fireplace with a power cord and an outlet nearby, you may elect to plug in the fireplace, and if so, you can skip this step.
5. Install the Wall Covering
5. Install the Wall Covering
Install drywall or another wall covering (you have choices) on the new bump-out wall. Finish and paint it. If you're planning on a mantel, this is a good time to install it, although you can also do it after installing the fireplace.
6. Drop In the Fireplace
6. Drop In the Fireplace
If you're going to hardwire the fireplace, make sure the circuit breaker is off and connect the wires in the cable you ran to the electric terminals or wires on the back of the fireplace as directed by the manufacturer. Secure all wire connections with wire caps and push the caps into the terminal box in the back of the fireplace. If you're going to plug in the fireplace, be sure the power cord hangs outside the wall when you drop in the fireplace.
Lift the fireplace into the opening, push it back until the front flange is flush with the surface of the wall, and screw it into place. Drive the screws into the wood that frames the opening. Some units have wrap-around trim with holes that allow you to drive the screws into the sides of the fireplace opening. When you're finished, install whatever ember or flame effects come with the unit according to instructions. Fit on the glass cover and screw it in place with the provided screws.
7. Test the Unit
7. Test the Unit
Turn on the circuit breaker and turn on the fireplace to ensure it's working properly. If you have a remote control, make sure it has fresh batteries before you use it to control the fireplace.