How To Get Your Swamp Cooler Ready For Winter
We may receive a commission on purchases made from links.
Homeowners who choose a swamp cooler over an air conditioner for whole-house cooling typically don't live in parts of the country with the most severe winters because those areas tend to be too humid for swamp coolers. The fact that winters are relatively mild is no excuse for not winterizing your swamp cooler, however (and if you live in an area that gets snow, that's more reason to winterize). Leaving your swamp cooler idle all winter can cause you all sorts of problems in the spring when it's time to fire it back up.
It doesn't take much time to winterize an evaporative cooler, but it does involve climbing on the roof or, if you have a wall-mounted unit, working from a ladder. Homeowners who find ladders challenging should hire an HVAC pro to do the job. It costs from $100 to $150, and it could save on expensive repairs in the spring. If repairs do turn out to be necessary, they probably won't be covered by the warranty since many manufacturers consider winterizing an essential part of regular maintenance.
Why Winterization Is Important
Why Winterization Is Important
One of the worst things anyone who owns a swamp cooler can do is turn off the unit in the fall and turn it back on in the spring without performing any maintenance at all. But if temperatures fell below freezing during the winter months, there may be broken water pipes, and if that problem isn't addressed promptly (and if a unit is mounted on the roof or an outside wall, a homeowner might not even be aware of it), a roof or wall leak could develop.
Even in the absence of this worst-case scenario, the drain pan is almost guaranteed to be harboring mold and mildew that will circulate through the cooling pads and into the house when you turn the cooler back on, creating fishy odors that will only get worse as the temperature rises. Finally, any rust that developed over the winter could cause a leak or a breakdown in the middle of the summer when you need the cooler the most.
Things Needed
-
Shop vac (if needed)
-
Old can or jar (if needed)
How to Winterize Your Swamp Cooler
How to Winterize Your Swamp Cooler
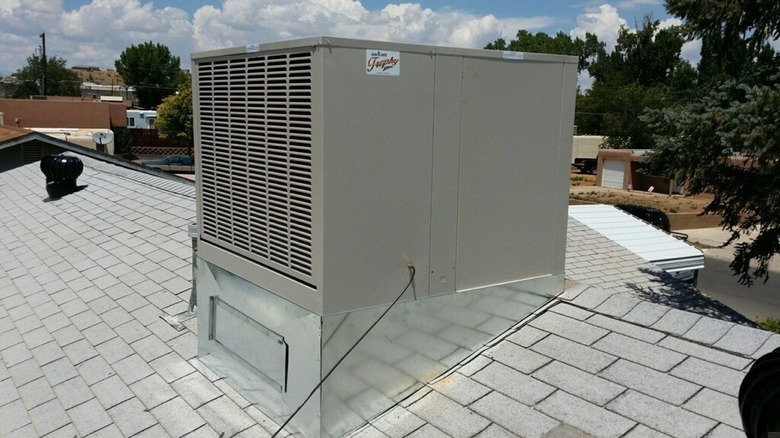
If you have a portable or window-mount swap cooler, the best way to winterize it is to store it in a warm place for the winter. This might mean taking your window unit down, but as long as you have someone to help, this is a lot easier to do than winterizing it. You don't have the option to dismount whole-house units mounted on the roof, on a wall, or on the ground, however, and these are the ones that need this winterizing procedure.
1. Turn Off the Power
You should turn off the power supply whenever you service your swamp cooler but especially when you're getting it ready for winter. While providing routine maintenance, you can often unplug the blower and water pump from receptacles inside the housing, but when winterizing, it's safer to de-energize the receptacles by turning off the circuit breaker in the main panel that controls the cooler. If the breaker isn't labeled, turn on the cooler and flip off breakers one by one until the cooler goes off. Leave that breaker off and label it so you don't have to search for it again.
2. Turn Off the Water Supply Valve and Drain the Water Line
The water supply line for most swamp coolers connects to an outdoor faucet with a dedicated outlet to which the supply line connects. You'll see an inline valve on the supply line right next to the faucet. Turn off the faucet, disconnect the swamp cooler supply line, and let it drain.
You can leave it disconnected — or even better, disconnect the other end from the cooler and store the hose in a dry place for the winter — but if you need to use the faucet, it may be better to reconnect the supply line after draining it and turning off the valve. That will allow you to turn the faucet back on when needed without supplying water to the cooler.
3. Remove the Front Panel
Remove the front panel of the cooler to access the water pan. The cooling pads may be attached to the panel, and if so, they'll come out with it, but if your cooler uses extra-thick honeycomb pads, you'll also need to remove the top panel so you can lift the front pad up and out. You may need a screwdriver to remove screws to get the panels off.
4. Empty the Water Pan
It's best to drain water from the pan using the drain plug in the bottom of the pan. If you look under the pan, you should see a cap that you can unscrew with a pair of pliers. If this is hard to turn or if the plastic appears brittle and easy to break, you can also vacuum water out of the pan with a shop vac, or you can scoop it out with an old can or jar.
5. Clean the Water Pan, Pump, and Float
Brush loose calcium buildup out of the pan with a scrub brush. If any of the scale is difficult to remove, pour in some white vinegar and let it sit for a few hours before scrubbing again. Vinegar will also dissolve rust, so if the pump and float are rusty or covered in scale, fill the pan with enough vinegar (or a 50/50 solution of vinegar and water) to immerse them and let them sit for a few hours or overnight. After cleaning the pan, pump, and float, wipe them down with rags to make sure they are dry.
6. Block the Vent Coming Into the Home
Airflow through the vent can result in heat loss and higher energy bills, so you should close off the vent registers in the house. An easy way to do this is to remove the register from each vent, measure the dimensions of the vent outlet, and cut a piece of rigid foam insulation to fit. Stuff the insulation into the vent and replace the register. Don't forget to remove the insulation in the spring before you start up the swamp cooler.
7. Cover the Cooler
Reinstall the front panel (and top as applicable) when everything inside the housing is dry and then cover the cooler. You can use a tarp that is tightly wound around the housing and secured with bungees, but a swamp cooler cover is better. If you get one designed to fit your cooler, it will fit tightly and won't blow off in the wind.
What About the Cooler Pads?
What About the Cooler Pads?
The cooler pads will need to be replaced, or if they are thick honeycomb pads, they will need to be thoroughly cleaned with a garden hose and dried before you use the cooler in spring. Whether you do this as part of winterizing or you wait until spring is up to you.
If you change the pads as part of winterizing, spring startup will be that much easier. Replacing the pads in the fall means new pads will be sitting all winter inside the cooler, however, and if moisture condenses underneath the cover because of heavy rainfall or snow, the pads could be moldy by spring.
If you're doing your own service, you can avoid this by simply removing the pads in the fall and waiting until spring to replace them. If you're paying for swamp cooler service, you might want to take your chances to avoid an extra service call in the spring and have the pads changed when you winterize.