How To Label An Electrical Service Panel
When you have an electrical problem and need to shut off a circuit, you should be able to identify the controlling circuit breaker immediately by looking at the panel index. This is a list posted inside or near the main electrical service panel that identifies each breaker by number and position and tells you what areas of the home it controls. It should be affixed to the inside of the panel door, but you might find it stuck to the face plate, the front of the door of the panel, or even on the side of the panel. Proper indexing is more than a matter or convenience and safety. It's a code requirement, so it's important to take it seriously.
Your panel was probably indexed by the electrician who wired your house, but if you live in a house that has undergone remodeling, the index may be out of date. If so, now is the time to update it. When you do this, it's best to work systematically.
Before You Start
Before You Start
If the panel already has an index and you know it's out of date, go ahead and pull it off and throw it away to start fresh. Trying to erase or revise existing labels can create a hodge-podge of different writing styles that can be confusing in an emergency. Remember that the person looking for a particular breaker may not be you—it may be a new owner who doesn't have your understanding of the home's electrical system.
 Best Electric Service
The Basic Procedure
The Basic Procedure
Panel indexing works best with two people. Station one person at the panel and assign the others the duty of moving around the house and testing devices. Use your cell phones to communicate, if necessary. Since this procedure involves turning off all individual circuits, it's best to work in the daytime when there is window light to assist you. If you must work in the dark, you can use a flashlight to move around the house in the dark.
Things Needed
-
Felt-tipped marker
-
Sticky labels
-
Paper
-
Outlet tester
-
Flashlight (as needed)
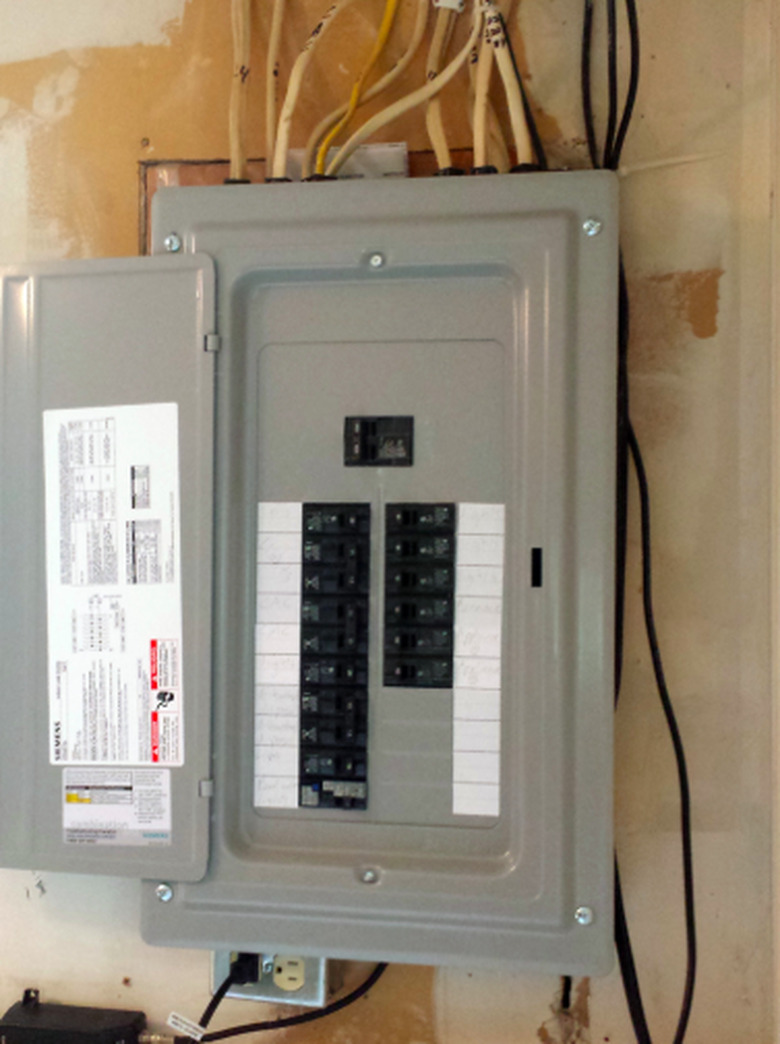
1. Number Each Circuit Breaker
Assign each circuit breaker a number inside the panel, starting with #1 at the top left. It's best if the number sequence proceeds down the left side to the bottom and continues from the top right to the bottom right. Write each number with a felt tip marker on a 1-inch square sticky label and affix each label next to the breaker it references.
Draw a diagram of the circuit board on a separate piece of 8 by 11 paper with the numbers arranged the same way they are on the panel. Leave enough space next to each number to write a description of the circuit. This is the actual index that you will affix to the inside of the panel door when you're done.
2. Begin Testing
Turn off all the circuit breakers. A breaker is off when it is toggled toward the outside of the panel. Starting with circuit #1. Check each light fixture and outlet around the home to determine which are controlled by that circuit breaker. Light fixtures are easy to identify—just turn on the wall switch to see if it operates the light fixture. To check outlets, you have to plug something in. If you don't have a plug-in outlet tester, use a plug-in table lamp that you know is working. Identify each device that comes on with a small piece of masking tape so you don't have to return to it. Once you've located all the devices on the first circuit, turn that breaker off and move on to the next circuit breaker.
This process will be slow at first because you'll have to check lights and outlets in several rooms before moving on to the next breaker. As you assign more and more devices to a circuit, things will start to move more quickly.
3. Catalog the Results
Use a sheet of paper to make a list of the devices that gain power when you turn on a particular breaker. Don't assume that all the devices on a particular circuit are all lights or all outlets, or that they are all in the same room. A particular circuit could easily power kitchen and bathroom lights and terminate at an outdoor receptacle. By the end of the process, you should have every outlet, wall switch, and light fixture identified by its corresponding circuit. Do not forget outdoor light fixtures and outlets, or those in a garage or shed.
4. Test the Appliance Circuits Last
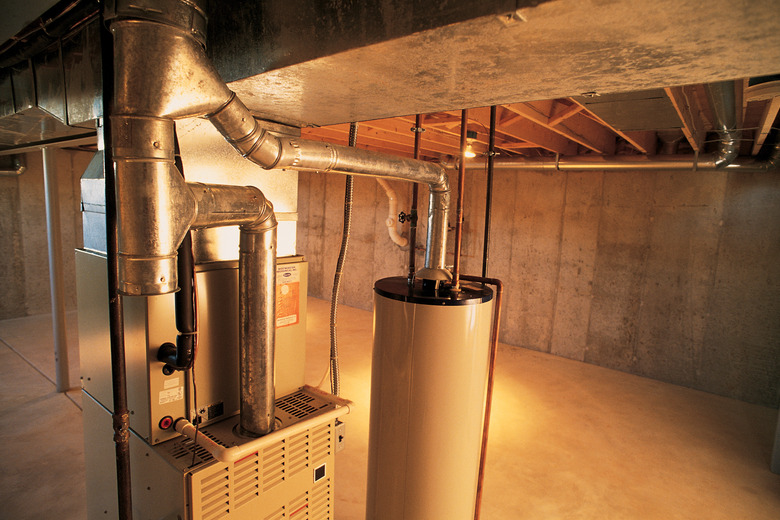
As you work through the circuit breaker panel, you will note that some breakers are paired sets. Each of these double breakers controls a 240-volt appliance, such as the stove, water heater, air conditioner, electric dryer, or furnace. Each paired set counts as one breaker and should have only one number next to it. Since each double breaker controls only one device, it's best to save them for last. Turn each one on in turn, check which appliance gains power, and assign the breaker to that appliance.
In addition, some single breakers may control dedicated appliances, such as a refrigerator, microwave oven, dishwasher, washing machine, or garbage disposer. Make sure these appliances are checked, as well, to determine which single-pole circuit breakers control them. Remember that in older homes they may be controlled by circuits that also control light fixtures.
Tip
This approach works for all appliances with an on-off control except an electric water heater, because it isn't obvious when the water heater element comes on. You can check the water heater by uncovering the control panel and testing the terminals with a voltage tester, but if you don't want to do this, you can also identify the water heater by a process of elimination. If nothing seems to happen when you flip on one of the double breakers, make a mental note of that breaker, then move on. After you've paired each of the other appliances with a breaker, come back to the mystery breaker and assign it to the water heater.
5. Make the Index
Compile the results into a concise description of each circuit and write the description on the index next to the corresponding number of the breaker. In most cases, all the devices for a single breaker will be in a particular room or a particular part of the house. Older homes, however, may have multiple rooms served by a single circuit—or may have light fixtures in adjacent rooms served by one circuit with outlets served by another.
When describing rooms on the index, use terms that a future homeowner or a hired tradesperson can understand. For example, instead of "kid's bedroom," say "northeast bedroom." Write the descriptions in pencil so they can be easily updated when circuits are modified. Tape or glue the index to the inside of the panel cover.
A Helpful Tip
A Helpful Tip
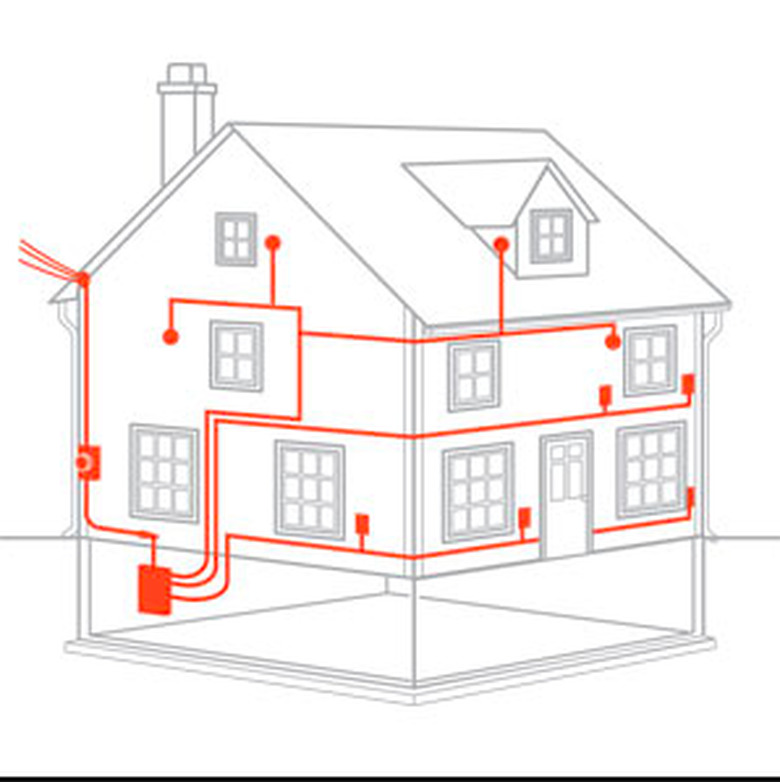
Draw an electrical floor plan that shows the positions of all the outlets, lights and hardwired appliances in the house. Anyone who works on the electrical system in the future will find it useful, and it will be a big help in the indexing process.
After indexing the panel, you might consider drawing each circuit on the floor plan in a different color or in some other way that makes distinguishing the circuits easy and obvious. This will help you or someone unfamiliar with the panel diagnose anomalies more easily. One such anomaly would be the case in which a GFCI outlet in one room feeds outlets in another room and causes those outlets to lose power when it trips.