How To Locate, Thaw And Fix Frozen Pipes
We may receive a commission on purchases made from links.
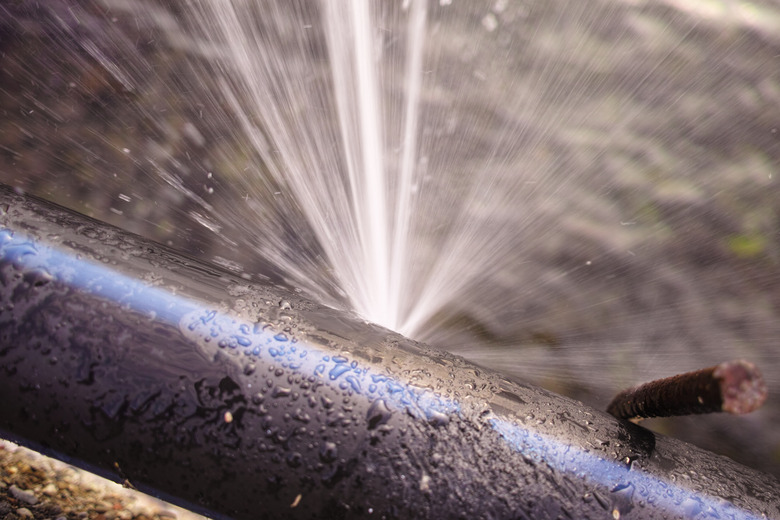
Harsh winter weather is hard on houses, and sometimes, it leads to frozen pipes. If you're lucky, you can find the frozen spot, heat the pipe and restore your plumbing to good working order. If you're not so lucky, you could find yourself dealing with a leaking pipe or one that has burst altogether, causing water damage and a lot of cleanup..
A burst pipe shooting water into your home is a pretty obvious sign that something is wrong, but fortunately, there are more subtle signs for which to watch.
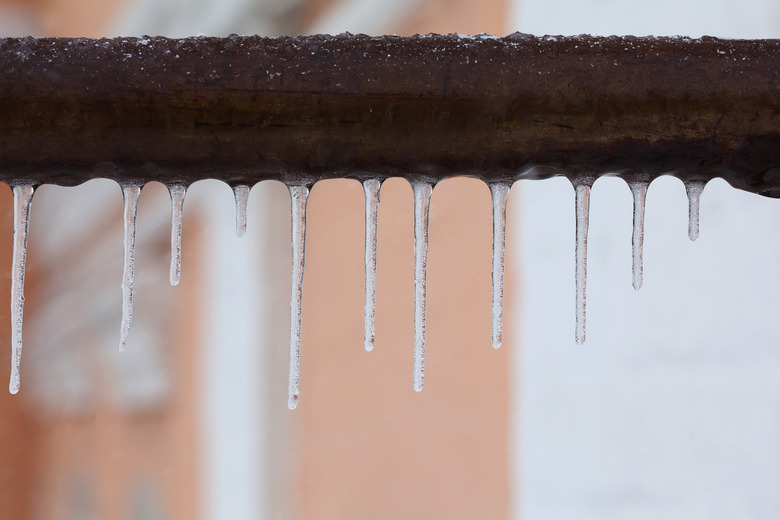
Do You Have Frozen Water Pipes?
Do You Have Frozen Water Pipes?
If your pipes are frozen but not completely blocked, you'll likely experience poor water pressure at your faucets. You may find that you can only get a trickle of water or that you aren't getting any water at all. If it's a drain pipe that's giving you trouble, you'll also notice a foul smell as the water gets trapped in the pipe and sits there rather than flowing away from the drain. You may also see frost covering exposed pipes or notice them bulging. These are both signs that you're in trouble and that your pipes need thawing before leaks start.
Things Needed
How to Locate, Thaw and Fix Frozen Pipes
1. Find the Frozen Pipe
You can't fix a frozen pipe if you can't find it, so tracking down the culprit is your first step. This sounds a little daunting, but there are a few tricks to make finding the problem easier.
- Work your way through your home, checking each faucet as you go. If you're not getting adequate water pressure from any of them, your frozen pipe is near your main water pipe. When the pipes on your first floor are working but those on the second floor are not, the freeze is in the part of your plumbing that supplies the entire second floor. If your problem is limited to one room, the problem is likely somewhere after your pipes branch off into that area.
- After narrowing down where your problem should be located, closely examine as many of the relevant pipes as you can, following each one as far as you can to look for the frozen area. If you don't see any obvious problems, run your hand slowly along the pipe. The frozen area will feel noticeably colder.
- Call for backup. Pipes in an attic, basement or crawl space tend to freeze first, and it's easy to look for them, but pipes can also freeze inside exterior walls. If you suspect your problem is in a wall, call a plumber. Fixing this problem may involve opening the wall and then fixing the subsequent hole, and it's probably not a DIY project for most homeowners.
2. Thaw the Pipe
Now that you've found the frozen pipe, you'll want to thaw it. There are several ways to do this, but there are also several methods you should avoid. Never try to thaw your pipes with a blowtorch or other open flame because doing so is dangerous. You must also avoid using a kerosene or propane heater.
- Open your taps. If you open a faucet, you'll know when the water starts flowing again.
- Wrap
the frozen pipe in an electric blanket or heating pad to warm it. If you prefer,
you can use a hair dryer to warm the pipe. In a pinch, towels soaked in hot water will do the job as well, but it may take a bit longer to work. - Leave
the heat source on the frozen section until you have fully restored the water pressure in your home. It typically takes about 30 to 45 minutes to thaw a frozen pipe.
 viti/iStock/GettyImages
3. Repair Any Leaks
If you think you can repair the leak yourself without a plumber, the easiest way to do so is with a slip coupling — a piece that easily allows you to reconnect your pipes after you have removed the leaking section. Sometimes called a push-in fitting, these couplings work on all kinds of pipes, including copper, PEX and PVC. A popular brand of slip coupling you'll likely see at the hardware store is the SharkBite, but any brand will do. Remember to turn off your water before repairing the leak; otherwise, you'll have a huge mess when you cut out the leaky section of pipe.
- Turn off the water at your main water supply line. Your main water supply line is most likely located in your basement, garage or laundry room. If the main line has a valve,
simply turn it 90 degrees to turn off your water. If it instead has a
circular handle, turn it clockwise until it stops. - Open the relevant tap to drain as much water as you can from the pipes.
- Use a pipe cutter to remove the leaking section of the pipe. Remove about an inch of pipe.
- Deburr (smooth) both the inside and outside of your cut ends using a deburring tool so they don't damage your coupling. Clean the pipe with a pipe cleaner to remove any metal shards left behind by the deburring process.
- Insert the pipe into a slip coupling measuring tool and draw a line on the pipe at the proper depth. If you don't have a tool, there are handy charts that will tell you how far onto the pipe to push your slip coupling.
- Place the end of your slip coupling over the end of your pipe and push it on until it lines up with the depth mark you made. Repeat this process for your other pipe, joining the two pipes together with the coupling in the middle.
- Turn the water back on.
4. Prevent Future Problems
As you crouch in your crawl space with a hair dryer pointed at your frozen pipes, you'll probably find yourself thinking that you really don't want to thaw your pipes ever again. Fortunately, there are steps you can take to make sure you don't have to do it again, including beefing up the insulation in your home.
- When you know cold weather is coming, open the cabinets under your kitchen and bathroom sinks. This lets warm air from your home flow around the exposed pipes to help keep them warm.
- Open all your taps to a trickle to keep the water in your pipes moving during cold snaps.
- Keep your house at least 55 degrees Fahrenheit in the winter even when you're not home.
- Wrap your pipes in insulation, especially if they're in a cold area, like an attic or a crawl space. If you have pipes inside a poorly insulated outside wall, add insulation to the wall. Many companies can now blow insulation into walls through small holes, so you need not tear out walls to insulate them.
- Consider wrapping pipes with self-regulating heat tape or cable that can turn itself on when it senses cold temperatures.
References
- David Leroy Plumbing: How to Keep Pipes From Freezing
- Home Repair Tutor: Repair Copper Pipe Leaks With SharkBites (Super Easy!)
- Home Depot: How to Fix a Leaky Pipe
- Kay Plumbing Services: How to Detect, Find, and Fix a Frozen Pipe in Your House
- Erie Insurance: How To Prevent Frozen Pipes (And What To Do If They Freeze Anyway)
- RestorationMaster: How to Find Frozen Pipes