How To Vermicompost — A Beginner's Guide
We may receive a commission on purchases made from links.
Vermicomposting, or using worms to create compost, is an excellent way to turn yard waste and leftover plant matter into a useful soil amendment. Vermicompost, also known as worm castings or worm poop, is a nutrient-rich material that benefits flower beds and garden beds. Worm castings are completely organic and can be used in garden beds, raised beds and even container gardens. If done properly, vermicompost doesn't stink or attract insects and vermin; in fact, you can even keep worm compost bins indoors if you're not too squeamish.
Where to Locate Your Worm Bin
Where to Locate Your Worm Bin
While the bins and the types of worms are important, the location of your vermicomposting setup is of utmost importance. The wrong location, such as a sunny area on a hot summer day, could actually kill the worms. The worms need a location out of direct sunlight that is neither freezing nor too hot with a temperature range from 55 to 75 degrees Fahrenheit. Depending on your climate, suitable locations include a garage or basement, beneath a deck, on a full-shade area of a porch or even in a cupboard or closet.
The bin should be out of direct sunlight and ideally protected from strong winds and rain as well. Heavy rains and puddling could cause excess water to get into a bin set on the ground, making it more difficult for the worms to survive and thrive. Scope out suitable locations for a worm bin before buying or building one for best results. That way, once you've prepped the bin with worm bedding, you can set it in its new location and add the worms rather than moving a full bin around after the fact looking for a good location.
The Best Worms for Vermicomposting
The Best Worms for Vermicomposting
Not every type of worm found in the yard is good for vermicompost projects. Earthworms and night crawlers found in yards like to burrow deep within the soil, usually at depths far greater than the average worm bin. They also get the nutrition they need from the soil and don't eat enough garden waste to make them good composting worms. Common earthworms or night crawlers are excellent at aerating the soil, however, so they're great to have around the yard and garden.
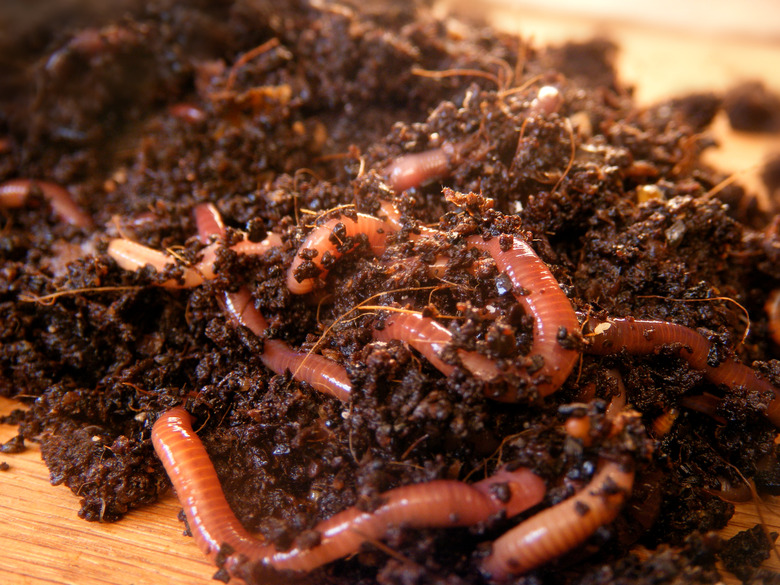
Red wigglers, or Eisenia foetida, are the best type of worm for vermicomposting. They're small and stay within the top few inches of soil, requiring so little space that you could even keep the entire worm-composting setup indoors, such as in a basement or a cupboard. These worms reproduce quickly and "recycle" compostable materials quite fast, turning plant-based food scraps or even yard waste into castings and liquid that are excellent for the garden. Once acclimated to their environment, they'll consume half their collective weight daily in organic matter. In other words, every pound of red wigglers eats a half pound of matter daily, including green produce scraps and brown matter, such as newspaper, dead leaves or coffee filters.
Red wigglers can be purchased from vermicomposting specialists, some of which also sell on the big-box online retail sites. If cared for properly, the worms prolifically reproduce, so you most likely won't have to purchase more to keep your vermicompost project going season to season and year to year. One pound of red wigglers, about 800 to 1,000 worms, is a nice amount for a first-time vermicompost operation. Over time, the bin will have enough worms to start a second bin or to "recycle" even more food scraps into useful compost.
How to Vermicompost
How to Vermicompost
1. Gather the Supplies
1. Gather the Supplies
At its simplest, worm composting requires a suitable worm bin with a lid, some red wiggler worms, worm bedding and compostable food scraps for the worms to eat. To determine what size bin to use, figure 1 square foot of surface area per pound of worms and per pound of food scraps your household produces per week. In other words, if you estimate that you'll have 1 pound of vegetable peels and lettuce scraps each week, you'll need a bin that's 12 inches wide and 12 inches long. Look for flexible plastic bins that are about 10 to 20 inches deep to provide plenty of room for 1 pound of worms, as they'll multiply in their new home.
Before your ordered worms arrive, start saving compostable food scraps for them in a sealable plastic bag or airtight container that can be placed in the refrigerator if necessary. Any kitchen scraps that can go into a standard compost bin are suitable for a worm bin too: leafy greens, apple cores, eggshells and even used coffee filters (paper only) and coffee grounds. The worms also really enjoy melons and pumpkin. Do not use citrus, grease, dairy or meat-based scraps for your worm bin or any composting bin for that matter. You may want to avoid garlic, onions and shallots as well since they may make the bin smell and may repel the worms. Tear or cut the compostable matter into small pieces to help the worms break down the scraps faster. Crush eggshells or pulverize them in a food processor or blender.
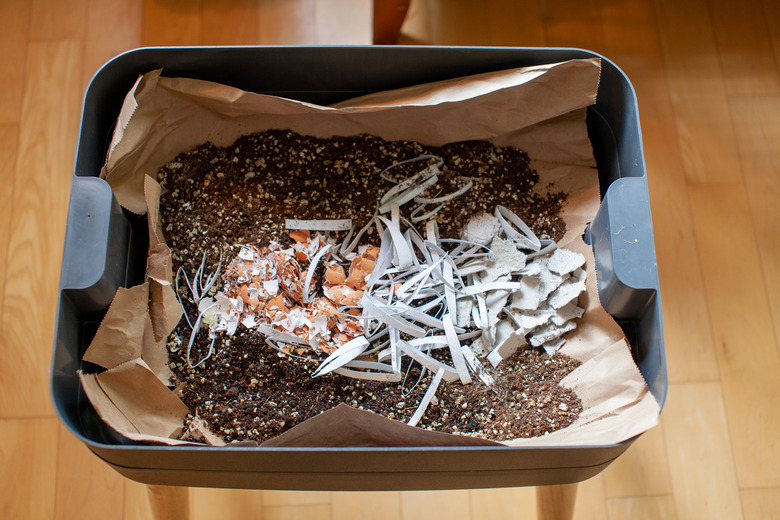
Make bedding for the vermicompost bin by tearing newspaper, corrugated cardboard, brown paper bags, recyclable office paper and similar materials into 1/2-inch-wide strips. Avoid magazines and other glossy papers as well as paper that's not white or brown in general, as it may have lots of dye in it. Also collect some dried leaves, coconut coir or even small, plain wood chips or peat moss, ensuring that none of the items has chemicals on it. Scoop up about a handful of garden soil as well.
2. Prepare the Bedding
2. Prepare the Bedding
Soak the paper and cardboard for a few hours in water in a bucket and then squeeze out as much water as possible so the paper is only damp. Fluff the shredded matter as you place it in the bin so there's plenty of air gaps within it; the goal is to fill the bin about halfway or a little more.
Mix in the garden soil, dried leaves and wood chips or peat moss to create a well-balanced environment for the new worm environment. The mixed bedding environment should still be damp.
Tip
If you're using a shallow, stacked-bin system you've purchased rather than a basic single-bin setup, read the instructions that came with the product to ensure you use a suitable amount of bedding materials and that you set up the bin properly, as multilevel systems can be a bit more complex.
3. Add the Worms
3. Add the Worms
Move the bin to the selected location and then set the worms directly atop the bedding. Leave the lid partially off your vermicomposting bin, as the worms' light sensitivity encourages them to burrow down a bit, which in turn helps them acclimate to their surroundings. Place the lid back on once most of the worms aren't visible on the surface.
Wait a day or two before adding any food scraps while the worms get used to their new home. As you're waiting, feel free to collect useful produce cuttings and scraps in a sealed bag, storing the bag in the refrigerator until feeding day. Keeping the scraps in a sealed bag or container helps keep away insects.
4. Add Produce Scraps
4. Add Produce Scraps
Add a small handful of produce scraps to the worm bin and then cover the scraps completely with a little bit of the bedding material or even with new, damp, shredded newspaper strips. Though worms are capable of consuming half their body weight in a day in optimal conditions, it's best to start light and see how quickly they eat what you've provided. Place the lid back on the bin and check it again in four to five days. If the food waste is gone, add more; otherwise, wait until the scraps are gone. If it seems they aren't eating much, make sure the pieces are small, as this helps them break down things.
After a few rounds of feeding the worms, you'll have a better idea of how much they'll eat in a week and which scraps they prefer. If they repeatedly aren't eating a particular material, don't add more of that type of item or break it down into really small pieces before trying again.
Feeding worms once every one to two weeks is ideal. Add fresh, damp bedding material to cover the scraps each time as well. As you're feeding the worms, also make sure the existing bedding feels slightly damp, as the worms need this moisture. While the food scraps and new damp bedding help keep the environment moist, you may at times need to spritz the surface with a light mist of water. Make sure the environment isn't so wet that it feels like soupy mud, as this could harm the worms.
Maintaining Your Worm Bin
Maintaining Your Worm Bin
Most worm bins have a tray or some sort of liquid collection area near the bottom. The liquid that collects in the tray contains useful soil nutrients. Collect the liquid with a turkey baster if it's pooled in a tray and squirt the liquid into the soil in your garden.
In three to six months, the contents of the bin will look more like soil than like the original bedding materials. This means the bin is full of worm castings — the stuff that's great for the garden. To harvest it, push all the material to one side of the worm bin and then fill the other side with fresh, damp bedding and a handful of produce scraps. In seven to 10 days, most of the worms will be in the fresh side of the bin. Scoop the worm compost matter out of the "old" side, setting it on newspaper or a tray for easier cleanup. If any worms are found in this material, simply place them back into the new bedding. Add more bedding to the bin and even out everything so it's a fresh environment for the worms once again.
Another option that works well for a smallish bin is to dump the entire contents atop a tarp or a sturdy plastic trash bag spread flat, pushing the finished worm castings to one area and the noncomposted matter into a large pile along with the worms. As you weed through the materials to fish out all the castings, the worms will burrow within the noncomposted material. Once you've fished out as many castings as possible, return the worms, bedding and produce scraps to your bin. Add more fresh, damp bedding using plenty if the worms seem crowded.
Storing and Using Vermicompost
Storing and Using Vermicompost
Like the worms themselves, a container of worm castings should be kept in a moderate temperature range out of direct sunlight and should be protected from excessive moisture, which could cause the castings to break down. A lidded plastic container with a few air holes is a good way to store the castings until you need them. Cover the castings with damp newspaper inside the container. Stored this way, the castings stay in good shape for at least six months.
Use worm castings by adding 1/2 cup to 1 cup of castings per hole for new vegetable and flower transplants. For potted plants, such as in container gardens, use 1 cup of worm castings per quart of potting medium. For plants already in the ground or in pots, sprinkle some castings near the plant and then cover the castings with soil or potting medium.
Make worm compost "tea" by steeping 2 cups of castings into 5 gallons of spring water. If you wish to keep the castings separate, tie them in a cheesecloth bag or similar material that allows water to flow through. Soak the castings for two to three days, stirring the liquid at least once a day. Use the tea to water around plants or even sprinkle it directly on plants that don't mind wet foliage. The tea's beneficial properties may also help boost the plants' ability to stay healthy.