How To Build A DIY Garden Arbor

We may receive a commission on purchases made from links.
If you want to grow grapes, dress up your backyard with elegant climbing vines like wisteria or jasmine, punctuate your landscape with colorful vertical growth or separate a section of the garden with a flowery entryway, then you need a garden arbor. You can buy a freestanding arbor at any garden center, but if you have basic carpentry tools and know how to use them, this is one landscaping job you can definitely DIY. It's easier than most other landscape woodworking projects, such as building a fence or a pergola, which is similar to an arbor but often has a solid roof.
The basic structure of an arbor consists of four or more posts connected at the top by beams across which are placed evenly spaced perpendicular rafters or stringers. The spaces between the posts and the rafters are often filled in with balusters or lattice, but they are never completely covered. The idea of a garden arbor as opposed to a pergola is to allow greenery to fill in the spaces, and when this happens, an arbor can supply all the shade a pergola does but in a more elegant way.
When you shop for arbors online, you'll find many styles, many made from metal and many with curved arches. It is possible and not that difficult to build a wooden DIY arbor with arches, but with or without, it's important to build it sturdy enough to support the vines you want to grow, and some of them, including wisteria, jasmine and grapes, are woody and quite heavy. One of the advantages of the DIY approach, besides the fact that it's fun, is that you can build exactly the structure you want.
Reasons to Build a Garden Arbor
Reasons to Build a Garden Arbor
From a purely design standpoint, there are many reasons to add an arbor to your outdoor space. It provides vertical definition and shade, which is especially beneficial in a predominantly flat landscape, and it divides the landscape into sections. It looks like a doorway, and many homeowners take advantage of this by placing an arbor on the front walkway or somewhere else in the landscape where there is a transition from one environment to another. When covered with greenery, a garden arbor can provide a shaded sitting area if you make it large enough, and it also provides shade for surrounding plants, increasing the options for what you can grow in your landscape.
Premade arbors are mostly decorative structures, and if you want a larger one that you can use as a sitting area, you usually have to pay a hefty price, and you're constrained to the design decisions of the manufacturer. Another problem with premade arbors is that they are temporary structures that sit on the ground, and they can be displaced by heavy growth. It isn't unusual to see a store-bought arbor leaning or rendered wobbly by what's growing on it. If you make your own DIY arbor, you can make a permanent structure that is able to support heavy, woody vines and fast growers, such as passionflower.
 PeteMuller/iStock/GettyImages
Garden Arbor Style and Materials Options
Garden Arbor Style and Materials Options
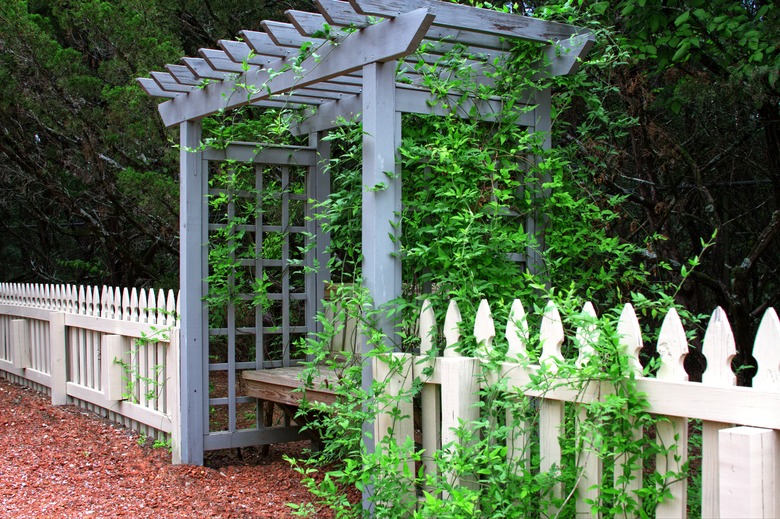
Most garden arbors are a variation of two basic themes: the grape arbor, with its flat lattice roof, and the arched arbor. A gabled arbor, which features a peaked roof that creates gables on the front and back, is a less common style that roughly resembles the roof of a rustic cottage. If you're looking to build a sturdy garden arbor for growing grapes or supporting wisteria, the grape arbor is the best option — and it's also the easiest to build — but if your intention is to grow nasturtium, passionflower or jasmine, an arched arbor will work just as well and will look better.
Although a garden arbor is basically four posts connected by beams and rafters, most have built-in extras, such as a trellis on either side, a bench and a lattice structure on the roof. These are easy to add after you build the basic structure, and you can use a variety of materials, including wood, metal pipes, cable and vinyl. You can also build the arbor from metal or vinyl, but if it's a DIY project, wood is best, specifically a rot-resistant species, such as redwood or cedar.
Things Needed
-
4x4 redwood or cedar lumber
-
2x10 redwood or cedar lumber
-
2x6 redwood or cedar lumber
How to Build a DIY Garden Arbor
How to Build a DIY Garden Arbor
A grape arbor is the easiest one to build and is capable of supporting woody vines as well as nonarboreal ones. If you make it from redwood or cedar, it will last longer than one made from any other wood species, even if you leave it unfinished.
1. Lay Out the Perimeter and Take Measurements
Determine the location of the arbor in your garden and mark the four corners using stakes. Stretch string between the stakes to mark the perimeter using a carpenters' square to make sure the strings stretching from each corner are perpendicular. Measure the longitudinal distances between opposite corners using a tape measure to determine how long to make the beams and then measure the latitudinal distance to determine how long to make the rafters.
2. Select the Wood
Rough-sawn redwood or cedar gives your garden a rustic look, but your arbor will look more elegant if you choose smooth wood. Choose 4x4 lumber for the posts, 2x10 lumber for the beams and 2x6 lumber for the rafters to make a robust structure. Check each board to make sure it's straight, and reject boards with cracks or other defects that could weaken them.
3. Dig the Holes for the Posts
You'll need to dig holes for each post using a post-hole digger. Four holes is usually enough, but if you make the arbor longer than 12 feet, you should dig two more holes between the corners for two extra posts. If the ground is rocky, use a digging bar to break up the rocks, and if the ground is sandy, have a drain spade handy to remove dirt because a clamshell digger doesn't handle sand very well. The holes don't have to be as deep as holes for a fence post because there's no danger of the arbor blowing over in the wind, so 2 feet should be deep enough.
4. Prepare the Posts
Cut the number of posts you need to the proper length using a circular saw. Because the saw blade won't cut all the way through 4x4s, you have to make two cuts from opposite sides of the wood, so draw lines for the cuts using a speed square to make them straight. Don't forget to add the buried part of the post to the total length.
Even redwood and cedar will rot when buried in the ground, so it's a good idea to treat the part that will be buried with wood preservative.
 cjmckendry/iStock/GettyImages
5. Prepare the Beams
Cut a length of 2x10 lumber that will span the distance between the posts plus 2 feet, which will allow for a 1-foot overhang on each side of the arbor. You can make the overhang longer or shorter as desired, and to make it more decorative, you can cut curves on the ends with a jigsaw and sand the cuts smooth with a pad sander and 100-grit sandpaper.
6. Attach the Posts to the Beams
Construct each side of the arbor in turn. Lay the posts on the ground parallel to each other and separated by the spacing of the post holes. Lay the beam perpendicular to the posts either flush with the tops or a few inches below depending on whether you want to be able to see the tops of the posts on the finished arbor. Double-check the distances between posts and then drill a 1/2-inch hole through the beam and each post and fasten the beam to the post with a 1/2 x 6-inch carriage bolt. Slip on a washer and tighten the nut with a socket wrench.
7. Set the Posts in Concrete
Lift one side of the arbor upright and set the posts in the post holes. Climb on a step ladder and put a 4-foot level on top of the beam to make sure it's level. If not, add or remove material from the holes until it is. Use the level to make sure each post is plumb, keeping in mind that because you used only one bolt in each post, there will be play in both directions. Backfill each hole gradually with concrete mix, checking with a level as you go to make sure both posts stay plumb (you can also use temporary cross-bracing to support the posts). Erect both sides of the arbor in this way and let the concrete set overnight.
8. Mark the Rafters for Notches
Measure the distance between the beams and cut one piece of 2x6 lumber to that length plus 4 feet, which allows for a 2-foot overhang on each side. You can make the overhang longer or shorter as desired. Working from a ladder, set the rafter on-edge on top of the beams with the same overhang on both sides and make marks where the edges of the beams intersect. Remove the rafter and draw a perpendicular line across each pair of marks 3 inches from the bottom edge of the rafter using a combination square; this completes each notch marking.
Cut out the notches with a circular saw and finish each cut with a handsaw. You can also cut the notch with a jigsaw. Finish the notch by tapping out the wood with a hammer and wood chisel. Test the rafter to make sure the notches fit and then shape the ends as desired and use it as a template to make as many as you need.
9. Install the Rafters
Space the rafters uniformly on the top of the arbor and secure them to the beams by driving a 3 1/2-inch exterior wood screw through the top of each notch into the beam. Once all the rafters are in place, add one more bolt to each post so the beam is secured to each post with two bolts.
Adding Finishing Touches to Your Arbor
Adding Finishing Touches to Your Arbor
You'll probably want to add some type of lattice between the posts to give vines something on which to climb, and there are several ways to do this. You can purchase wood lattice and nail it to the posts, or you can drill holes through the posts at regular intervals and stretch cable between them. You can also make a lattice with copper pipe by drilling holes in the posts for the pipe.
The last thing you'll want to do is seal the wood to preserve it, and the best way to do this is to apply a semitransparent stain with the same color as the wood. Both cedar and redwood stains are available, and this type of stain will guard the wood against sunlight as well as moisture. It's wise to choose a product that contains a mildewcide because the environment underneath the foliage is likely damp.