Bathroom Vent Fan Duct: A Homeowner's Guide
The building code requires a bathroom exhaust fan to vent outside the building, so installation of a new bathroom fan necessarily involves installation of ductwork. This is much easier to do if you have attic access because if you don't, you usually have to remove some ceiling drywall and run the ducts along a joist. In the attic, where you have room to move, you can run the duct pretty much anywhere as long as you keep it as short as possible and minimize the number of bends.
The building codes don't have much to say about how you run the ducting, but that doesn't mean any configuration is OK. HVAC pros have a few best practices to ensure adequate air flow and to minimize the effects of condensation in the pipes, and it's wise for DIY builders to follow them. It's also important to check with the local building authorities for any requirements they may have over and above the national codes.
The Basics of Venting a Bathroom Exhaust Fan
The Basics of Venting a Bathroom Exhaust Fan
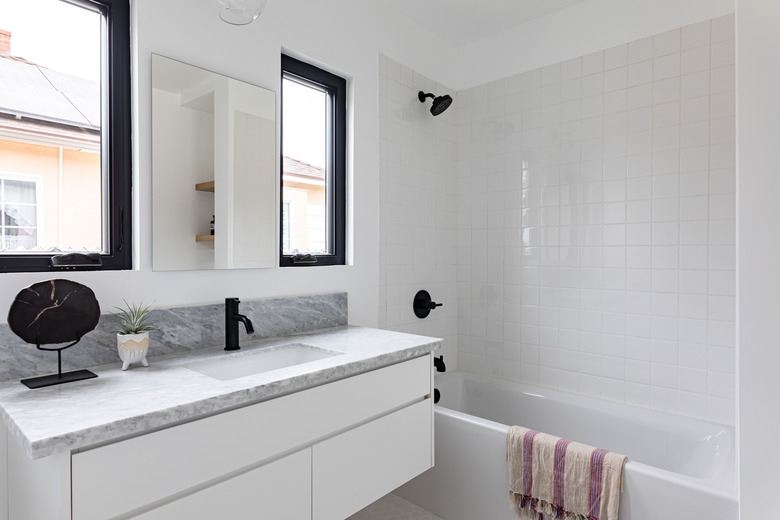
The bathroom exhaust ventilation fan disperses air through an opening in the fan housing, which is usually 3 inches in diameter and ideally faces in the direction of the ventilation system outlet. A 3- or 4-inch duct connects to the outlet on the fan housing and runs to a side wall or to the roof and connects to a vent cap that allows the exhaust to disperse outdoors.
Some veteran builders used to consider a soffit as an appropriate placement for the event outlet, but Section M1501.1 of the 2012 International Residential Code (IRC) changed the language to disallow exhausting through a soffit vent or ridge vent or into an attic or crawl space, leaving a side wall or roof as the only two options. The 2018 IRC contains the same language. A gable wall is usually the best option, keeping in mind that the outlet must be 3 feet away from a window or opening that allows air into the building.
 Sanford Creative
What Type of Vent Pipe to Use
What Type of Vent Pipe to Use
Flexible aluminum duct is easier to use than rigid duct and can bend around corners without the need to install extra fittings, but some local codes won't allow it, so be sure to check. Rigid pipe, either metal or PVC, won't collect debris inside and block air flow. When the pipe needs to change direction, the curve should be as smooth as possible, so a pair of 45-degree elbows separated by a short length of pipe is preferable to a single 90-degree elbow for a 90-degree bend.
Condensation can be a problem in an uninsulated attic, so the Homeowners & Trades Resource Center recommends installing rigid pipe with a minimum slope of 1/8 inch per foot toward the vent outlet to keep water away from the fan. In some localities, the building department may require the use of R-3 to R-8 fiberglass pipe insulation to control condensation, and even when it isn't required, it's a good idea to use it, especially if the vent opening is likely to ice up during the winter.
Venting Is Easier Over a Short Distance
Venting Is Easier Over a Short Distance
Ideally, you should aim for the nearest outlet location to make the vent for your bathroom exhaust fan as short as possible. If the bathroom has an external wall, that wall is usually the best choice, and if it's difficult to access, the roof over the fan is a good second choice for bathrooms on upper floors. A side wall is your only choice for first-floor and basement bathrooms, and if you have the option, aim for a wall on the side of the house rather than in front or in back.
When venting a basement on a lower floor, the usual practice is to remove the ceiling drywall and run the vent pipe along one of the joists to the side wall and out through that wall. If that's difficult for some reason, perhaps because the building has brick siding, it's acceptable to route the vent through the wall up to the roof or a gable wall in the attic.
 Stephen Paul for Hunker
Installing a Vent Cap or Roof Vent
Installing a Vent Cap or Roof Vent
A wall cap is different from a roof vent both in design and the way you install them. You install a wall cap by cutting a hole through the siding using a hole saw or reciprocating saw, nailing or screwing the cap to the siding and connecting the vent pipe with foil-backed tape, a cable tie or both. You should apply waterproof caulk to the cap before installing it and apply more around the edges after installation to ensure a good seal.
To install a roof vent, start by choosing a good location from inside the attic and then pound a nail all the way through the roof at that location so you can find the spot from outside. After tracing the outline of the vent opening on the roofing, cut through the shingles with a knife to expose the roof decking and then drill a hole for the vent with a hole saw or reciprocating saw. The flashing of the roof vent goes under the shingles and gets nailed to the decking with roofing nails.
It's important to properly seal a roof vent to prevent water from leaking into the attic. Apply a generous amount of waterproof caulk to the underside of the flashing before you set the vent and caulk the undersides of the shingles before you set them back in place.