How To Hook Up The Water To A Swamp Cooler
We may receive a commission on purchases made from links.
A swamp cooler, also known as an evaporative cooler, is an efficient and effective way to cool your home if you live in an area with low humidity. Swamp coolers are also more environmentally friendly than air conditioners since they don't require the use of chemical refrigerants. They do need a constant supply of water to operate, however, so you'll have to hook yours up to a water supply line before summer weather hits.
How to Hook Up a Ground Unit
How to Hook Up a Ground Unit
Swamp coolers installed on the ground or side-mounted in a window are the simplest to hook up. You can easily supply water to these units by running a supply line from the cooler to a spigot on the outside of your home. A simple adapter allows you to attach the water supply line directly onto the hose bib for a fast and easy hookup.
- Gather your supplies. You'll need two 1/4-inch plastic sleeves, two 1/4-inch brass nuts, a 3/4- to 1/4-inch swivel adapter, and a length of 1/4-inch plastic irrigation hose long enough to reach from your water source to the float on your swamp cooler. You'll also need two 1/4-inch wrenches.
- Slide a brass nut onto one end of the irrigation tubing. Next, slide a plastic sleeve onto the tube as well. If the sleeve has a flange on one side, be sure to install the sleeve so that the flange faces out.
- Slip the end of the irrigation tubing into the float hookup on the swamp cooler. Slide the plastic sleeve and brass nut down onto the threads of the swamp cooler and tighten the nut by hand. When the nut is hand-tight, use a wrench to tighten it another 1/4 turn.
- Run your irrigation line from the swamp cooler down to the ground if necessary and then run it along your home to the water supply. Make sure the line is close enough to the building's exterior wall that no one will accidentally run over it with the lawn mower or hit it with the weed whacker.
- Slip the other brass nut onto the supply end of your irrigation tube followed by the plastic sleeve. Again, make sure the flange on the sleeve faces out.
- Place the end of the irrigation tube in the 1/4-inch side of the swivel adapter. Slide the plastic sleeve against the adapter and slide the brass nut down over the threads.
- Tighten the brass nut by hand. When it's hand-tight, place one wrench on the brass nut and the other on the adapter. Give each wrench 1/4 turn in opposite directions.
- Screw the swivel adapter onto the hose bib of your outdoor spigot and turn on the water.
- Check your irrigation line for leaks each spring before hot weather strikes. Plastic irrigation tubing usually lasts about three or four years. It can have a shorter life span in direct sunlight, however.
Tip
If you want your swamp cooler's water supply line to last longer, use flexible copper tubing rather than irrigation tubing. If you do, you'll need to replace the plastic sleeves with brass sleeves during your installation.
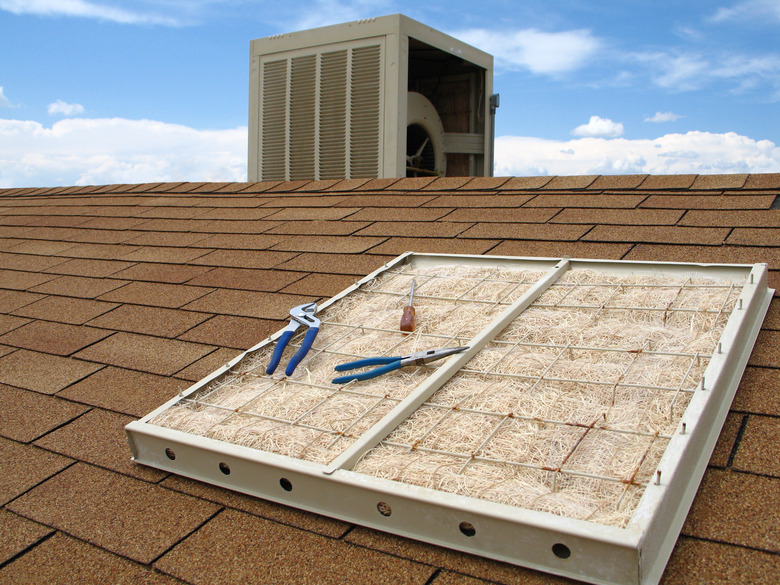
How to Hook Up a Rooftop Swamp Cooler
How to Hook Up a Rooftop Swamp Cooler
Technically, you can hook a rooftop swamp cooler to a water supply line in the same way you would one mounted on the ground or in a window. However, you may have a long way to go from the roof to the ground and then to a water supply. As such, rooftop coolers tend to run their water supply lines down through the chimney and then into the water heater supply line. This is a trickier installation, so consider hiring a pro if you're not entirely comfortable with the process.
- Attach a 1/4-inch irrigation line to the swamp cooler just as you would if it were mounted on the ground.
- Run the irrigation line through the attic and down through an interior wall or flue to the water heater. Your water line will follow the same path as the swamp cooler's electrical wiring most of the way.
- Verify that the water line isn't touching the sides of the flue. Plastic tubing may melt if the flue gets hot, and copper tubing placed against the flue will rot if it sits against galvanized sheet metal.
- Turn off the water to your home.
- Solder a tee connection into your water heater supply line. This will allow you to branch off the line, running water to your swamp cooler while still supplying your water heater. As always when soldering pipes, clean the ends of the pipes with emery cloth and apply a layer of soldering flux to the pipes before permanently connecting them.
- Install a shutoff valve on the water supply line leading to your swamp cooler in case you develop a leak at some point in the future. Note that you can do this job more quickly if you use a saddle valve to connect the swamp cooler water supply line to your water heater supply line. Many DIY websites will direct you to do so, but this is not recommended since saddle valves are notorious for leaking.
- Turn the water to your home back on and check your soldering to make sure there are no leaks.