

He Uses Old Window Blinds To DIY Concrete Paver Stepping Stones On A Budget

We may receive a commission on purchases made from links.
A tasteful stepping stone path in your backyard or garden is a dream for many, one that often gets deferred by the high cost of all those stone pavers. That's a major reason why so many look to clever DIY alternatives, using molded concrete to create a custom path rather than shelling out for pre-made pieces. After all, an 80-pound bag of Quikrete Concrete Mix runs less than $7 and can create several small stepping stones with little effort. All you need is a mold, and there are plenty of budget-friendly options, including the repurposed household item the creator at YouTube channel willythatglassguy used for his backyard path project.
Using repurposed flexible plastic hanging window blinds and some bags of Quikrete, the DIYer was able to make a stepping stone path from the back door all the way to the garden shed. After taping each window blind into a rough circular form to create the molds for the concrete, he piled the concrete powder into them and added water, and — presto — the stepping stones came to life.
The beauty of this DIY hack is that it puts old broken window blinds to use and creates a slightly different shape for each stepping stone, making them look more unique and more like natural stone slabs without the extra cost. The window blind dimensions create the ideal depth for a roughly 2-inch thick stepping stone, and you can easily adjust the size of the stones by using shorter or longer lengths of window blinds to form the molds. Just be sure to use cheap, thin blinds that will easily flex into shape without breaking.
Applying this DIY for durable, attractive stepping stones
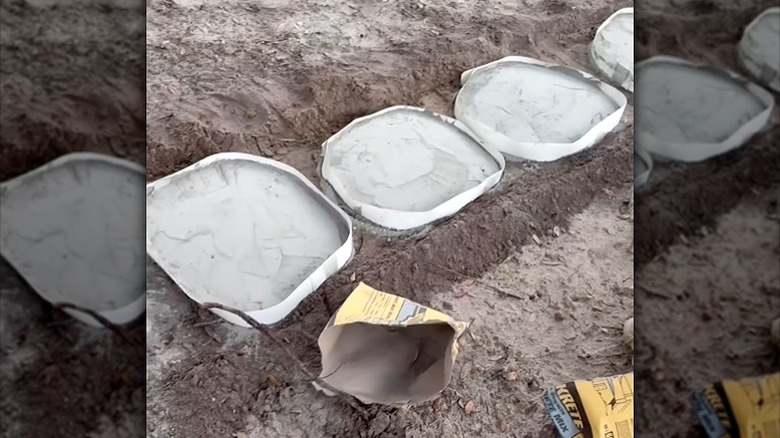
The creator in this video leveled and firmly tamped down the soil along the path and then started on his stepping stones. He wrapped each individual blind into a loop, securing the ends with tape, and placed these forms a few inches apart to create his path. From there, he simply dumped the concrete mix into the molds and hosed it down with water to hydrate the material. This is called the dry pour method, and while it technically works, you will be left with weaker concrete that is vulnerable to cracking over time.
In a wet pour, you thoroughly mix the concrete with water (check the instructions on the bag for the right ratios) in a wheelbarrow or something similar and pour the wet sludge into the mold. This allows the water to react consistently with the concrete mix and creates a stronger final product. For almost every application, including stepping stones, wet pour beats dry pour. But, if you absolutely don't want to whip out a wheelbarrow and learn how to mix concrete, a dry pour will get this DIY done.
Whether you opt for wet pour or dry pour, there are a more few ways you can elevate this project even further. Consider different additives to make the concrete stronger, and customize the look to suit your desired aesthetic. While it's still slightly wet, go over the surface of the concrete mix with a trowel or other tool to create a rough layered effect, or put your name and handprints to personalize them. Once they have fully cured, you can apply a concrete stain in almost any color to give your stepping stones the exact look you want.