

Add Hanging Storage To Your Garage With This Simple Milk Crate DIY

Remember those milk crates you used in your dorm room for everything from record storage to extra seating? We're throwing it back, but this time with a new appreciation for the simple plastic bins. We're using them for easy, affordable garage storage and organization. The idea is to simply mount the sturdy high-density polyethylene plastic crates with the bottom of the bin flat against the wall, as demonstrated by Samgreen_maker. It becomes a bit of a floating shelf for your garage wall. By mounting the crates directly to the wall where you have open vertical space, you're increasing your storage capabilities without taking up precious shelf space on your existing shelving.
No milk crates? No problem! You can buy them new — the Fleet Farm 16-Quart Milk Crate is only $7.99, and other farm and home improvement stores also sell them. If you don't care about having a matching set, check on Facebook Marketplace or your local Habitat for Humanity ReStore location for cheaper used options. Either way, using milk crates for customized hanging storage is a more affordable alternative to pricy garage storage systems. And since the crates are relatively small, you can fit them into little pockets of space. Add just a few or fill an entire wall with crates, depending on your storage needs.
They're also relatively easy to install — you screw the bin directly to the wall. The open grid design offer natural openings for the screws (and all of those gaps allow for good ventilation for your shelving). You'll need concrete screws, anchors, and a masonry bit for your drill if your garage has cinder block walls.
Anchor milk crates to the wall for ample storage
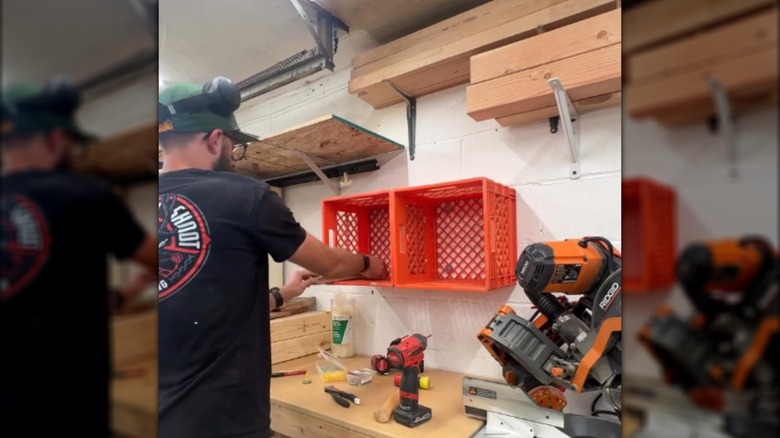
Since plastic milk crates come in a rainbow of colors, you could end up with a mismatched collection if you're buying them secondhand. Those different colors can be used as a color-coding system, but you can also spray paint the plastic if you want all of the crates to be the same color. Use a spray paint product designed for plastic, and clean the crates well before applying the paint.
Placement is crucial for this DIY garage space organization idea. Consider what you're storing and where you'll access it from. Hanging the crates above your work surface is ideal for items you use frequently during projects. Less-used items can be stored in less accessible areas. Keep in mind potential hazards — installing a crate to hold spray paint near your garage heater creates a risk, for example. Sam Green zip tied two crates side-by-side and attached them together for a two-part shelf. You can also install each crate individually, whether you place them next to each other or space them out.
To hang the bins, drill pilot holes in the wall and add anchors — measure the spacing between the holes in the bins first to position the pilot holes correctly. Hold the crate against the wall, and place a large washer against the plastic crate. This helps hold it in place. Then, add a screw to the hole to secure it. Repeat on the other side of the bin.
Ways to customize your milk crate garage shelving
So far, we've talked about mounting the crates with the bottom against the wall to create a shelf. However, there are other smart ways to use the milk crates, including mounting the crates to the wall with the opening facing upward. This would work well to store small kids' toys or other items that might roll or fall out of an open shelf. Instead of using screws to attach the crate in this way, install a row of sturdy hooks. Then, you can hang the crate on the hook through the cutout handle, which allows you to take the crate down to access items.
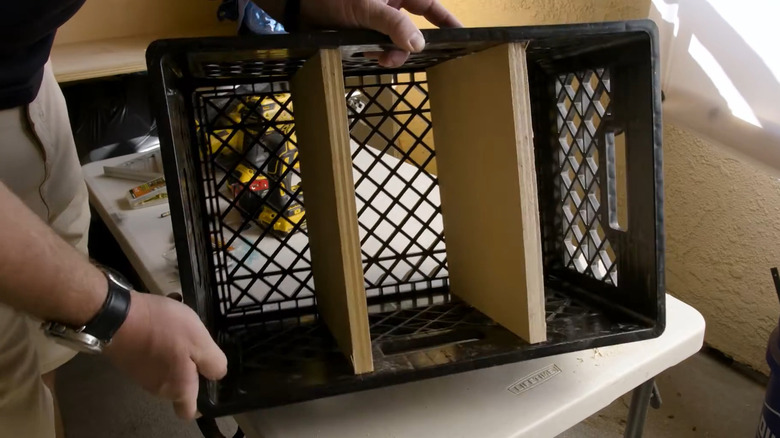
While the openings on the crate improve ventilation, they're not great for small items. Lay a mat or a thin piece of wood at the bottom to keep items from falling through. To divide the space up in a shelf-style crate, consider adding additional organizers or DIY shelves inside the crate. Zip tie or stack smaller milk crates or similar plastic bins inside the larger crate to sort items or create multiple tiers of storage. You can also loop S hooks through the openings to create hanging storage inside or outside of the crate.
To make a shelf inside the crate, cut a piece of scrap wood the same width as the crate. Hold a large washer against the outside of the crate, and attach a screw through it into the wood to secure the shelf. Add several screws in this way to make the shelf sturdy. You can also build a simple wooden shelf with two upright support pieces and a horizontal wood piece to slide into the crate. That keeps it removable if you want to repurpose the crate in the future.