

DIYer Turns 2 Dollar Tree Cutting Boards Into Gorgeous Countertop Storage

You don't need a master carpentry designation or a massive workshop to craft creative DIY storage. You just need a quick trip to Dollar Tree, starting in the kitchen section. There, you'll grab two bamboo cutting boards so you can replicate the unique countertop storage solution presented on the Nora G's Nook YouTube channel. The creator uses the cutting boards as decorative top and bottom pieces with divided plastic storage bins sandwiched between them, topping it with a decorative crystal knob. It's the perfect way to turn Dollar Tree finds into cost-effective countertop storage.
To create this yourself, you'll need two Cooking Concepts Bamboo Cutting Boards. The compartments the creator uses are two of the Essentials Plastic Three-Compartment Storage Trays With Lids, to create 6 divided sections. The cutting boards are just over 8 inches long, and the storage trays are exactly 8 inches, so they'll fit together perfectly. As the bottoms and lids of the plastic bins are flat, they can easily be attached to the boards with glue.
Every DIY needs fun little touches to personalize the look. If you want to change the color, pick up some paint. For this project, pick out your own decorative knob or handle to attach to the top. Optionally, wood beads or blocks make ideal feet for the bottom board to raise the finished piece.
How to build the storage container
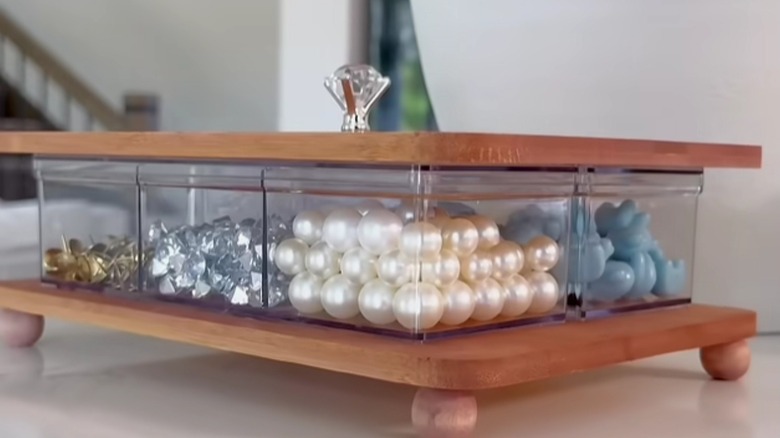
If you like the natural look of the cutting boards, simply remove the packaging. Otherwise, paint the board in your desired color or design. You can make the boards look weathered and reclaimed by painting and lightly sanding for a distressed finish, or do a light wash of chalk paint for a stain-like effect, as the YouTube creator did in their tutorial.
Once dry, position the two plastic storage bins on the bottom cutting board, centering the bins evenly. Use a craft glue that works on both bamboo and plastic to attach the bins to the bottom pieces. Then, put a drop of glue in the center of each section of the plastic lid. Press the top cutting board into the glue, making sure it lines up perfectly with the bottom cutting board. Using a ruler or similar long, straight object can help with the alignment. Putting a few heavy books on top helps all of the glue adhere fully.
Once you've finished the actual structure, you can add the decorative details like wood balls for the legs or a specialty knob, using glue to secure them in place. Fill each compartment with a different item, and place the storage bin where you want to use it.
Customize your countertop storage project
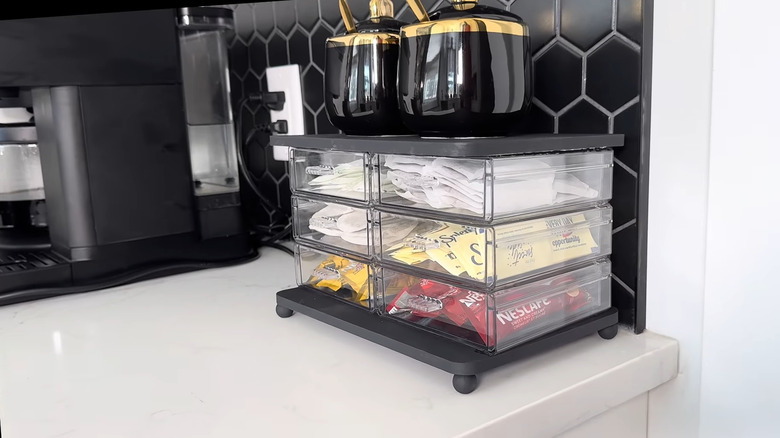
You can adapt this idea to use with other plastic storage containers, as Nora G's Nook shows us in the project pictured above. In this version, you don't need a handle on this option since the drawers open to the front. This is an ideal option for storage when creating a coffee station in your kitchen. You can use other storage containers as well, as long as they fit the size of the cutting boards.
You can also customize the look. Instead of leaving the plastic bins clear, you can cover them with a layer of spray paint. Another variation is to decoupage pretty patterned paper onto the drawers or cutting boards. Consider the purpose of the container and choose stickers or labels that correspond — food images for kitchen storage work well, for example. If you're using it for jewelry, line the compartments with soft fabric, like felt or velvet. Ribbon or other trim details can also make the display pop. You really can personalize this project idea as much as you want.