

Clever Crafter Transforms Empty Tuna Cans Into The Cutest Way To Decorate

We may receive a commission on purchases made from links.
Many DIYers overlook smaller tuna cans. It's easy to write them off and toss them in the trash without a second thought. However, if given a quick scrub with dish soap, tuna cans can be turned into the cutest DIY decor. The TikToker Lee Lexi Creations transformed a modest tuna fish can into whimsical decor with clay, wood, and natural elements for a farmhouse-inspired living space.
The bird nest-inspired design is a budget-friendly, cute, and crafty way to decorate shelves, countertops, and tabletops. Style it as a standalone piece or pair it with other rustic decor as part of a larger centerpiece. In fact, you could even arrange this decor alongside other upcycles, such as the one that turns tuna cans into adorable mini candles. While many tuna can projects serve functional purposes, this DIY is solely decorative.
In order to create Lee Lexi Creations' idea, you'll need air-dry clay and an ornate clay mold, such as Taoxibei's Crown Polymer Clay Mold. You'll also need off-white acrylic paint, brown finishing wax, and glue. To further emulate the original creator's finished look, a drill, crafting wire, a small wooden spindle, artificial foliage, and wooden figurines are necessary. Ensure all of the chosen embellishments are small enough to fit inside a tuna can, which is typically only 2 ⅛ inches in diameter and about 2 ¼ inches tall.
How to turn empty tuna cans into adorable decor
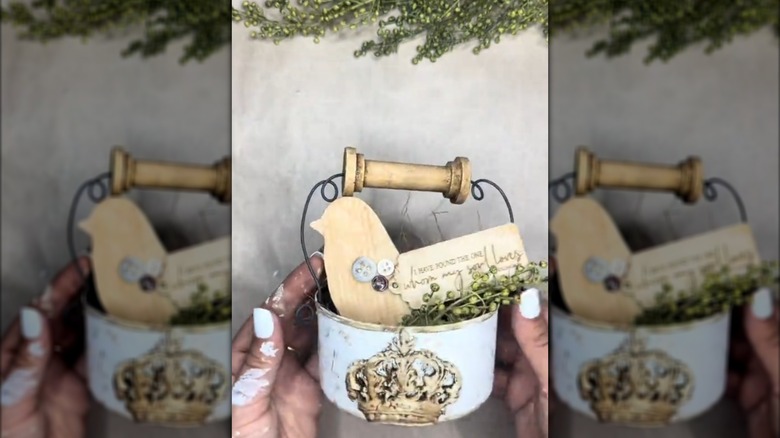
Before crafting with old food cans, remove the label and ensure they're free of debris. Thoroughly wash the tuna can with dish soap and water, and sand down the rim as an extra safety measure. Shape a piece of clay using your chosen mold as a template. Keep the piece of clay thin, around ⅛-inch, so it's lightweight and less likely to crack as it dries. Keeping it thin also makes it easier to adhere to a metal can. Press it against the tuna can while it's still moldable so it fits properly to the curved shape. Use hot glue, super glue, or a two-part epoxy glue to ensure it adheres to the can, and let it dry for the glue's recommended curing time.
Paint over the entire can and clay with an off-white acrylic paint. Once dry, use a brown finishing wax, like Dixie Belle Paint Company's Best Dang Furniture Wax. Apply the wax with a paintbrush, dusting over the raised clay design, the rim of the can, and other random spots to give it an aged look. Afterward, drill two holes, one on each side of the can near the rim, so that the holes are opposite from one another. Thread crafting wire through the holes and a spindle to serve as the handle.
@andreinarom116 A tuna can NEVER looked so good! 😍🤎 Another reason to recycle your cans and create something pretty! 🤩 #crafttok #crafting #craftideas #upcycling
The tuna can should be unrecognizable as an old food container, and it's ready to be decorated with your chosen embellishments. The original DIYer filled it with artificial grasses, a wooden bird figurine with super-glued buttons, and a small wood sign. This turned it into a whimsical piece of decor that looks like a handcrafted bird's nest. You can follow suit, or customize the look to reflect the current season. For example, use the Crafter's Square MDF Halloween Icon Ornaments for a Halloween-inspired look. Or, fill the can with Easter grass and festive spring accents. And of course, you aren't limited to tuna cans. The same decorative embellishments can repurpose empty soup cans in a similar way.