

DIYer Uses Mosaic Tile To Give His Trash Can An Adorable Makeover
We may receive a commission on purchases made from links.
Taking out the garbage might be a drag, but that doesn't mean your trash can needs to be a downer too. Creative ideas for decorating old, ugly, and boring bins have been popping up all over social media. Covering the cans with layers of paint or individually-placed rhinestones leans heavily into 2026's joycore trend, a movement embracing happiness and self-expression. But one DIYer figured out a much quicker way to give his trash can an adorable makeover, covering it with mosaic tile to create a disco ball effect that puts the kitsch in kitchen.
Saying goodbye to the eyesore of outdoor trash cans is easier than you might think, but hiding the indoor ones in a kitchen or bathroom is much trickier. It can be awkward or even impossible to squeeze them inside a cupboard. Keeping them in a pantry is inconvenient. High-tech versions often need to be located near an outlet. Plus the vast majority are available in white, black, or stainless steel colors that don't necessarily fit into every decor scheme. That's what makes this DIY so genius, because peel-and-stick tile is available in an enormous array of colors and styles that can match or coordinate perfectly with the rest of your kitchen or bathroom finishes.
You can skip right ahead if your trash can is brand new. But if you're embarking on this adorable makeover because yours is looking a little worse for wear, your trash can is probably gross and begging for a deep clean. To get the longest-lasting results, give it a good scrub with a degreaser and allow it to dry thoroughly before getting started.
Tips for using peel-and-stick tile to upgrade a trash can
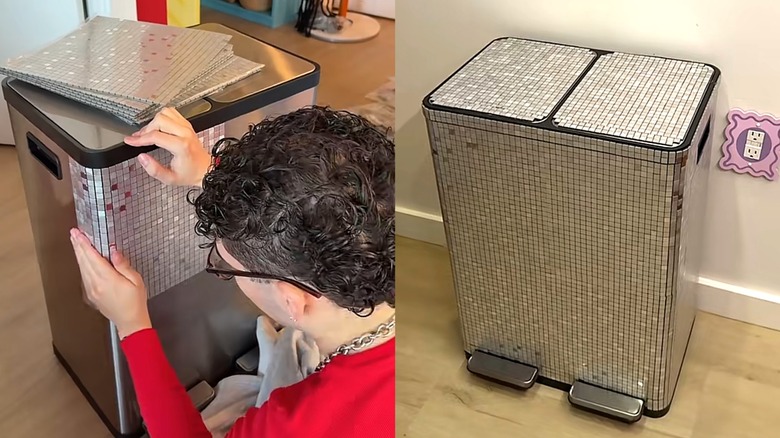
TikToker Juan Marquez used metallic peel-and-stick tiles similar to the XUANINY Metal Mosaic Backsplash Tiles from Amazon to completely cover all four sides of his divided stainless steel trash can. He began by placing a square tile along the front center line of the trash can before firmly pressing it into place. After completely covering the front and back of the trash can, he used basic kitchen scissors to cut and piece together smaller sections around the handles. Marquez finished by also covering both lids, creating a reflective look that became a focal point in his kitchen.
If you have a rectangular trash can and opt for mosaic tiles, the process of lining up your seams and patterns will be a little easier. However, any combination of trash can and tile shapes can work for this project. Keep in mind that circular cans don't have a true front or back, so use a level to draw a straight-edge from top to bottom to make it easier to correctly position your first tiles. You may also find cutting peel-and-stick tile easier with a sharp utility knife instead of scissors, especially if your pattern includes arabesque, fan, or other curvaceous shapes.
Pressing each cut piece against your trash can firmly is important, but using the lowest setting on a hair dryer to slightly warm the adhesive backing of your peel-and-stick tile before situating it will create a longer-lasting hold. It goes without saying you shouldn't try that trick if you want to make removal easier on yourself down the road. But because peel-and-stick tiles can be quite pricey, if you're only looking for a temporary makeover, use this technique with an inexpensive roll of wipeable contact paper instead.