

Make Magnolia's Viral Checker Cutting Board On A Budget With An Easy DIY

Whether you head to Waco to spend a day shopping at the Silos or you get your Magnolia fix online, it's easy to be tempted by understated finds like the Checkered Wood Riser. The piece is designed to elevate kitchenwares, baked goods, or seasonal displays, and it has a tone-on-tone checkered pattern that adds subtle detail. Despite its simplicity, even the smaller 9.75-inch square version isn't the most affordable option when you're decorating on a budget. However, Magnolia's viral checker cutting board is an extremely good candidate for a DIY dupe. YouTuber The Daily DIYer recreates the look by painting two inexpensive Dollar Tree cutting boards before attaching four small feet on the bottom corners to elevate the decorative riser.
The best part of this project isn't just how close your final result can be to the original, even if you're a crafting beginner. It's how much you'll save off full price. Just like the Magnolia finds, Dollar Tree has two cutting board options: a smaller version for $1.25 each or a larger one for $5.00 each. Along with picking up two boards in the size of your choice, grab some brown crafter's paint, a small foam paint brush, and super glue, too. The project also requires a roll of one-inch painter's tape and four decorative wooden knobs. If you opt to make the smaller size, you'll spend around $15 on materials instead of $36 at Magnolia. But going for it on the larger size offers even greater savings. Instead of splurging on a $60 piece of decor, you can dupe it for under $25!
How to dupe Magnolia's viral checkerboard display
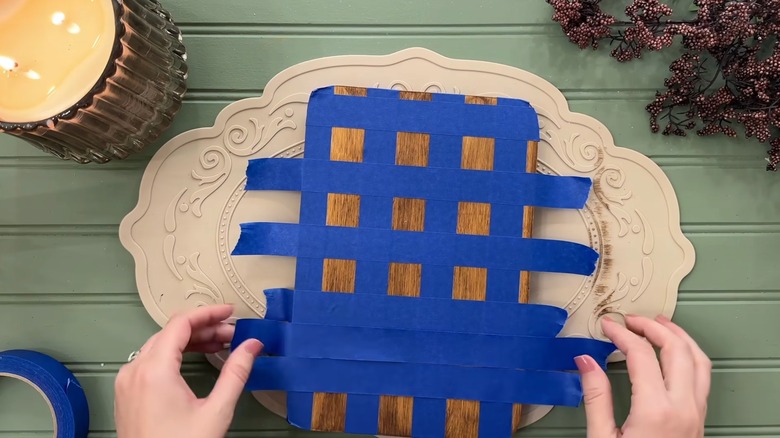
Start by gluing your cutting boards together to increase the overall thickness and height of your finished riser. While it cures, use clamps or a stack of heavy books to ensure a lasting hold. If glue has leaked out along the edges, scrape it off with a flathead screwdriver and sand it smooth. Since nailing a slightly weathered finish is necessary to get the Joanna Gaines look on a budget, apply a thin coat of brown paint on both sides and every edge of your board. Before it dries, rub the surface with baby wipes to create a distressed effect.
After your base coat is fully dry, begin creating the checkerboard. You can either use the same color brown paint applied more thickly or add a little black paint to make it slightly darker. Start by applying a piece of painter's tape across the longest side of your board, leaving a gap at the top. Wrap the tape around the edges and press it firmly into place before gently pressing another piece right below it, which will serve as a spacing guide. Continue the process, alternating well-adhered pieces of tape with your spacing guide until you've reached the bottom of the board. Then, rotate the board 90 degrees before repeating the process to create a series of evenly spaced squares.
Use a foam brush to paint inside each square, including those along the edges of your board. Once it's fully dried, remove the tape to reveal your colored squares. You'll then repeat the entire taping process to create the next set of squares.
Customizing your cutting boards
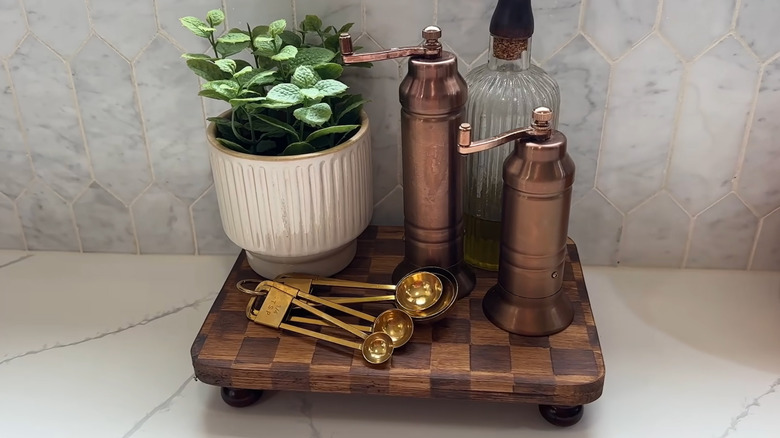
To transform your checkered cutting boards into a show stopping display riser, you'll need to add some feet. The Daily DIYer grabbed a few basic wooden cabinet knobs she already had in her craft stash, securing them to each corner with super glue. While it may be tricky to find knobs that are an exact match for the Magnolia original, there's a huge array of decorative wood finials available on sites like Etsy. To keep the height over your finished project as close as possible to the inspiration pieces, opt for feet between one and two inches.
In addition to customizing your checkered wood riser with unique feet, you could also ditch brown in favor of brighter paint colors. Because Dollar Tree's inexpensive bamboo cutting boards will be very difficult to stain, stick with acrylic paints to keep this craft project quick and easy. Adding a thin coat of clear lacquer is an optional step that can protect your painted finish from nicks and scratches over time.
That said, even though this DIY starts as a cutting board, there are some important things you need to know about wood finishes and food safety. Acrylic paint is non-toxic, but that doesn't mean it's entirely food safe. Even once fully cured, constant exposure to sharp knives, acidic ingredients, or hand-washing can make acrylic paint flake off into your food. Even if you keep yours in the kitchen as a place to display potted herbs or fancy spices, it's a safer bet to use your new DIY riser for decorative purposes only.