

Turn Empty Milk Jugs Into Stylish Countertop Storage With This Whimsical DIY

You can never have too much storage. After all, doesn't everyone want to maximize every possible inch of space? However, the cost of all those little containers adds up fast — because let's face it, they aren't cheap. You can, of course, turn dollar store finds into stylish storage, but there are other options. What if you could take something you were going to throw away anyway and transform it into an adorable DIY storage solution? With a few simple craft supplies and just a bit of time, you can turn used plastic jugs and a scrap of cardboard into a stylish countertop tote. It's great for storing utensils or carrying them outside for a backyard picnic, and has two sides for double the storage space.
This DIY by Evrim Taşer Yılmaz on YouTube repurposes used plastic jugs and cardboard to create a cute countertop holder or tote. In her video, Evrim shows the tote being used to store kitchen utensils like spatulas and wooden spoons, but you can use it to store just about anything. To complete this DIY, you will need two plastic jugs of the same size, cardboard, craft sticks, paper tape, and decorations such as jute twine and silk flowers. You will also need a hot glue gun, scissors, a box cutter, and some general-purpose pliers with a built-in cutting edge.
Making the base of your new tote
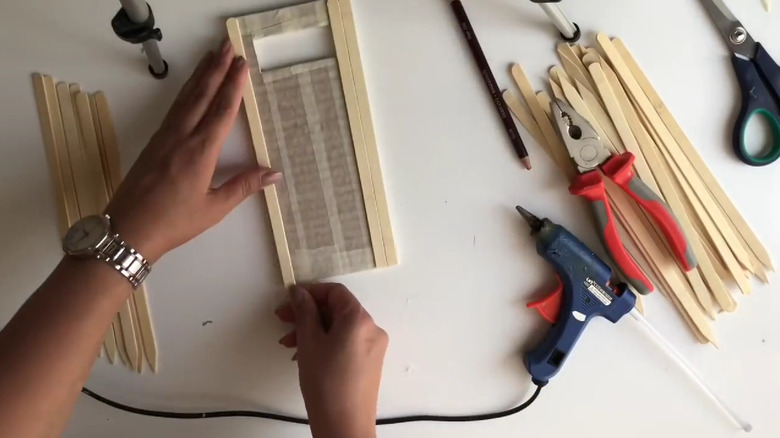
The first step is to make the base. Using scissors, cut the jugs in half, rinse them out, and let them dry. This is also a good time to remove any labels. The cardboard will be used to make the handle. Cut it into a rectangle with your scissors. It should be the same width as the containers and as tall as you want the handle to be. It should clear the tops of the jugs enough that you have space to cut a hand hole. Use a box cutter or craft knife to cut a hole in the top of the cardboard. This will be the handle of your storage tote.
Now it is time to prep the pieces. Using wide paper tape, cover the entire piece of cardboard. If you use the same color of tape as the craft sticks, it will give it a more finished look if anything peeks through. In the original tutorial, Evrim does not put anything over the plastic jugs. If you have the time and want to make your project look a bit more polished, you can either paint the jugs or use Mod Podge and patterned napkins to decoupage the entire surface. There will be no sticks on the interior of your countertop tote, so anything you do now to cover the plastic will look adorable on your finished product.
Turning trash into treasure
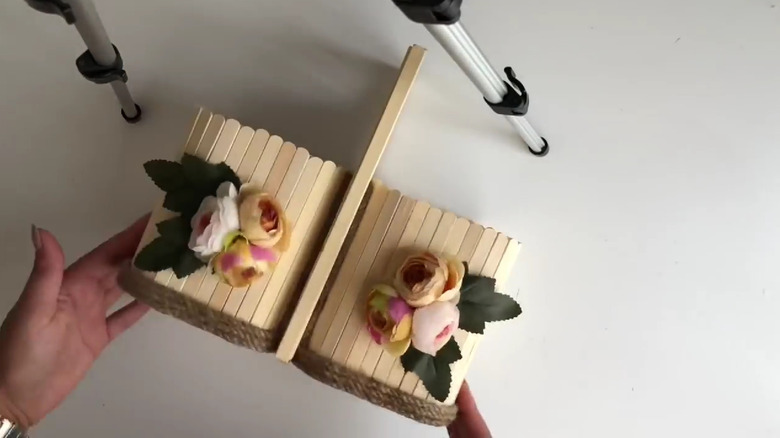
In the original DIY, Evrim uses wooden craft sticks to cover the outside of her tote. Cut each stick to fit, and then use a hot glue gun to glue them vertically like fence slats over the entire cardboard centerpiece, and around the outer edges of each tote. There should be nothing visible between each slat. While Evrim uses wooden plant labels or pointed craft sticks for this, you could use regular craft sticks, popsicle sticks, or even coffee stirrers. In the video, general purpose pliers are used to cut each stick to the correct size, but you can also use miter shears for a cleaner and more precise cut.
Once all the sticks have been cut and glued, it is time to assemble the individual pieces into a tote. To do this, you will need to glue each milk jug half to the bottom section of the cardboard, one on either side, so that the cardboard handle is sticking up between them. In the video, Evrim uses a combination of fast adhesive and hot glue to join all the pieces together. After everything has dried, it is time to apply the finishing touches. Evrim uses jute cord wrapped around the bottom of each jug to make the edges look neater. If you don't like jute, ribbon would also work. Evrim also glues fabric leaves and flowers to the side of her tote for decoration. You can decorate with anything you like, or even just leave it as is. To add your own special touch, try decorating with paint, sea shells, pressed flowers or even something unique like folded origami.