

Turn An Old Hutch Into A Stunning Bathroom Vanity
Is your builder-grade bathroom vanity in need of a major overhaul? Remodeling a bathroom isn't for the fainthearted, but replacing cheap MDF cupboards with a high-end wooden vanity can make a dramatic difference. While there are plenty of options from stores like Pottery Barn, West Elm, or Wayfair, they aren't exactly budget-friendly. Fortunately, there's a surprisingly affordable upgrade you can DIY. With some careful shopping on Facebook Marketplace or your local thrift store, along with some basic woodworking skills, you can turn an old hutch into a stunning bathroom vanity (with some extra storage as well).
There are plenty of YouTube videos out there demonstrating how to turn a wood dresser into a bathroom vanity. But by substituting a hutch with doors on either side, instead of a dresser with full-width drawers, you'll save yourself a ton of hassle since there will be far fewer precision cuts needed to accommodate the sink basin and plumbing. But, you'll still need either a jigsaw or hole saw to create openings! This project will require water-resistant polyurethane sealant to protect the wood from moisture. And you'll have to determine if you want an under-mount or drop-in sink.
The sink style and material you choose will impact the price of this project. However, sourcing an old hutch instead of buying a new one can drastically reduce the overall cost to complete it. Searching for "hutch," "buffet," or "china cabinet" will return a surprising number of affordable pieces neighbors are selling or giving away on Facebook. If you're on a really tight budget, consider checking out the Buy Nothing Project, the global program that can help you find free appliances and other items.
Measure carefully before choosing or cutting your hutch
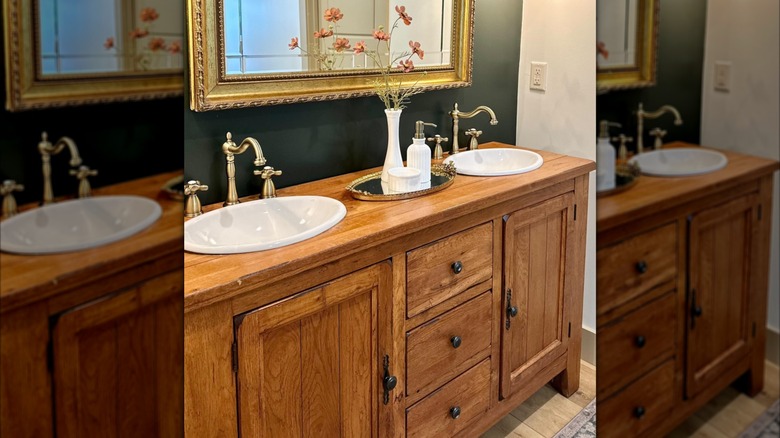
Before you fall in love with a particular hutch or enlist the help of a friend to move it, you must measure carefully to figure out the perfect bathroom vanity size for your space. The typical depth for a bathroom vanity is 21 inches. The correct width will depend on whether you want single or double sinks, and the best height will depend on what feels most comfortable while you're washing your face or brushing your teeth. To get the most bang for your buck, and have an easier time lugging it home, choose a hutch that either consists of a single lower piece or a stacking top and bottom that come apart.
@rosacox A lot of people have been asking about the hutch we repurposed! It is a Broyhill Attic Heirloom piece we bought off of Facebook Marketplace. I really wanted antique vanities in my bathrooms and I got two pieces for the price of one! (Way cheaper than building laundryroom cabinets and a master vanity. My husband and FIL cut out the holes for the sinks and @Kingston Brass faucets (my fav) and the top cabinet piece fit so perfect over the washer and dryer! Def one of the harder pieces to plumb but cheaper! #vintage #vanity #bathroom #repurpose #laundry
Next, you'll need to make even more measurements to determine exactly where to make your sink and plumbing cuts. If you opt for a solid surface countertop with an integrated sink, you can simply remove the entire top of the hutch. But for drop-in sinks, it helps to make a template so you can trace precisely where to cut. After using a jigsaw to create the necessary openings, waterproof the wood with a coat of sealant. Then, carefully situate the hutch into place before installing the sink and related plumbing.
You may find yourself wondering what to do with the top of your old hutch, unless for some reason you've decided to give up on bathroom mirrors altogether and want to install it back on top of your sink. Since it will stay in the splash zone, we don't recommend that approach. Instead, consider mounting it in your laundry room to hold detergent or dryer sheets.