

Turn Pavers Into Fun And Cutesy Yard Decorations With A Crafty DIY
We may receive a commission on purchases made from links.
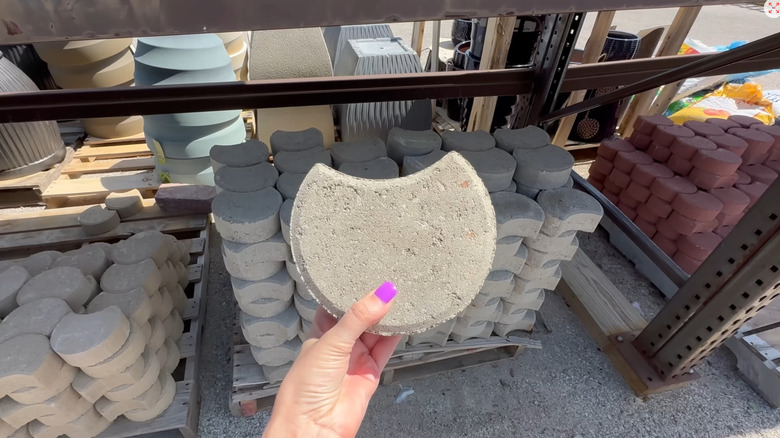
Think installing a paver patio is the only use for those inexpensive concrete squares and rounds? Then you're missing out on a whole lot of creativity in your garden! TikTok creator deewilliamson70 shares several cute critter projects that all start with a rounded paver piece, similar to this Crescent Edger Block from Menards. She paints them to look like a whole menagerie of animals and insects that add pops of color and whimsy to gardens, patios, and front yards.
The blocks she uses are mostly circular pavers with a rounded section cut out of one side to let them sit next to one another. Turns out, this shape is perfect for making caterpillars, owls, ladybugs, and whatever other creatures you can dream up. The thickness of the blocks helps them stand upright, but you can also lay them flat on the ground if you want to turn them into colorful stepping stones. And since the pavers are heavy and sturdy, you don't have to spend too much time figuring out how to hold down and secure the lawn decorations.
You'll paint the designs onto the pavers, so choose an outdoor acrylic paint — like this Shuttle Art Outdoor Acrylic Paint – that will hold up to the weather. You can also coat the pavers with sealant to lock in the design. Grab paintbrushes and other painting tools you might want, like sponges, foam brushes, and dotting tools. If you plan to stack your designs, having construction adhesive on hand is helpful — the glue keeps them from falling over or shifting apart.
Paint a herd of critter-themed pavers
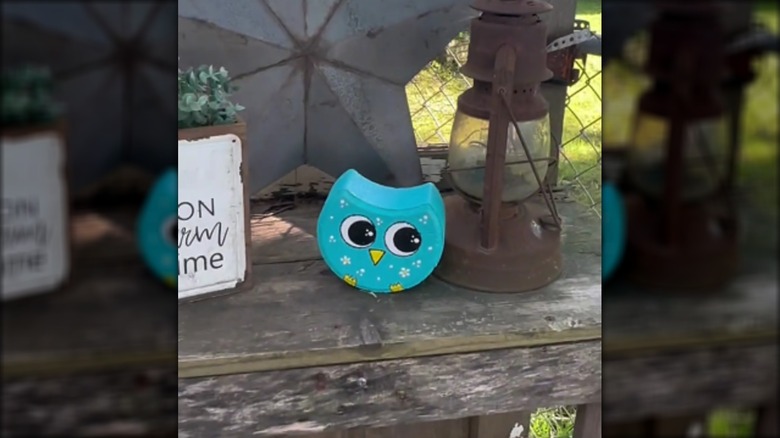
The basic idea here is to paint the entire paver one color and then paint the face details to transform it into your critter of choice. Keep the design realistic by using true-to-life color choices and detailing, or go with the more whimsical vibe shared by the original creator. For example, her owl is light blue with white polka dots and flowers on the body, but you could go with shades of brown and add wings, too.
How you position the block depends on what you're making and how you want it to look. In the owl example, the curved cutout goes at the top to form the ears. But on the creator's ladybug design, she turns the paver the other way so that the main rounded portion creates the bug's body. Or, flip it to the right so the points look like the ladybug's open wings. Get creative with the animals you paint — the points can serve as ears for all types of animals, including cats and dogs. You might even prefer using different paver shapes, such as a hexagon to create a lion's face.
@deewilliamson70 🐛 Who knew a few ordinary landscape pavers could become such an adorable caterpillar? This is one of those projects that's easy to make your own! Choose your favorite colors, add a bow, create a fun face, and let your imagination take over. No two caterpillars have to look alike—that's the beauty of handmade creations. Thank you all so much for the amazing support you've shown my owl tutorial. Seeing so many of you enjoy these landscape paver projects has inspired me to keep creating and sharing even more ideas with you. 🩷 Where would you display this little cutie—in your flower bed, along a walkway, or on your porch? 📌 Save this tutorial for later and share it with someone who loves DIY yard art! YardArt #GardenDecor #CraftTOK #FarmhouseStyle #CreativeDIY
Another idea is to combine multiple pavers to create one complete critter, like a caterpillar, with each paver serving as a section of the body. Feel free to make it as long or short as you want. Alternatively, you could make a taller owl by stacking two pavers, painting the bottom one to look like the body and the top one as the head. Finally, turn the pavers into the cutest DIY garden path to lead to your critter display, or consider positioning your paver animals along a flower path.