Transform An Old Shoebox Into A Clever DIY Jewelry Storage Solution
Do you have empty shoeboxes taking up space in your closet? Although some of them are so flimsy they're easily smushed into the trash, it can be difficult to part with the sturdier lidded ones after investing in a new pair of sneakers or boots. If you're serious about accessorizing, there's no need to chuck them out. Instead, clever TikTokers are transforming old shoeboxes into DIY jewelry storage solutions. You'll cover the box inside and out with fabric or contact paper before adding cushioned lids to protect delicate pieces, cardboard partitions that help avoid scratches, and rolled paper inserts to hold earrings and bracelets in place.
Along with leaving more money in the budget for new gems and baubles, creating upcycled jewelry storage is a sustainable solution to a serious problem. Thanks to their plastic inserts and thick coated cardboard materials, most shoeboxes aren't actually recyclable. Fortunately, those features can be reinterpreted into unique jewelry boxes that provide plenty of space for your sparkliest things.
To make one, you'll need enough fabric or contact paper to completely cover your shoebox. Using leftovers from your fabric stash will keep your costs down, but you'll need craft or hot glue to attach it. A sharp pair of scissors will also come in handy. Although it's totally optional, you may also want to add a decorative touch. A few inches of colorful cord, and a handful of beads or a decorative pendant will do the trick.
Customize your shoebox storage with cardboard drawers, dividers, and pushpins
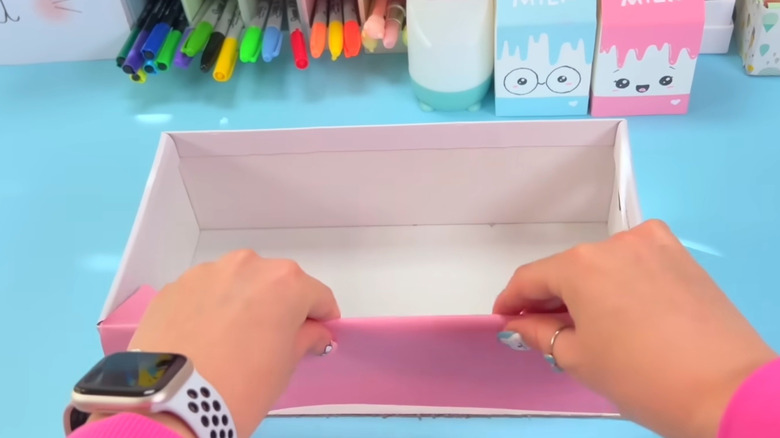
The first step is to cut the lid off and cover the box in fabric using hot glue or craft glue (you can also use contact paper, but the box may not feel as sturdy). For the lining, either glue a strip of excess material to the bottom of the box, or use fabric in a different color for contrast. Now, cut the lid into three pieces: two rectangles with a thinner cardboard strip in the middle. Secure the pieces together with masking tape. You can repurpose any plastic packaging inside your shoebox to create a slightly cushioned effect. To do that, cut a piece of cloth that's slightly larger than the lid itself. Glue all but one of the edges to the bottom of the lid, creating an envelope-style opening at one end. Fill it with packaging (or cotton balls or fabric batting) before gluing the final edge to achieve a padded effect.
@craft_tiptop Shoe Box into Jewelry Box – Easy Craft #jewelrybox #jewelryboxcraft #diycraft #easycraft #cardboardcraft #papercraft #shoeboxcraft #shoebox #craft #handmade #diy
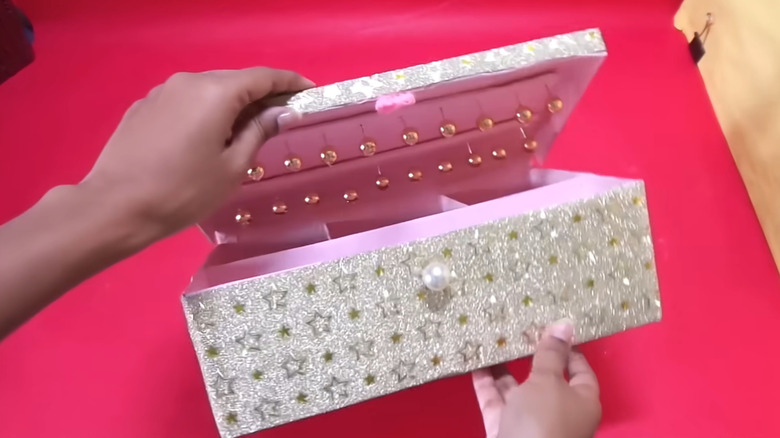
Consider how you'll open and close your jewelry box. It's easy to add a pull tab that's both decorative and functional. Just glue a thick cord directly to the center of your cardboard lid before covering it with fabric or contact paper. You can also glue a bead onto the front of the box as a little handle.
Now, think about all of the possible jewelry organization ideas for your most treasured possessions. If you have lots of rings and earrings, add a few tightly rolled sheets of paper inserted lengthwise across your shoebox and glued into place. For bracelets and broaches, avoid unsightly scratches by using upright pieces of cardboard as dividers. When a collection is mostly longer necklaces, rotating your shoebox so that the lid functions like a door can help avoid tangles, especially when you add small pushpins for hanging each strand.