Ditch The Traditional Aerator: There's A Smarter DIY Solution For Your Lawn

We may receive a commission on purchases made from links.
Aerating your lawn is one of the tasks we think homeowners don't talk about often, which is sad, because it's a great way to keep your lawn healthy and your soil from compacting. But, let's face it, lawn aerator tools can get unnecessarily expensive, and it can be hard to justify dropping a few hundred bucks for something that you only use once or twice a year. So, instead, we recommend creating a DIY version that's just as effective and only requires a few materials (2 two-by-fours, nails, 2 screw hitches, and a strap).
While it's true there are some relatively cheap versions — we found this easymake 2-in-1 Lawn Aerator & Weeding Tool Set for $20 — we can't imagine it's going to outlast the sturdiness of the two-by-fours this project uses. Plus, you can make your version as big as you want, saving you a ton of time if you've got a bigger yard. There's also the option of just using a drill to aerate your lawn by hand but even for small yards, you might find it's just more efficient to do this DIY version instead. So let's break down how to create your own aerator step by step.
Creating a DIY lawn aerator only requires a few things
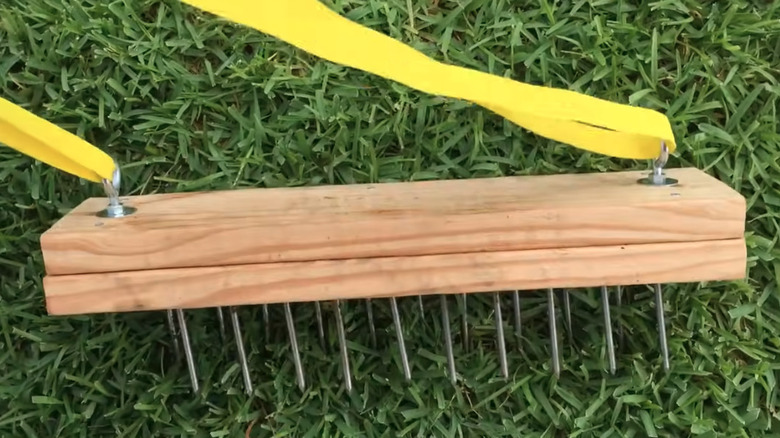
Have you ever seen those lawn aerators that you strap onto boots, like spiky snowshoes? Well, this DIY is essentially recreating that, but with a little more oomph. For this project, you'll need two wood planks cut to your preferred size, two hitching rings, and 60D nails (these 6 Inch Galvanized Landscape Spikes are perfect for the job), and a sturdy strap. You can use smaller nails, too, if that's what you've got, but these will go deeper and create bigger aeration holes than a standard construction nail could. Tools-wise, you'll just need a vise or clamp, hammer, and drill.
Start by getting one of your planks that will be easy to drive the nails all the way through. Then use a marker to mark the design so that you know where the nails should go; the nails should be evenly spaced and in alternating rows. Next, just hammer the nails through but be careful since you'll now have sharp spikes poking through. Next, clamp your second board on top of the nail board (on the side you hammered on) and screw a hitch hook onto either end. Then run the strap through the hooks and secure it to your desired length.
To use the tool, you'll just push the pointy side down into your lawn with either your foot or a rubber mallet, then use the strap to pull it out. Remove the soil buildup from the spikes before reinserting it and make sure to clean it before storing to keep it ready to go next year. If you keep up with this routine every spring, you should notice a healthier lawn and a drastic reduction in your pesticide and herbicide usage.