Stop Wasting Empty Tin Cans — Transform Them Into A Unique Hanging Storage Solution

Metal cans end up in the trash so often that it's safe to say most of us don't look at them and consider their potential to become beautiful and functional household items. One DIY, however, might change your perspective! If you've been wanting more living room storage or a piece to help with office, kitchen, or bedroom clutter, stop tossing your empty tin cans. They can be attached together to create a hanging storage solution with multiple cubbies to help organize small items around the house. And don't worry about the looks — you'll give them a makeover first, so the end result is chic instead of an eyesore.
YouTuber DiY BiGBooM shared this creative project online. The other supplies needed are spray paint, hot glue, and jute twine, such as SMART&CASUAL Natural Jute Twine. You can also decorate the organizer with PMLAND Artificial White Pearls, which resemble the ones the DIYer uses, or grab strands of beads or rhinestones, if they're more your style.
Start collecting cans from your favorite foods, washing them out thoroughly. To make a large wall piece like in the video, you'll need 16 empty cans. Of course, you could always adjust the amount if you'd prefer a different organizer size or shape (or you want to keep a few extra containers so you can turn your soup cans into garden decor). Just note that it might be easier to use similar-sized cans for this project. Once you're finished, hang it in a room to categorize and store things like costume jewelry, hair accessories, cords, mementos, art supplies, and more.
Repurpose tin cans into a stylish wall organizer
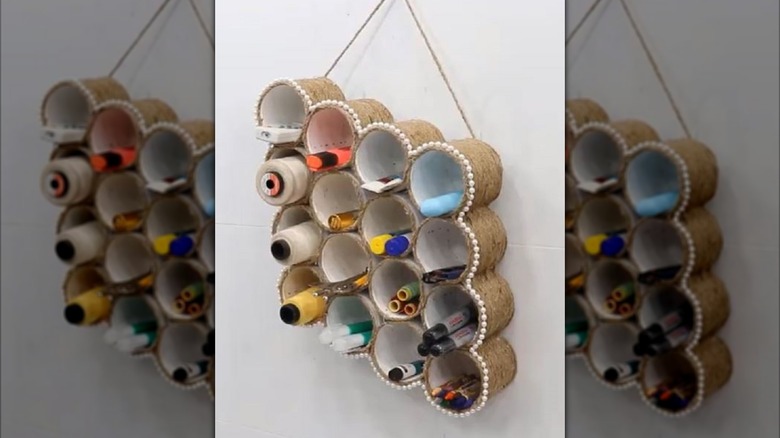
Begin by setting your tin cans up so that you can paint them. Feel free to spray both their insides and outsides — but the insides are what matter most, since they'll be more visible. Pick a color that'll blend beautifully with the room you'll be hanging the organizer in. Once the cans are dry, attach them together using hot glue. You could do so in a honeycomb formation, creating a rhombus shape, hexagon, or triangle, but aligning them in a square would turn out lovely, too.
Time to get out the jute twine. Glue the end to the bottom side of a can, and wrap it around the entire piece, adding glue as you go. Keep the twine close together so that the tin cans are fully covered. After wrapping the organizer, glue a piece of twine around the top of each can to soften the edges and complete the look. Embellish the piece by attaching strands of faux pearls, beads, or rhinestones around the outer edge. Or, glue on things like fabric flowers.
To make a hanger, attach rope to the organizer's back with heavy-duty adhesive, such as super glue or epoxy. Alternatively, drill holes into the backs of two of the top cans to hang it on long nails. You can now use the cubbies to sort out items. For example, it would be a helpful piece if you've been seeking home office storage ideas to cut clutter. Hang it by your desk, and fill it with supplies that typically eat up drawer space. Or, put it in a child's bedroom to help organize miniature toys. There are so many possibilities — just be mindful not to add too much weight.