Build This Sweet Birdhouse Just In Time For Spring!
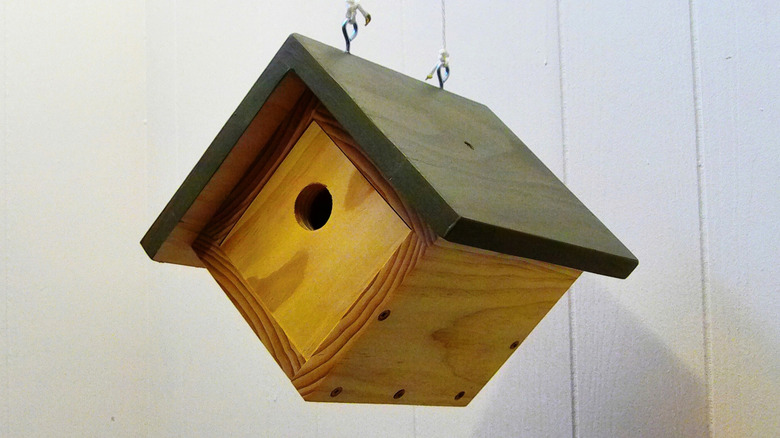
Among the myriad springtime blessings that come to us at the end of a long winter, the return of migrating birds is one that I truly look forward to every year. As a master woodworker with decades of experience, my inclination is to build birdhouses to attract those birds to my yard. They've varied from fancy to simple to quirky. A hanging birdhouse, similar to this cute DIY birdhouse, offers a classic look that will enhance any outdoor landscape — just in time for spring.
Our birdhouse will be made from 1-inch by 6-inch select grade pine lumber (with an actual width of 5 ⅜ inches) that you can find at any big box home improvement store or lumberyard. First, you'll need a way to cut the pine pieces to size. A chop saw, a handheld circular saw, or jig saw will work well. In a pinch, you could use a hand saw. Use a paddle bit to bore the entry hole. Note that it's critical that the parts are cut squarely with the edges of the pieces at 90 degrees to one another. A try square tool or combo square will help you achieve that goal. To start, cut out all of the parts with the exception of the two ends — you'll cut those to fit.
Start by crosscutting pieces from the 1 by 6 pine lumber, aiming for a total of 10 pieces: Four ¾-inch by 5 ⅜-inch by 8-inch sidewalls, two ¾-inch by approximately 4-½ inch square ends that you'll adjust later, two ¾-inch by 5 ⅜-inch by 10-inch roof pieces, one ¾-inch by 2 ¼-inch by 10-inch long wide eave, and one ¾-inch by 1 ½-inch by 10-inch long narrow eave. Use an "X" to mark your eaves.
Start with the subassembly processes to build your spring birdhouse
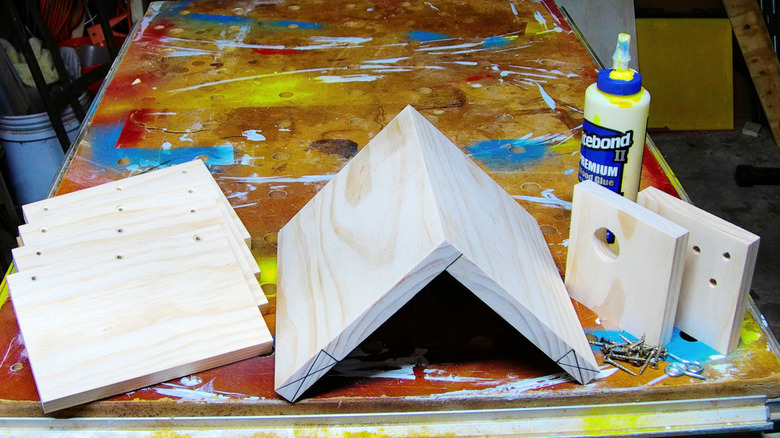
Your next step in this DIY process is to create two subassemblies, which are project pieces assembled separately in preparation for the final assembly. In this case, we'll make the roof first and assemble the sidewalls later. Use a water-resistant glue such as Titebond II to glue the roof pieces together, mating the edge of one piece to the face of the other. (If you have clamps, use them for this task. If not, you'll need to use some finishing type of nails to facilitate the task.) You can see their orientation in the photo above.
When the glue has cured after about an hour, glue the eaves in place on the long edges of the roof. I chose to add the eaves to the roof to avoid the need of purchasing wider lumber. Place them so that each side of the roof is the same width. Again, the photo above with the eaves marked with will be useful. If you don't have clamps, secure them in place with masking tape until the glue cures.
The sidewalls are also secured to one another in the same "edge to face" orientation, but in this case, you'll be using screws to join the pieces together. Sand the sidewalls smooth before going forward. Predrill three pilot holes equally spaced on the pieces (see the screw locations in the photos). Use #8 1 ½-inch long coated exterior screws (they often have a golden color) which will not rust when exposed to the elements. I chose not to add glue to the screws for this particular subassembly.
Finishing your birdhouse in the final assembly process
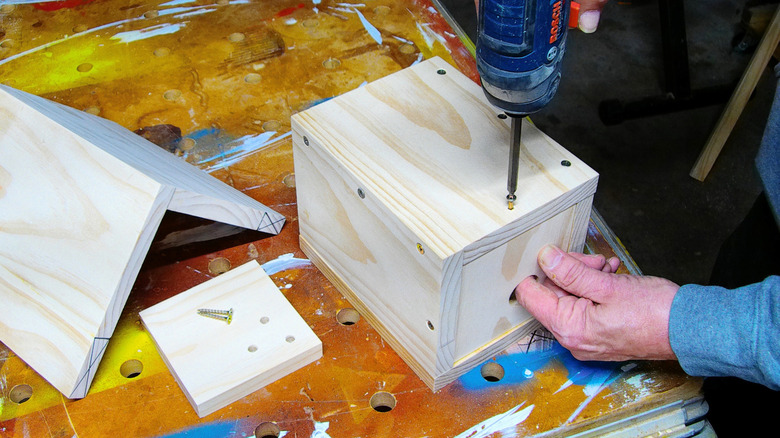
With the sidewalls assembled together, measure the openings and cut the ends to fit. Mine were 4 ⁹⁄₁₆ inches square. When you've cut and test fitted the piece, you'll need to drill some holes. On the end that will become the back of the bird feeder, drill three ¼-inch diameter holes. Placement is not critical; they are there to allow air circulation.
Drilling the entrance hole requires some research and decisions. Use this chart to determine what diameter hole for which species of birds you hope to attract. (Yep, it makes a difference.) I made mine 1 ¼ inch in diameter. I did not install a perch under the entrance hole, because not only is it not needed, but it could possibly help predators gain access to the birdhouse. Secure the ends with two screws driven in through the body of the birdhouse. Make certain the back's screws will be accessible after you attach the roof, as you'll want to take the back off once a year to remove the previous season's nesting materials.
There are just a few steps remaining. Sand the ends of the birdhouse body to level the area and prepare it for finishing, then sand the roof subassembly and mount two screw eyes to the peak of the roof. I used an exterior finishing oil on the body of the birdhouse and painted the roof green. I think it gave the birdhouse a classic backyard look. But you can choose to finish the project as you wish. Secure the roof to the sidewalls with screws, and you are finished with your springtime birdhouse.