This Creative Dollar Tree Hack Organizes Your Shoe Clutter With An Unexpected Item

Shoes might very well be some of the most difficult items to organize. For starters, shoes are bulky, as they come in so many different shapes and styles. Some shoes are also used less often than others, such as formal footwear and rain boots. As a result, certain pairs can get pushed to the wayside, leading to a cluttered entranceway or closet. The most common solution is to buy a shoe rack, but if you're on a budget, you might be looking for a more wallet-friendly option.
If this dilemma sounds familiar, try making a two-tier shoe rack using several Cooking Concepts Metal Cooling Racks from Dollar Tree. The affordable project, which was shared by YouTuber LifeDIYJosie, can store four pairs of shoes (though the exact number will depend on the style and size of your footwear). It's the genius Dollar Tree hack your cluttered closet needs for extra shoe storage, as it's great for organizing special occasion, rarely-used footwear in your closet. Alternatively, you could make multiple racks and place them side by side in the entranceway or hallway; simply move them around as your needs change. But how do you make a shoe organizer out of cooling racks, anyway?
How to make a shoe rack with Dollar Tree cooling racks
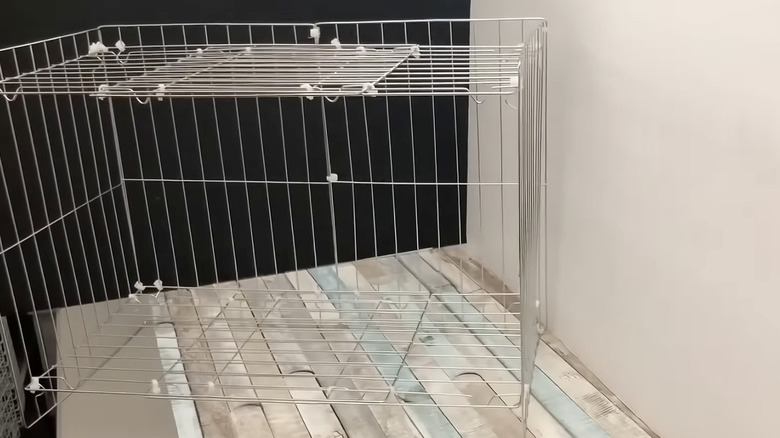
You'll need eight Dollar Tree cooling racks and zip ties, like the Tool Bench Nylon Cable Ties also at Dollar Tree. Take one pack of racks, then move them away from each other until a square (with a narrow rectangle on each side) forms. In each rectangle, add two zip ties to the top and two to the bottom, where the racks overlap. You'll add four zip ties to each rectangle, but you can use more for additional stability. Finally, snip the excess zip ties with a wire cutter, which will ensure the cleanest cut. Repeat with one more pack, making sure it's the same length as the first shelf. You should now have two wire shelves — one for the bottom of the shoe rack and one for the top.
Set one of the wire shelves on a flat surface, feet down, and separate the third pair of racks. Place one rack (with the feet facing inward) against the short side of the shelf, then attach with zip ties. Repeat on the other side with the second rack. At this point, the racks won't be supported, so lay the unit on its side. To add the top, use zip ties to connect the second shelf to the free edges of the cooling racks.
Separate the final pair of racks to make the back of your organizer. Set them side by side, long sides together and feet facing the same way, and connect with three zip ties. Place them against the back of your shoe rack, and secure with four zip ties on each side. The result? An entranceway shoe storage idea that'll keep chaos in check.
Ways to customize your shoe rack

There are so many ways to customize this organizer. For example, if you're not loving the silver finish, you can spray paint the entire unit in the color of your choice. Another idea is to line the bottom with a piece of foam board wrapped with patterned contact paper. If you're the crafty type, try weaving materials like fabric scraps or ribbon through the metal slots.
For extra stability, add a dot of hot glue or superglue, like E600, to each zip tie. Hot glue is best if you're short on time, as it dries quickly. You can also wrap twine or leather cord where the cooling racks meet each other. This will reinforce their connection while hiding the zip ties. Simply glue the end of the twine or cord to one end, then wrap tightly along the metal bars, adding dots of glue along the way.
Though this project is designed to be used on the floor, you can try hanging it with screws and plastic anchors. It's a great way to turn it into budget-friendly shoe storage that makes use of empty wall space. In either case, it will help tidy up your shoe clutter in the home, once and for all.