Can You Paint Over Lead Paint?
We may receive a commission on purchases made from links.
Lead paint is serious business, and if any of the paint on the interior or exterior of your home tests positive for the dangerous element, it's important to act promptly. As paint ages and turns brittle, it starts to flake and fall off, exposing you and your family — including young children, who are especially vulnerable — to lead poisoning caused by inhalation of lead dust or ingestion of lead-loaded paint chips. If the paint hasn't started to chip, the situation is still urgent, but it's more than urgent — critical, in fact — if the paint is visibly deteriorating.
The most effective mitigation strategy for lead paint is to have it professionally removed by a licensed lead abatement company, but that isn't always practical. Lead paint removal is an intrusive process, and while it's occurring, there's an increased risk of lead dust inhalation, so homeowners are usually advised to stay away. That's a lot to ask of a busy household, so it's natural to ask if there's an easier way, and as it turns out, there is.
You can in fact paint over lead paint with a process called encapsulation, which simply means to cover the lead paint with a fresh coat of new paint. However, you can't use just any paint for this; you need a paint designed for the purpose. Learn more about what paint encapsulation is, where you can use it, and the pros and cons.
What Is a Lead Paint Encapsulant?
What Is a Lead Paint Encapsulant?
Encapsulation, which is a technique that's also used to contain asbestos, involves coating lead paint with a layer of material that permanently prevents the lead paint from flaking off. The encapsulant must be thicker and more durable than ordinary paint, and it must remain flexible as it ages to prevent it from chipping off and exposing the paint underneath.
Three types of materials are generally listed as encapsulants, but one is a cementitious mixture you wouldn't generally use for painting. The two types of products you would want to use are epoxy- and polymer-based paint products.
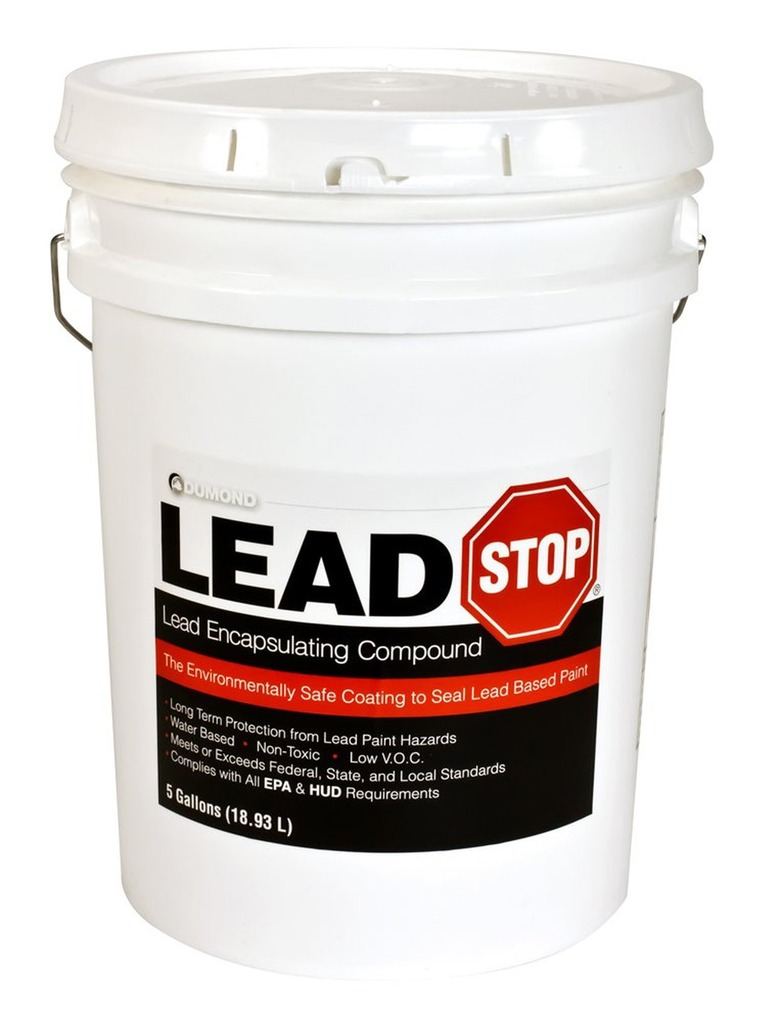
- One highly recommended product, INSL-X Lead Block, is a water-based elastomeric acrylic formulation that can be used as a primer or a topcoat.
- If you're doing the painting yourself and are sensitive to VOCs (volatile organic compounds), consider Ecobond Lead Defender.
Tip
Besides sealing in lead paint, encapsulant often includes bitter-tasting chemicals to discourage toddlers from taste-testing.
Where Can You Use an Encapsulant?
Where Can You Use an Encapsulant?
Encapsulants are safe to use on most interior and exterior surfaces, but there are three places where they aren't recommended:
- Floors, stairs, and other places where people walk
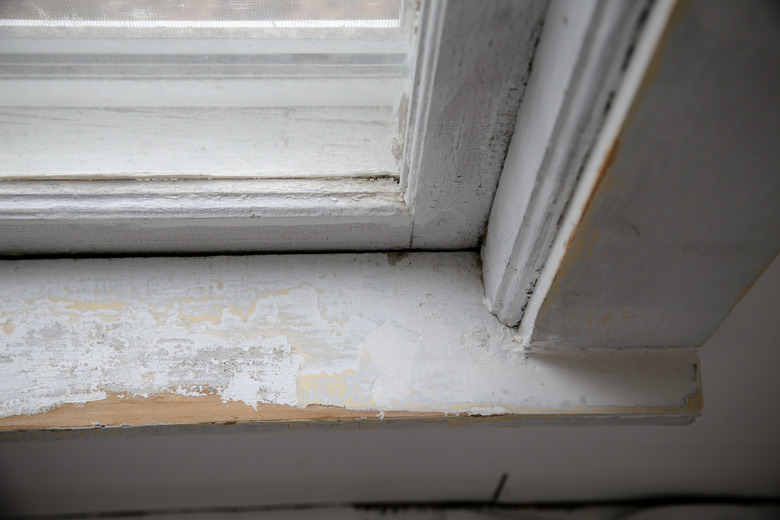
- Places subject to friction, such as window and door frames or drawers
- Surfaces with existing paint in poor condition that has started to crack, chip, or flake
Warning
Encapsulation may not work in places subject to extreme or prolonged moisture, such as windowsills where condensation collects regularly. In places in which encapsulation won't be effective, the only other options are lead paint removal or replacement of painted woodwork, such as doors, windows, window frames, door frames and drawers.
Pros and Cons of Encapsulation
Pros and Cons of Encapsulation
Because encapsulation is a fairly new technique (current EPA guidelines were released as recently as 2020), there is little long-term data regarding its effectiveness. That's one potential drawback to the technique, and there are others, as well as a few pros:
Pros
- Less expensive, safer, and less work than removal
- Does not require evacuation of the premises while work is underway
- Faster than removal. Surfaces that are clean and in good shape can often be repainted with minimal preparation.
Cons
- Not all surfaces can be encapsulated. Some other abatement technique is needed for floors and surfaces vulnerable to paint wear from friction.
- Encapsulation is not a safe solution for surfaces with existing paint in poor condition.
- Encapsulants will flake off surfaces that haven't been properly prepared. They need to be inspected regularly for evidence of chipping, flaking, or cracking.
Surface Preparation for Encapsulation

Surface Preparation for Encapsulation
Although preparation may be minimal, it's still important, especially if the existing surface is glossy. Encapsulating paint won't stick well to glossy surfaces, so they have to be de-glossed but not by scraping or sanding. It's never a good idea to sand lead paint because that just amplifies the health risks, so a liquid de-glosser, such as Klean-Strip, is recommended. It's easy to use; just wipe it on with a cloth and let it dry.
To provide an effective barrier, the encapsulant film must be continuous. Here's how to ensure that happens:
- Defects in the surface, such as holes and scratches, need to be repaired before you paint. It's best to do this with a flexible material, such as caulk or putty, rather than with a type of filler that needs to be sanded.
- After applying the fill material, wipe off as much as possible with a rag, let it set, and then paint.
How to Apply Lead Paint Encapsulant
How to Apply Lead Paint Encapsulant
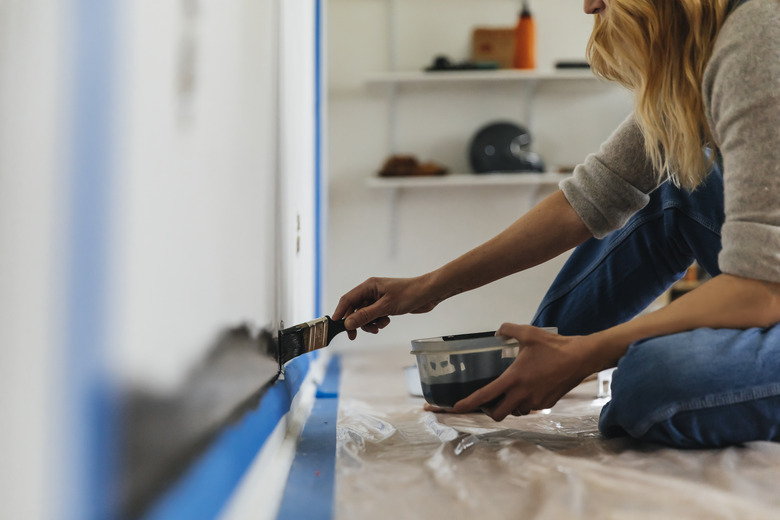
Perhaps the best way to apply an encapsulant is to spray it, which requires the least contact with the lead-contaminated surface, but most DIY painters opt to apply it with a roller and/or paintbrush. Either way, it's important to wear coveralls and a HEPA or P100 respirator to prevent inhaling stray dust particles. Don't forget to remove furniture from the room and cover the work area with drop cloths.
- Check the coverage. Lead-encapsulating paint is meant to leave a thicker coating than regular paint, so to prevent spreading it too thin, check the expected coverage on the paint can and try to keep your coverage close to that number. (For example, 1 gallon of INSL-X Lead Block covers 85 to 100 square feet, which is less than 50 percent of the coverage of ordinary enamel.)
- Measure the area. Measure out that approximate area on the surfaces you're painting and plan to use a full gallon to cover it. You won't get the full benefit of the encapsulating properties if you spread the paint thin, and you won't save money either because you'll probably need an extra coat.
- Gather your tools. Use a medium-nap roller (which means a nap length of 1/2 to 5/8 inch) and buy a synthetic-bristle paintbrush. Waterborne encapsulating paints, like all latex paints, soak into natural bristles (which are often some type of animal hair) and make them floppy and difficult to control.
- Keep your tools clean. Scrub your rollers and brushes with soap and water after each use.
Can You Paint Over Encapsulating Paint?
Can You Paint Over Encapsulating Paint?
You might be wondering whether it's possible to paint over encapsulating paint if you aren't happy with the color. The answer is yes; some painters treat encapsulating paint as a primer rather than a topcoat. The problem with this is that the extra topcoat makes it more difficult to monitor the condition of the encapsulant.
If you use a different kind of paint as a topcoat and you later notice cracking or bubbling, it might be difficult to tell if the problem is with the topcoat or the encapsulating layer. You can test by using one of the inexpensive lead paint test kits available at your hardware store or online to determine whether any lead has leached through, and if so, you may need to apply another coat of encapsulant. If you properly prepare the surface before applying the encapsulant and give it plenty of time to dry and cure before recoating it, however, you shouldn't have this problem.