How To Test For Lead Paint
We may receive a commission on purchases made from links.
Lead paint is a household hazard that continues to exist in American homes despite the fact that its use was outlawed in 1978. Homes built before that time are likely to have at least one coat of lead paint, although it may be covered by one or several coats of newer paint. Add to that the facts that countries like Japan and Vietnam continue to use lead paint on products they sell in foreign markets and that some 40 countries worldwide, including such major exporters as China, Taiwan and the Philippines, still use lead as an additive in paint products. Testing for lead paint before removing paint from wood or similar projects helps you protect your family.
Why Lead Paint Testing Matters
Why Lead Paint Testing Matters
Lead is toxic, and ingesting it even in small quantities is dangerous, especially for children. If you live in a house built before 1978 or if you have furniture that originated in a country that allows the use of lead paint, there may be a risk of lead-based paint ending up in your food or in the mouth of a curious toddler. And to remove the risk of lead paint, you first have to find it.
Testing for lead is something you can do yourself with a store-bought kit, but in some cases, it's better to collect a sample of suspect paint or dust and send it to a professional lab for testing. If you opt for lab testing, it's important to follow the recommended procedure for collecting a sample to ensure a reliable test.
Lead: The Poisonous Pigment
Lead: The Poisonous Pigment
Element number 82 in the periodic table, lead is a soft, bluish metal that exists in small amounts in the earth's crust. Artists and painters have used lead carbonate for centuries as a pigment because of its highly opaque, scintillating white color, and they have also used lead tetroxide, which makes paint bright red.
Lead resists corrosion, improves paint durability and acts as a drying agent, so it's no wonder that paint manufacturers in the U.S. began adding it to their products in the 1800s. This practice continued until lead use was limited by Congress in 1971 and finally curtailed by the Consumer Product Safety Commission in 1976. A complete prohibition of lead in household paint took effect in 1978. Homes built before that time could have lead paint on plaster walls, window trim and any other painted surface. The prohibition came into effect because of the growing understanding of the adverse health effects of lead.
Lead is a neurotoxin that produces a number of symptoms in adults, including headaches, joint and muscle pain, and problems with memory and concentration. Children and pregnant women are particularly vulnerable to lead poisoning. Children can experience learning and developmental disorders, hearing loss and seizures. Pregnant women may give birth prematurely, and the newborns may weigh less than normal and experience slowed growth. Even though paint-making technology has changed, old paint in your home can still expose you to lead.
Using Lead Test Swabs
Using Lead Test Swabs
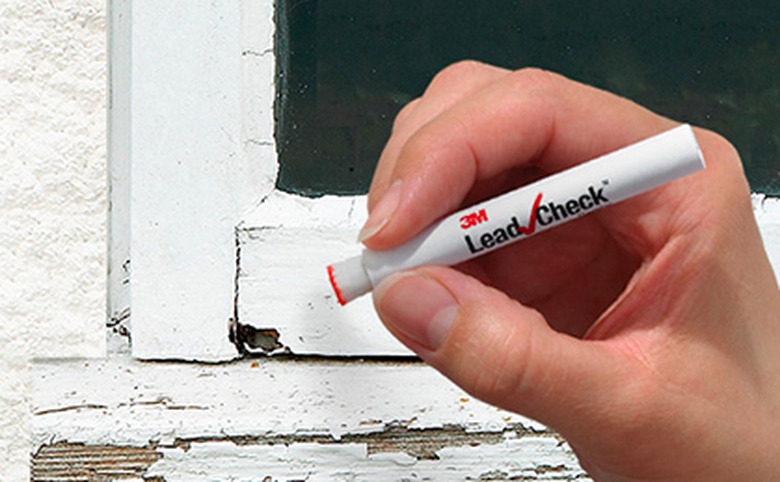
One of the test kits recommended by the EPA is LeadCheck from 3M. This kit is widely available and costs about $10 for a two-swab pack. Before you perform a test with the LeadCheck kit, it's important to expose all the layers of paint on the surface you're testing. The top layers may not contain lead, but the older ones underneath might since people often paint over lead paint during renovations.
When testing on wood, make a cut through the paint with a utility knife all the way to the wood to remove a small piece of paint and expose the wood. When testing on drywall, hold the knife at a 5-degree angle and cut a circular section about the size of a nickel. Be sure to cut all the way down to the drywall, but try not to cut through the drywall paper. Gypsum could interfere with the testing chemicals in the swab.
Performing the Test
Performing the Test
Each swab is attached to a pair of sealed ampoules enclosed by a cardboard tube.
- Squeeze the cardboard tube and crush the ampoules. You'll hear the sound of glass breaking.
- Shake the tube to mix the chemicals. The swab is now activated. It only remains activated for 90 seconds, so be sure the test area is ready.
- Squeeze slowly and firmly until a little of the mixture appears on the swab.
- Rub the swab on the test area and keep rubbing for about 30 seconds, then stop. If the test area or the swab itself turns pink or red, lead is present; this is a positive test result. If there is no pink or red coloration, the test did not detect lead–a negative result.
- Confirm a negative result by depositing a drop of the mixture on one of the dots on the confirmation card dots that comes with the test kit. It should immediately turn red, confirming that the test swab chemical is activated. If the dot on the card does not turn red, the test is invalidated, and you must test the paint again with a new test swab.
Each swab is good for only one test, so you need a new one for each additional area to be tested. Be sure to clean the knife blade with alcohol to prevent cross-contamination before you begin preparing another test area. You should wear disposable gloves when conducting these tests. After all tests are complete, deposit the used swabs in one of the gloves, stuff that glove into the other one, and throw everything away.
Collecting a Lab Test Sample
Collecting a Lab Test Sample
You may prefer to send a sample to a lab for testing. The results from lab tests are more accurate, especially when you suspect lead in a sample of dust or paint chips that have fallen onto the floor. You can buy a lab test kit at any building supply outlet for less than $20. It comes complete with instructions, but here's a quick rundown of the procedure:
- Put on the gloves that come with the test kit. If you're taking a paint sample, clean dust and dirt off the test area. If you're collecting a dust sample, no cleaning is required.
- Collect a paint sample by cutting through all the layers of paint down to the substrate and removing enough paint chips to fill a tablespoon.
- Collect a dust sample by using the wipe that comes with the kit. Rub the wipe lightly to ensure you actually collect dust and don't simply push it around.
- After you collect the sample, fold the wipe in half so that the soiled side is inside the fold. Rub the clean side of the wipe along the surface again in the perpendicular direction. Fold the wipe again.
- Deposit the paint chips or the wipe in the plastic bag supplied with the kit, seal it and put it in the postage-paid mailing envelope supplied. Include a check or money order for the testing fee and mail the envelope.