How To Install A Garage Door Opener

We may receive a commission on purchases made from links.
If you know how to install a garage door opener, you can save yourself between $250 to $500, which is equivalent to the cost of professional installation. But installing a garage door opener isn't exactly a walk in the park — online experts rate it from moderately difficult to difficult. That said, garage door opener installation is a home improvement project you can DIY as long as you have a helper.
Different garage door openers have varying features, so shop around to find the right one for you. Choose a model that can handle the weight of your door. A garage door opener with a power rating of 1/2 or 3/4 HP will work for most standard garage doors.
You'll also choose between openers with one of three drive systems: chain, belt, and screw-drive. Chain drive models tend to be clunky and noisy, but are affordable options. Belt drive openers, which cost a little more, work in essentially the same way, but are quieter. A screw-drive opener is quiet and low-maintenance compared to the other two types, but it's the most expensive option.
Before You Begin
Before You Begin
Before you install your new garage door opener, make sure the door is balanced — otherwise, the opener will have to work too hard, which will cause it to fail prematurely. To do this, lift the garage door almost all the way and release it. The garage door spring, also known as the torsion spring, should pull it the rest of the way. Next, open the door halfway, release it, and it should stay where it is. Finally, open it only a few inches, release it, and it should fall back to the floor. If the door fails any of these tests, the torsion spring needs adjustment. Trying to adjust the torsion spring can send it flying at dangerously high speeds, so it's best to call a professional who knows how to deal with it. Most contractors will be able to handle it safely.
It's also a good idea to lubricate the rollers on the sides of the door and the tracks in which they roll.
How to Install a Garage Door Opener
How to Install a Garage Door Opener
If you're replacing an existing garage door opener, remove all of its components, including the safety sensors mounted on the sides of the door. These required safety features are not interchangeable between models.
You'll need to mount the garage door opener near a power receptacle. If there isn't one available already, have an electrician install one (preferably in the ceiling).
1. Unpack the Product and Make Sure You Have Everything
Check all the parts against the parts list included with the instructions for your new garage door opener. You should find the following:
- The opener and mounting brackets
- The carriage tube that mounts on the garage ceiling
- The carriage, which slides along the carriage tube
- A header for securing the carriage tube over the door
- A bracket and connectors to secure the garage door to the carriage
- A wall switch
- A remote control
- Two safety sensors
- Wires to connect electrical components to the opener
2. Assemble the Carriage Tube
Follow the manufacturer's directions for assembling the carriage tube. The instructions will specify the appropriate length based on the height of your door. The pieces of the tube should slip together, and when the assembly is the proper length, use the fasteners provided in the package to secure them. Tighten the fasteners with a socket wrench.
3. Fasten the Carriage Tube to the Opener
Use the fasteners provided to secure the carriage tube to the top of the opener. At this time, you should also attach the brackets that will hold the opener to the strapping you'll mount to the ceiling. Depending on the model, you may also have to connect the wires for the safety sensor and wall switch at this time, so be sure to consult the installation instructions.
4. Install the Carriage
Slip the carriage onto the carriage tube from the end opposite the motor and slide it several feet along the tube. Hook up the provided emergency release cord to the carriage. This allows you to disengage the door from the carriage so you can open and close it manually.
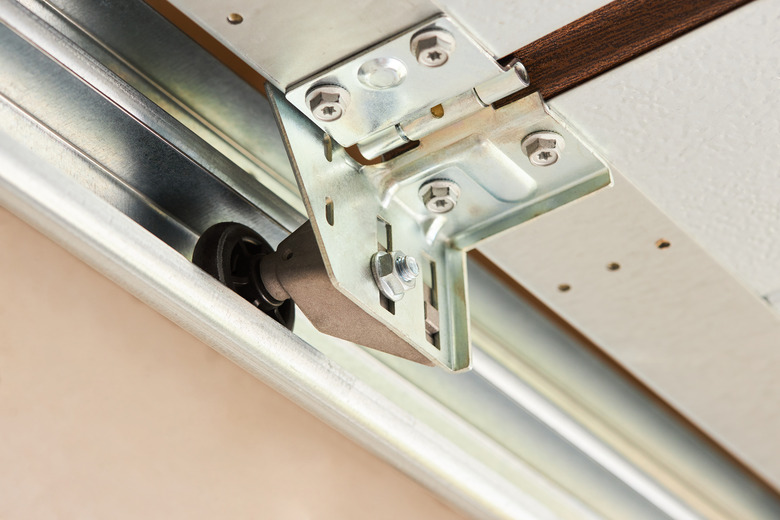
5. Install the Header Bracket
Manually lift the garage door to the fully open position and mark the top of the door on the wall. Measure 2 inches from this mark using a tape measure and make a second mark. Align the bottom of the header bracket with the second mark and secure it to the wall with the fasteners provided using a socket wrench or drill to drive them. The header has to support the full weight of the door, so be sure to fasten it to a framing member. The door header should be wide enough to accommodate the bracket.
6. Attach the Carriage Tube to the Header
Leave the door opener on the floor and lift the opposite end of the track to attach it to the header using the supplied fastener.
7. Lift the Opener Into Position
Rest the opener on the top of a step ladder while you secure the strapping to the ceiling that will hold it. You usually need an 8-foot step ladder for this.
8. Hang the Opener
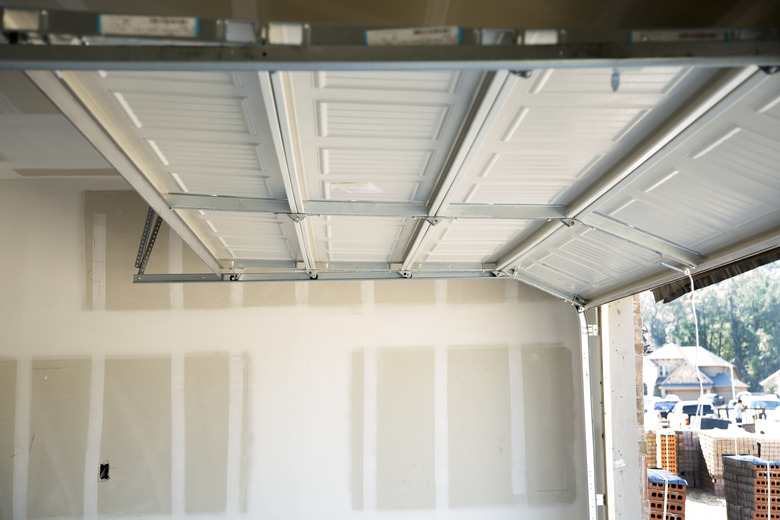
Bolt the perforated angle iron that comes with the opener to a ceiling joist with lag screws and tighten the screws with a socket wrench. Attach the brackets that will hold the opener to the angle iron and then lift the opener and secure it to the brackets. All the hardware you need for this should be supplied. Lift the door to its fully open position to make sure it clears the opener. If it doesn't, you'll have to take down the carriage tube, make it a little longer, and reposition the angle irons on the ceiling.
9. Connect the Carriage
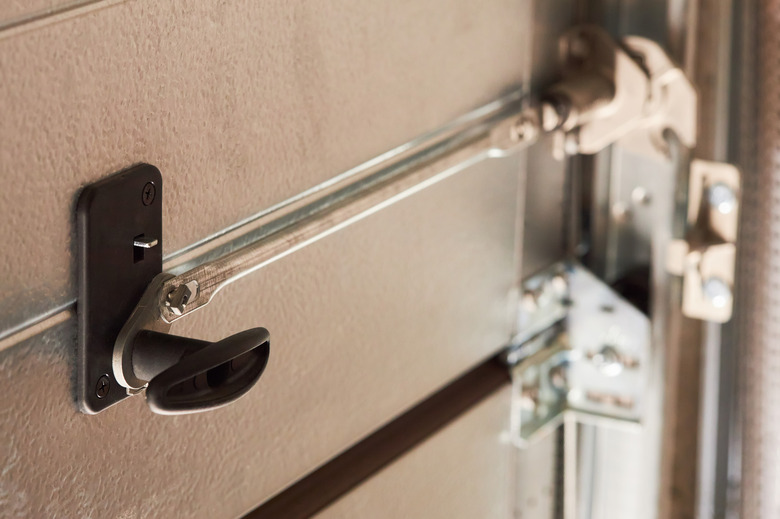
Install the chain or belt that connects the carriage to the opener following the manufacturer's instructions. Connect the other end to the door using the brackets provided. There should be two brackets. Fasten one to the carriage using the fastener provided. To secure the other end to the door, you must first install a door bracket by screwing it to the door. Once you've done that, fasten the other carriage bracket to the door bracket and then connect the carriage brackets together using the fasteners provided.
10. Hook Up the Wall Switch
Connect the wall switch wire to the door opener if you haven't done this already and run the wire to the switch location. If you can't run the wire behind the ceiling and wall, staple it to the surface with wire staples. Connect the other end of the wire to the switch and mount the switch on the wall.
11. Install the Safety Sensors
Mount a sensor on either side of the door no more than 12 inches from the ground. The best place for the sensors is usually directly behind the door track. The sensors have to be at the exact same height and facing directly toward each other so each can "see" the beam of light that passes between them. Once the sensors are installed, connect the wires that control them to the door opener and run a wire to each sensor, stapling it to the ceiling and wall as needed.
12. Test the Door Opener and Make Adjustments
Plug in the opener and use the wall switch or remote control to open and close it. Adjust the limit controls on the opener to make the door stop in the fully open and fully closed position.
13. Test the Safety Sensors
Open the door all the way, close it, and while it's closing, put your foot in the path of the sensor beam. The door should stop immediately and reverse. If it doesn't, realign the sensors until it does. It sometimes helps to use clamps to secure the sensors to the door tracks while you drive the fasteners into the walls. But never permanently fasten the sensors to the door tracks.
Troubleshooting a Garage Door Opener Installation
Troubleshooting a Garage Door Opener Installation
If this is the first time your garage door has had an opener and you notice the track or door vibrating excessively when the opener is operating, check the track fasteners. They might be loose, or they may have been installed with nails instead of screws. Tighten any loose fasteners with your socket wrench and if you find any nails, replace them with lag screws. Vibrations can also be caused by an overly flexible door, which you can remedy by installing a steel reinforcing bar on the top of the door.
For proper operation, the door opener must be installed on a straight, perpendicular line with respect to the door. If it's skewed to one direction or the other by even a small amount, it will pull the door at an angle. If the door is buckling or binding as it opens or closes, double-check the door opener alignment and move the opener if necessary.