How To Replace A Garage Door Spring
Garage door springs can —and will—break, and if you're anywhere near the garage when this happens, you'll know it. Nothing else sounds quite like a giant metal spring snapping under tension. Even if you don't hear it, you'll know the spring broke as soon as you (or your garage door opener) try to lift the door and finds that it now weighs twice as much. So faced with a broken garage door spring, the question is, can you fix it yourself?
You absolutely can replace a garage door spring, but the type of springs you have may influence your decision. If you're uncomfortable with any part of the process, simply leave the job to a garage door professional.
 GarageDoorStuff.com
What Type of Springs Do You Have?
What Type of Springs Do You Have?
Your decision on whether to try and replace a broken spring may depend on what type of springs you have. Garage door springs come in two main types: extension and torsion. Identifying which type you have is easy. If your door system has a long, skinny spring running parallel to each horizontal door track, then you have extension springs. If your door has one or more beefy springs on a metal rod parallel to, and directly above, the door opening, then you have torsion springs. Both of these springs are found on standard sectional garage doors. If you happen to have an old one-piece, swing-up door with vertical springs at both sides, you also have a variety of extension springs, sometimes called side springs.
Both types of springs are loaded, or under tension, when the door is closed. This gives them stored energy to help lift the door as it's being opened. When the door is all the way up, the springs are relaxed, or relatively so—they still may be under some tension. The mechanical difference between extension and torsion springs is that extension springs are loaded by stretching, or elongating, while torsion springs are loaded by twisting, creating torque.
 Service Spring/Amazon
Garage Door Anatomy
Garage Door Anatomy
All standard sectional garage doors use systems of pulleys, cables and springs (of either type). The pulleys are steel wheels or drums that the cables are wrapped around. The cables simply transfer the force of the springs to help carry the weight of the door, whether it's opening or closing.
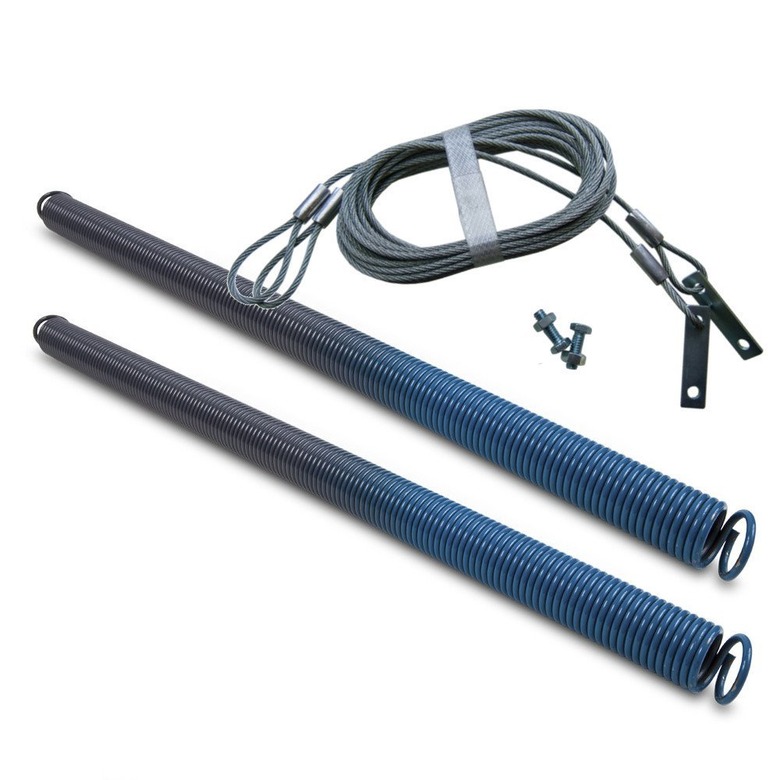
Doors with extension springs have two sets of pulleys (which are sometimes called sheaves): one at the end of each spring and one at the top of the vertical door track. They also have two cables on each side. One cable attaches to the bottom of the door, runs up and over the pulley above the door and around the spring pulley and then attaches to the door track bracket. The other cables are safety cables that run through the middle of the springs and are fixed to a track bracket at both ends. These cables restrain the springs if they break under tension. All extension springs must have safety cables.
 Ideal Security Inc./Amazon
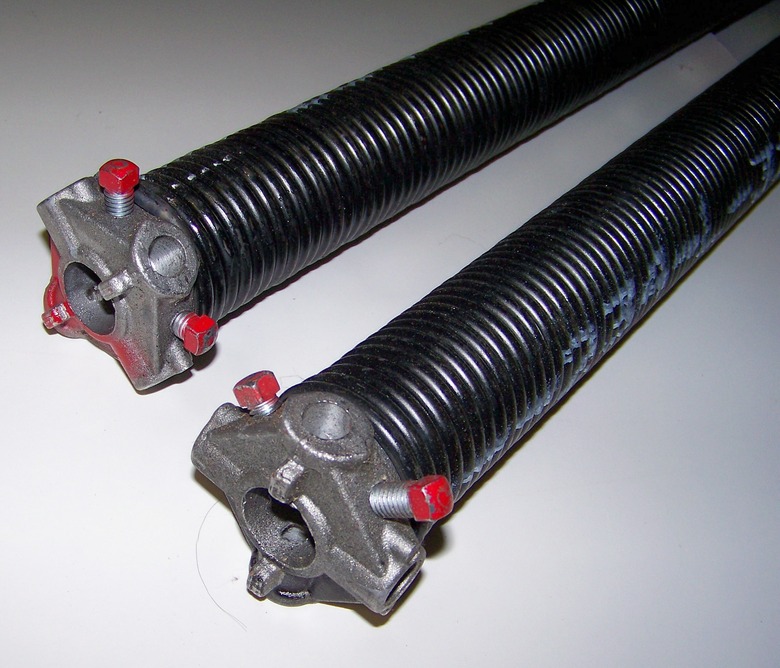
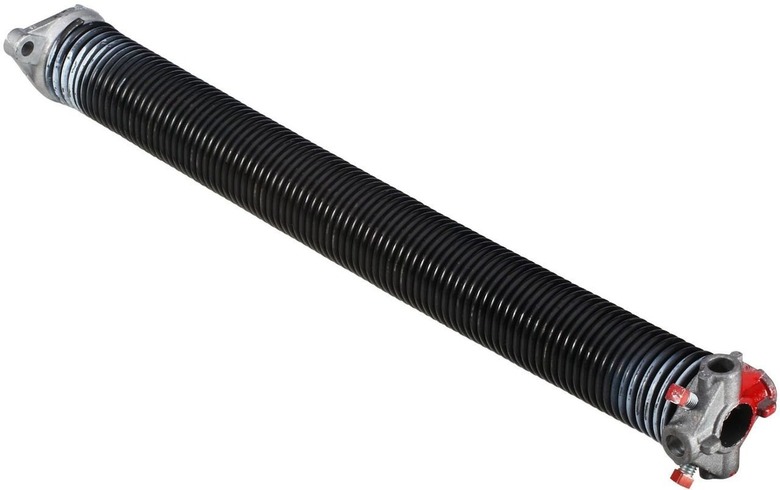
Torsion-spring doors have a drum-like pulley at each end of the metal rod that runs through the springs. Each pulley has a cable attached to the bottom of the door. The springs and pulleys are fixed to the rod so they all rotate together. When the door closes, the rod turns and winds up the springs, creating tension. When the door opens, the springs release the tension and turn the rod in the opposite direction.
Replacing Extension Springs
Replacing Extension Springs
Unlike torsion springs, replacing extension springs has long been given the "green light" for DIYers, primarily because you can complete the job without having to deal with spring tension. The general process is simple and safe: open the door to relieve the spring tension (and secure it open with C-clamps in the tracks); disconnect the spring from the track bracket and the spring pulley, and disconnect the safety cable from one end; install the new spring, reinstall the pulley, and reconnect the safety cable, and you're done.
On one-piece doors with side springs, you open the door to relieve the spring tension, and simply swap out the springs on the opener-arm mechanism; there are no cables or pulleys to deal with, and the springs have internal safety rods. Some doors have tensioners that maintain moderate tension when the door is open all the way, and on these you'll have to loosen the tensioner in order to remove the spring.
Replacing Torsion Springs
Replacing Torsion Springs
Homeowners have long been warned that torsion springs are extremely dangerous to work with and that replacing them must be left to a professional. But these claims are somewhat exaggerated. If you understand how they work, and you pay attention to what you're doing, you can replace them safely and surprisingly easily. Granted, they're a little spooky to work with at first (partly due to their reputation), but this is a good thing—you really don't want to forget that they're under tension. Thinking about every step — before you take it — is the key to staying safe.
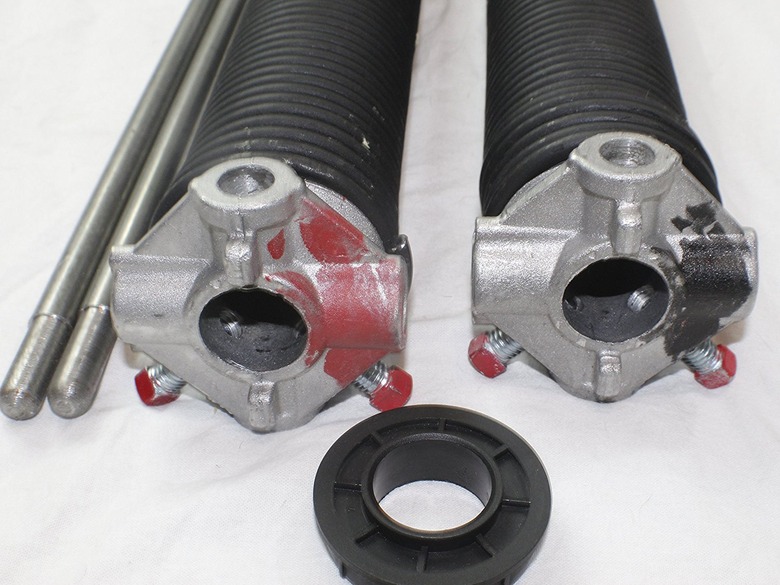
There are many steps to replacing torsion springs, but overall it's a simple, straightforward process. If you're inclined to attempt it, find a good online video tutorial (preferably done by a garage door pro) that walks you through the entire process, including how to buy the right size of springs. You can also buy new springs and any related parts online, along with the most important items that you need: the two solid-metal winding rods that you use to wind and unwind the torsion springs.
 SS/Amazon
The tricky parts of the job involve you carrying the tension of the spring. Replacing a spring requires that you first unwind the spring to relieve the tension, then wind it back up and secure it while it's under tension. Winding bars are used for all winding and unwinding actions—don't try to save a few bucks by substituting long screwdrivers or pieces of rebar for the real winding bars. Substitute tools are much more likely to slip, or they may bend or break under the load of the spring.
The winding and unwinding is done at a metal fitting, called a winding cone, attached to the outside end of the spring. You stick a winding bar into one of the four holes in the cone and use the bar as a lever to turn the cone. Once you've completed a quarter turn, insert the other bar into a different hole in the cone and let the bar lever against the closed garage door to hold the spring tension. This allows you to move the original bar to repeat the process, alternating the bars with each quarter-turn. It takes about 30 quarter-turns to fully tension a standard torsion spring.
Replacing torsion springs is done with the door closed. You start by carefully unloading all of the springs (most standard-size doors have two; any broken spring will already be unloaded), using the winding bars. Then, you unbolt the springs from the central rod bracket, disconnect the cables from the pulleys, and loosen the pulleys and slide them off of the rod. Next, you swap out the springs, reinstall the pulleys and cables, and secure the inside ends of the springs to the central bracket. Finally, you wind up both springs (securing them with two setscrew bolts on the winding cones) and test the door for proper spring tension. Often, springs need an extra quarter-turn or two to get the door balance just right.
Should You Replace One or Both Springs?
In most cases, only one spring breaks or wears out at a time, and you can get away with replacing just the failed spring. But this is a little like replacing old car tires one at a time. You'll get the best performance if all the springs are new and have the same strength. Extension springs are replaced individually, making it more tempting to replace just one. With torsion springs, you have to disassemble everything to replace either spring, so it makes sense to swap out both springs during the repair.